EVERYTHING
Shopify Inventory Management

The who, what, how, and why everything Shopify inventory management guide to help merchants get the most out of this amazing platform. This guide will cover the whole end-to-end platform from adjusting quantities, multiple locations, barcode scanning, and much more. We've broken the Shopify inventory management everything guide into a few different sections so that everyone from beginners to intermediate and advanced users will get some benefit from this guide, and hopefully enable you to more effectively deliver more products to customers. One small goal is that even the proverbial industry veterans will learn a little something about the Shopify inventory system. This shouldn't be hard since there are small changes happening all the time. That said, let's outline the guide and how you can utilize it.
Overview
What Is Shopify Inventory?
Storefront vs. Inventory
3rd Party Fulfillment
Shopify Inventory Management App
The Basics
Products vs. Variants vs. Inventory
Locations, Pickup & Delivery
Custom Order Fulfillment
Vendors
Intermediate
Transfers & Suppliers
Adjustments & Returns
Expired, Damaged, Stolen Items
Barcoding
Advanced
Shopify POS & Stocky
Mobile Inventory Management
Shopify Flow with Inventory
Selling When Out of Stock
Extras
Using an Inventory System
Optimizing for Retail Inventory
Optimizing Inventory
Considerations
Get started using SKUSavvy and automate your entire inventory management.
50 Orders Free Monthly
Overview
If you're new to Shopify and the inventory management system offered there might be a few things that don't make sense. In this section we're going to answer many of these questions to lay the framework for understanding all that Shopify inventory management can do for your store.
First, a little history on Shopify. It was created by Toby Lutke in Ottawa Canada after running into frustrations with the existing eCommerce platforms while launching his own snowboarding company, SnowDevil. Toby rebranded and switched the focus of the snowboard brand to provide a platform other companies could utilize to launch their own eCommerce sites, and thus in 2006 Shopify was born. At this point the platform was simple offering just a base template and ability to hold product information. Since then Shopify launched their API (applicaiton programming interface) and then the Shopify app store in 2009 which allowed app developers to create connections and get paid when other merchants added their app to their store. Since then, Shopify has released a mobille app for iOS and Android and added numerous new products including Shop Pay, Shopify Flow, Shopify Capital, Shopify POS, and Shopify Fulfillment. Since Shopify offers their own unique templating language, Liquid, it is a flexible platform while still offering the benefits of a hosted solution, which has enabled close to 2 million merchants to build a store on Shopify.
What is Shopify Inventory Management?
The inventory part of Shopify is specifically focused on how many units of each of your products and variants you have in stock, and at which location they are in stock. When you peel this back further, you have inventory transfers which is new inventory coming into a location, then there are adjustments you can make with an attached reason, and furthermore, you can adjust the way stock is dealt with then the inventory gets to 0. The whole purpose is to help you keep track of what products you have quantity for, and which location its at. What Shopify won't help you do is to keep track of each bin location the inventory is in, where you should pick the inventory from, expiration dates or lot tracking, kit assembly or manufacturing, purchasing, replenishment or other elements that might fall under the warehouse management category. For these things, you need a software solution such as SKUSavvy which extends the scope of what your Shopify store is capable of.
Part of what Shopify inventory enables you as a merchant to do is to provide a streamlined way for you to send orders off to a 3rd part fulfillment center or drop shipper. While you may not touch any of the physical inventory in these scenarios Shopify inventory is the facilitator of information for that inventory, as well as for which orders should be fulfilled on your behalf with what quantity of inventory.
What Shopify Inventory Management Does
Keeps track of quantities available for each variant
Creates new transfers for inbound inventory
Holds multiple locations with inventory at each location
Send fulfillment information to 3rd parties
Track incoming inventory
Track committed inventory
Tracks inbound, committed, on-hand inventory value
Allows adjustments with reason attached
Enables merchants to continue selling items when you are out of stock (back stock)
Enables merchants to discontinue sales of an item when out of stock
Keeps a history of inventory movement
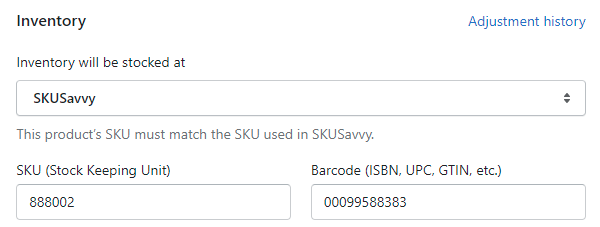
Hold SKU and barcode information
Shopify Inventory Management Doesn't Do
Hold bin location information for inventory
Track expiration and lot numbers with records for traceability
Automate purchase order creation
Track individual cost levels on arrival inventory
Allow for inbound transfer discrepancies
Hold information regarding bundles and kitted inventory
Cycle counts on inventory
Print barcode labels and bin labels
Won't hold inventory that pertains to packaging materials used in the fulfillment process
Hold unit of measure information for single, case, pallet etc.
Enable transfer of inventory from holding stock to pick stock

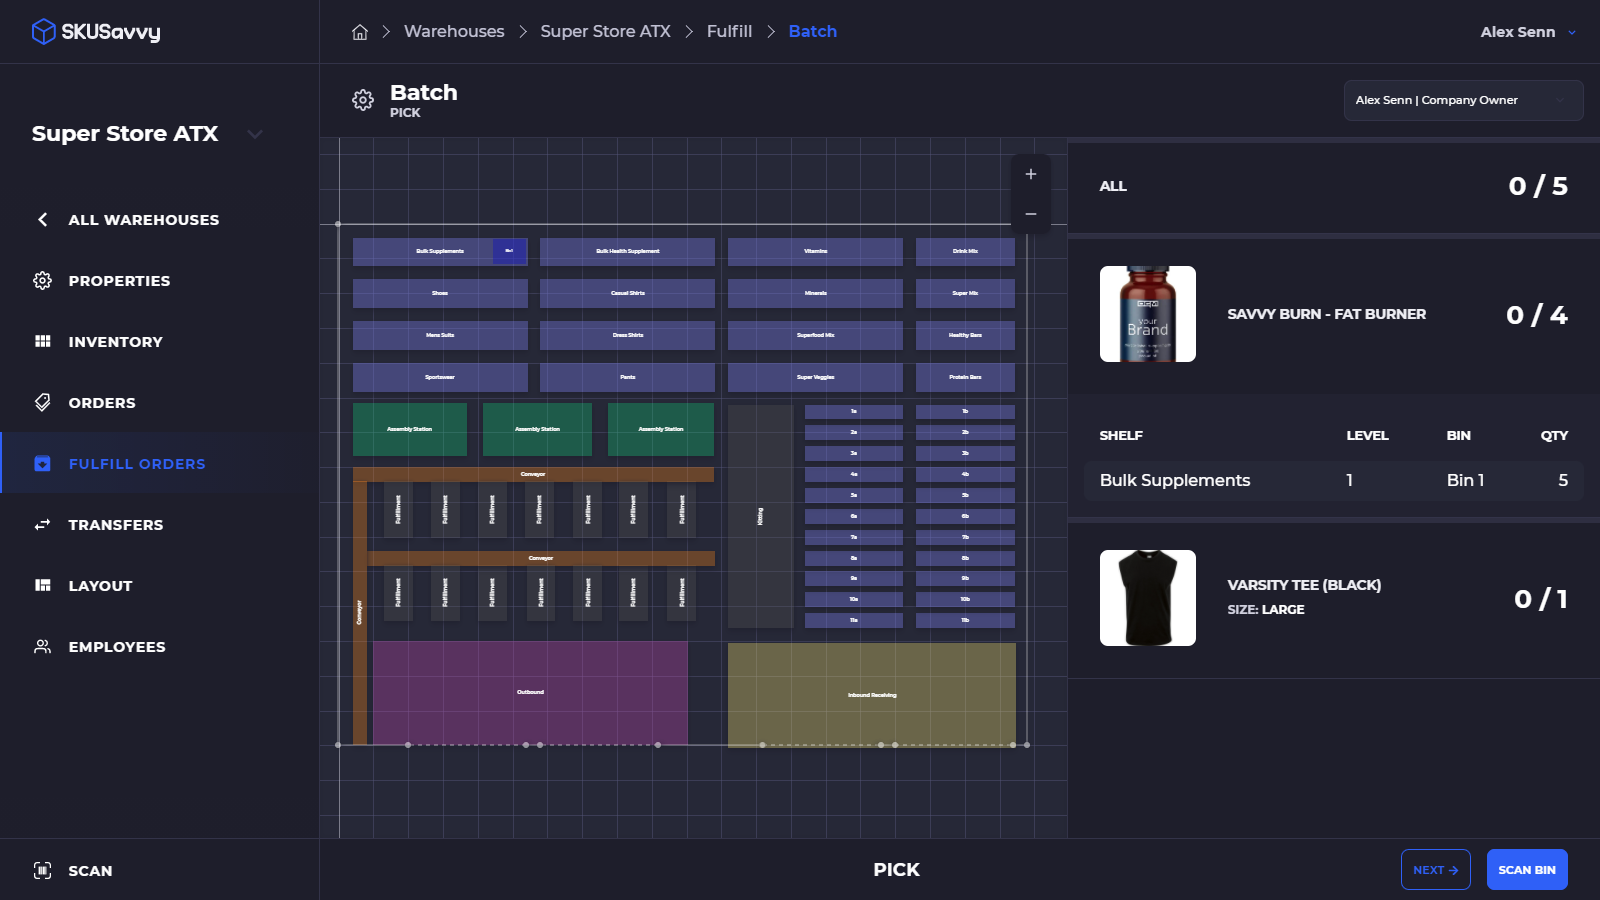
Maximize the Effectiveness of Shopify Inventory with Visual Inventory Placement
Storefront vs. Inventory
An important distinction to make within Shopify is the storefront vs. the back-end inventory. The storefront is what your customers see. It is the website where products can be viewed, added to cart, and purchased, as well as to manage a customer account. The storefront interacts with the inventory in a few ways, and if using an app this could be expanded. With the back-end and inventory information, this is for your as the merchant to know what you've for quantity on hand and where it is. Based on the quantities available within Shopify inventory management the storefront may be impacted to not show/sell the product anymore, it might limit the availability of inventory by locations, or there might be limited quantities available. The back-end inventory system might provide you with low-stock information and help you determine how many back-orders you have. Let's take a look at a few examples of how the storefront might be impacted by inventory events.
Inventory management system stops selling an item when stock quantity is equal to 0
Storefront only shows inventory to customers based on the availability in their location for pickup and delivery orders
Inventory automatically makes a product available on storefront when new stock has arrived
Inventory holds negative quantity for backstock when storefront continues selling when out of stock
Third-Party Fulfillment (3PL)
In this operations strategy, a merchant will not hold any physical inventory, instead, they hire a company to hold this inventory and fulfill orders on behalf of the merchant. Shopify will work with a variety of 3PL companies through a Shopify app offered by the 3PL. When your inventory is held with a 3PL, you will still connect to this inventory via the app, and inventory quantities will still be displayed within the Shopify inventory management page. As orders come in and are picked by the 3PL the quantity of inventory available for a specific product will be reduced accordingly. If you're working with a 3PL and they do not automatically update and track inventory back to Shopify, this should serve as a red flag since the headache it will cause not to be integrated is more than the value of the 3PL.
Most 3PL providers will offer their own app which will connect to your store and automatically set up a new location to hold inventory. Since the 3PL is receiving this inventory it will connect to your account and they will manage the inventory available. You won't very likely have access to view where exactly within the warehouse your inventory is, though it will suffice for most people's needs. As orders come into your store and get routed to the location with your 3PL they will receive the orders, pick then pack those orders and upload a tracking label. This is the most basic use case for 3PL. Some may be handling subscriptions, kitting assembly, as well as cross-docking. Whichever 3PL you choose, make sure they are offering a way to sync your inventory to locations, as well as at a minimum to offer tracking and order status updates for your customers.
Shopify Inventory Management App
Explore SKUsavvy Shopify Inventory Management AppA good tool in your arsenal is the Shopify app, which enables merchants to view and adjust inventory as well as to scan barcodes and identify products. While basic, it will get most brands started and enabled up to a point. The inventory app will provide all basics you would find on the normal Shopify back-end. See below for an outline of features.
Get the Official Shopify App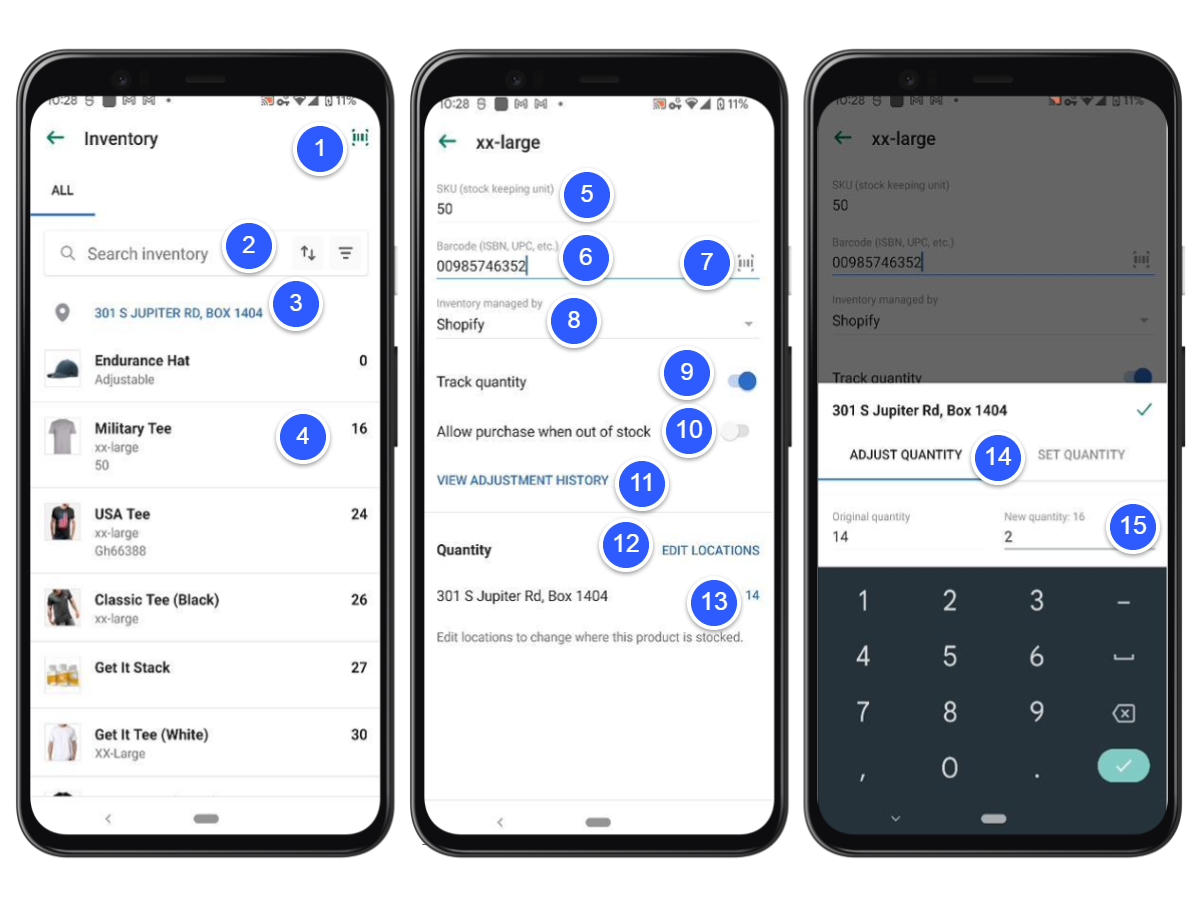
From the main Shopify app screen select Inventory - then you will see the first screen
1) Barcode scanner
2) Search inventory, sort and filter inventory by product name
3) Warehouse location to show inventory for
4) Product name and quantity available at the location
Once you click into an inventory item you'll see the middle screen
5) SKU of the item
6) Barcode for the item
7) Barcode scanner to attach a barcode to the product
8) Selection of inventory management, which is influenced by any 'Custom Order Fulfillment' partners you might have, apps can also create a new entry here
9) Setting to track the quantity of inventory on the item
10) Setting to turn on/off backorders for the product, as in to keep selling the item when out of stock
11) View the adjustment history of a product
12) Edit or add new locations this product is held within
13) Current locations and quantity of this item. Click on the quantity to make an adjustment
14) Select adjustment or directly set the quantity of the item. Adjustments are tracked and can have a reason, setting new quantities will display that value
The Basics of Shopify Inventory Management
Shopify does things a certain way, so to help understand this, the basics of Shopify inventory management will go through the data structure and relationship used to maintain product information integrity. This will in effect help you understand the broader scope and capability with which you can use Shopify or other platforms for inventory management.
Products vs. Variants vs. Inventory
As you can already see with the Shopify app images and within your Shopify account each of these categories is dealt with together and separately. Products are 'parent' objects within your store, which can hold variants that are akin to 'child' objects which hold individual information about the variant of the product such as barcodes, SKU, inventory quantity, and settings for the variant. In your storefront, the product shows on just one product page, then the user selects a variant such as color, size, unit, etc., and makes a purchase for that variant. So on the inventory side, this is why you deal with each variant separately even though it is one main product. Settings such as whether to continue selling when out of stock or not are also attached to the variant instead of the product as a whole.
Product Information Flow
Shopify product
Name
Description
Image
Status
Sales Channels Available
Category
Vendor
Tags
Collections
Options
Variants
Single Variant
Variant option selection (size: large, color: red etc.)
Variant image
Variant price
Variant compare at price
Variant cost
Variant inventory locations
Variant barcode & SKU
Setting to track stock & continue selling out of stock
Variant weight
Variant origin country
Variant harmonized code
Variant inventory
Location
Incoming
Committed
Available
Variant Pricing and Inventory Details
Inventory Locations
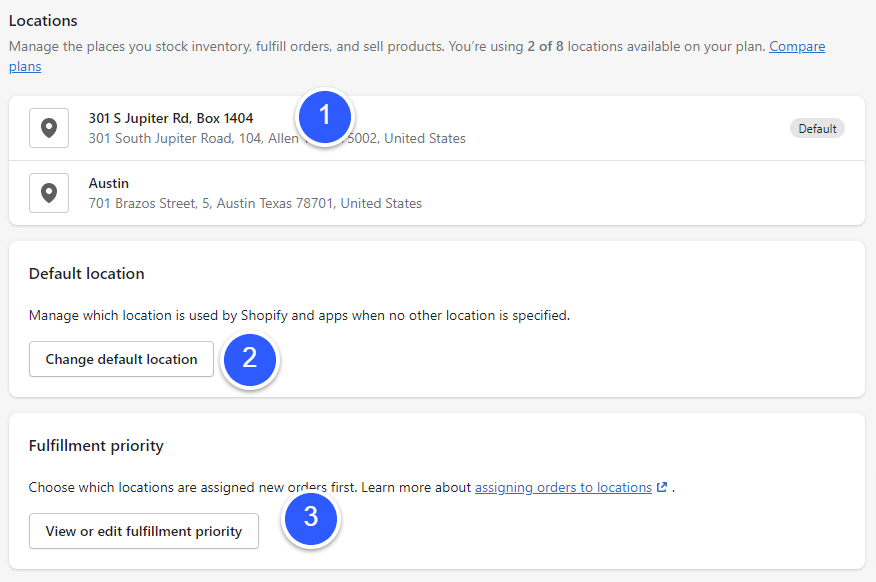
Your Shopify store can have multiple locations for inventory. You can think of these as warehouse locations. When you have more than one warehouse location Shopify will look to see which is the default warehouse, then look at the order of fulfillment you've placed the locations. Adding a location enables you to start adding inventory to that location for any of your products. To do this you'll first add the location, then navigate to your inventory and make a selection in the top right corner. A few important things to set up when it comes to locations:
With only 1 location, all orders are routed there, otherwise orders are routed based on the fulfillment priority
Location limits: Shopify lite - 3, Shopify Basic - 4, Shopify - 5, Shopify Advanced - 8, Shopify Plus - 20
Apps that are added and create a location automatically (like SKUSavvy) do not count toward the location limit
Use transfers to move inventory between two locations
Currently you much use an app to limit product availability by location
1) List of available inventory locations
2) Default location setting
3) Fulfillment priority of the locations
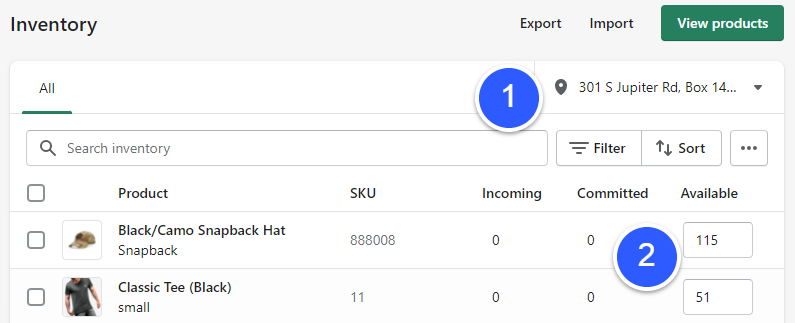
1) Location selection for which inventory to view
2) Incoming, committed (sold), and available quantities of a product at this location
Local Pickup & Delivery
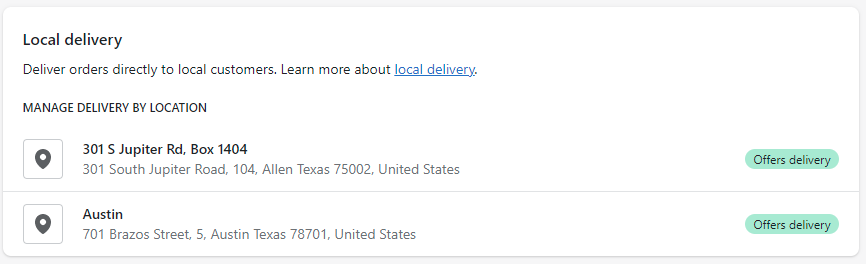
Shopify offers merchants a way to accept orders for pickup at your location, as well as a delivery app for making deliveries to a local area. Each of these solutions leverages the same format for inventory availability by location, it is simply a setting on the product to allow for product deliveries and pick up.
Shopify Local Delivery
Using local delivery enables merchants to offer a new type of delivery during checkout, which is shown to customers who are within a set range or a series of zip codes nearby your location. With the Shopify delivery app, merchants can also have their routes planned for the deliveries. To get started you'll need to add the location you plan to deliver from the main Shopify locations settings. Once this location has been added click into Shipping and Delivery where you will scroll down to find the local delivery option. Click on one of your locations to adjust the settings for local delivery using Shopify inventory management to keep track of what quantities of your product are available for delivery. Below is the local delivery setting on your Shopify store.
Once you've selected a location Shopify will provide options to adjust how local delivery works with your store. Again, this setting only applies to customers who are checking out within the area you have set on that individual location under the local delivery settings. The settings are as follow:
1) Enable/disable local delivery from the selected location
2) Select how you will determine who is within the delivery area - by zip codes or by distance from the location
3) Assign a name and delivery radius (if delivery radius is used) or enter the zip codes (if using zip codes)
4) Enter the minimum order price that must be reached to enable local

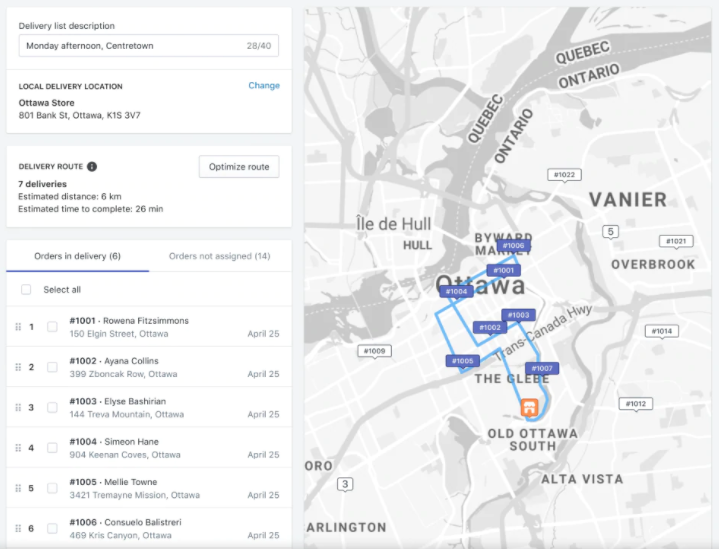
Once you've enabled and made these settings, your customers will automatically have a new option when selecting their shipping to include a local delivery option. The next part of this is to begin leveraging the local delivery app from Shopify which will take the orders received for local delivery and allow you to allocate these orders to a route. The route will have a driver, and it will have orders assigned to that route. As a driver selects a route, the app will guide the driver to each stop where they can deliver the item and collect a proof of delivery, or deal with scenarios where the order is not able to be delivered.

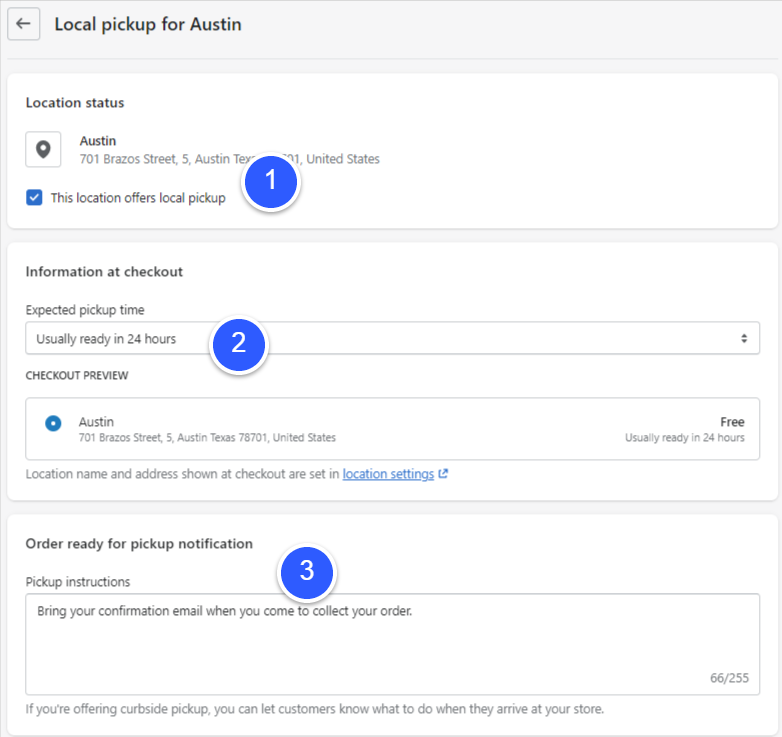
Shopify Local Pickup
Using Shopify pickup your customers will see an option after they've entered their shipping address to use a local pickup instead of shipping. The pickup options can be enabled and configured to allow pickup for specific zip codes. When using the pickup option you'll first need to add the location as an available location then you can go into your Shopify settings and select shipping and delivery. From here, you'll select the location you want to enable this on within the Local Pickup table.
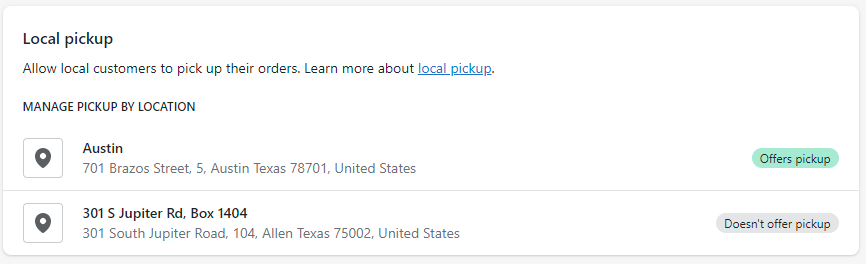
Select one of your locations to enable the location for pickup. This will create options for you as a merchant to select which areas are available for pickup, as well as when someone can pick up the item. Enabling this option provides a customer with a new pickup method for shipping during checkout. The settings for Shopify local pickup are as follow:
1) Enable/disable the location for pickup
2) Input the pickup availability, view a sample of what this pickup option looks like at the checkout
3) Notification to the customer that a pickup is ready
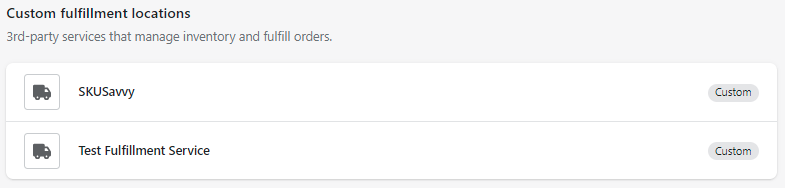
Shopify Custom Order Fulfillment
Using this Shopify inventory management feature enables you to add outside fulfillment partners for the orders which come through to your store. This will not actually change anything about the inventory quantities held, it simply provides a way to funnel the order information to a 3rd party fulfillment partner if they do not provide an app. As mentioned above, if your 3PL doesn't yet offer an app, it should be seen as a red flag.
Full Shopify Custom Fulfillment Setup GuideThe reality is this custom order fulfillment option doesn't really do a whole lot with respect to the inventory management system Shopify provides, though it will help merchants who might have a few different fulfillment services that need to orchestrate the order fulfillment without a technical solution for importing and managing orders separately.
Vendors
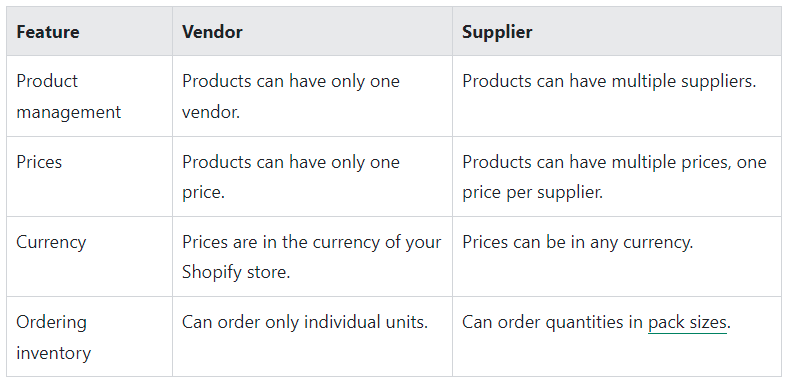
Using vendors with Shopify inventory management enables merchants to attach vendors to products and track supply back to those vendors. This will also enable merchants to create inbound transfers from this supplier to a location so you can track the incoming supply. In its most basic form, the vendors are a very introductory way of handling the relationship between vendors and your products. There are several ways to incorporate vendors and suppliers, though it will require Shopify POS pro and/or the Stocky app to use. Of course, you can avoid all of this by using an inventory management system powered by SKUSavvy.
Place POs Automatically, Check-In Product, and Record DiscrepanciesOnce you've got Stocky or POS pro you can use Suppliers which enables you a little more capability to tie transfers to a particular supplier and to check in the number of items. The basic differences and features of each are listed below:
Products - using vendors you can only assign one vendor per item, with suppliers you can attach multiple suppliers per product
Price - using vendors a product can only have one cost associated, using suppliers can allow for one cost per supplier
Currency - with vendors the currency is the currency selected as your stores currency, using suppliers allows you to have multiple currencies attached to a product cost
Ordering inventory - using vendors you can only purchase items by the single, using suppliers will enable you to purchase in any unit of measure
Intermediate Shopify Inventory Features
Now that we're through the basics, this section will help you figure out how to leverage Shopify inventory management for the more complex areas of your business, and in ways that will help streamline operations. Keep in mind that for the purpose of this guide these features are intermediate because Shopify doesn't have the features essential for large-scale inventory and warehouse management, even with Shopify Plus. Some of these features may require an Advanced plan or Shopify POS. Please reach out directly to [email protected] if you are switching over to Shopify from another platform, including upgrading to Shopify Plus or Shopify POS (In full transparency we earn a referral commission when you join from our affiliate link or reach out ahead of time when upgrading to Shopify Plus and we would surely appreciate your support plus it doesn't cost you anything :-)
Join Shopify using this Affiliate Link to Support our WorkTransfers & Suppliers
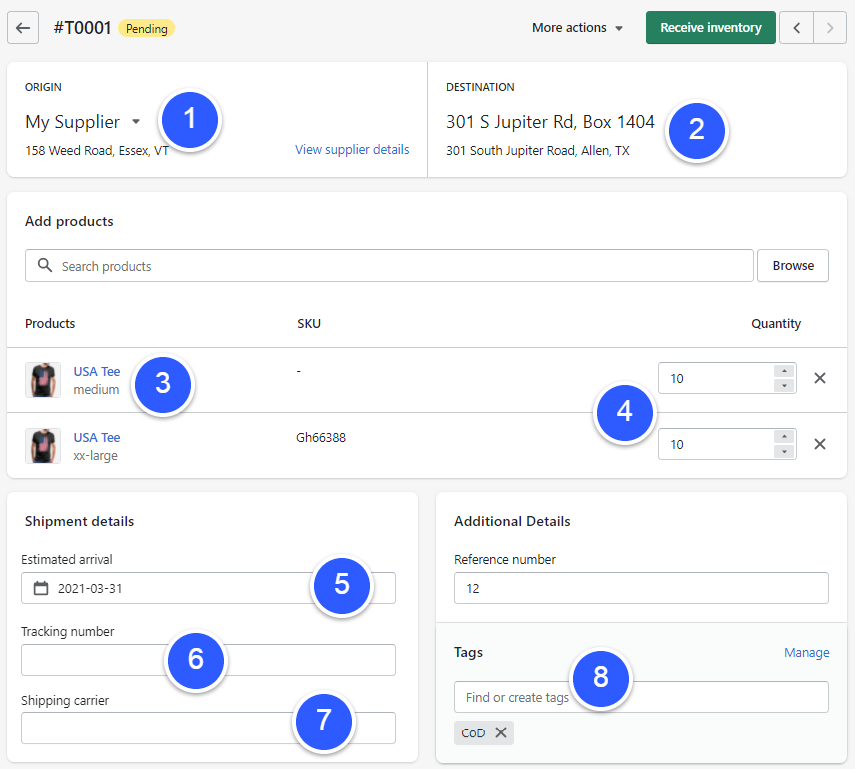
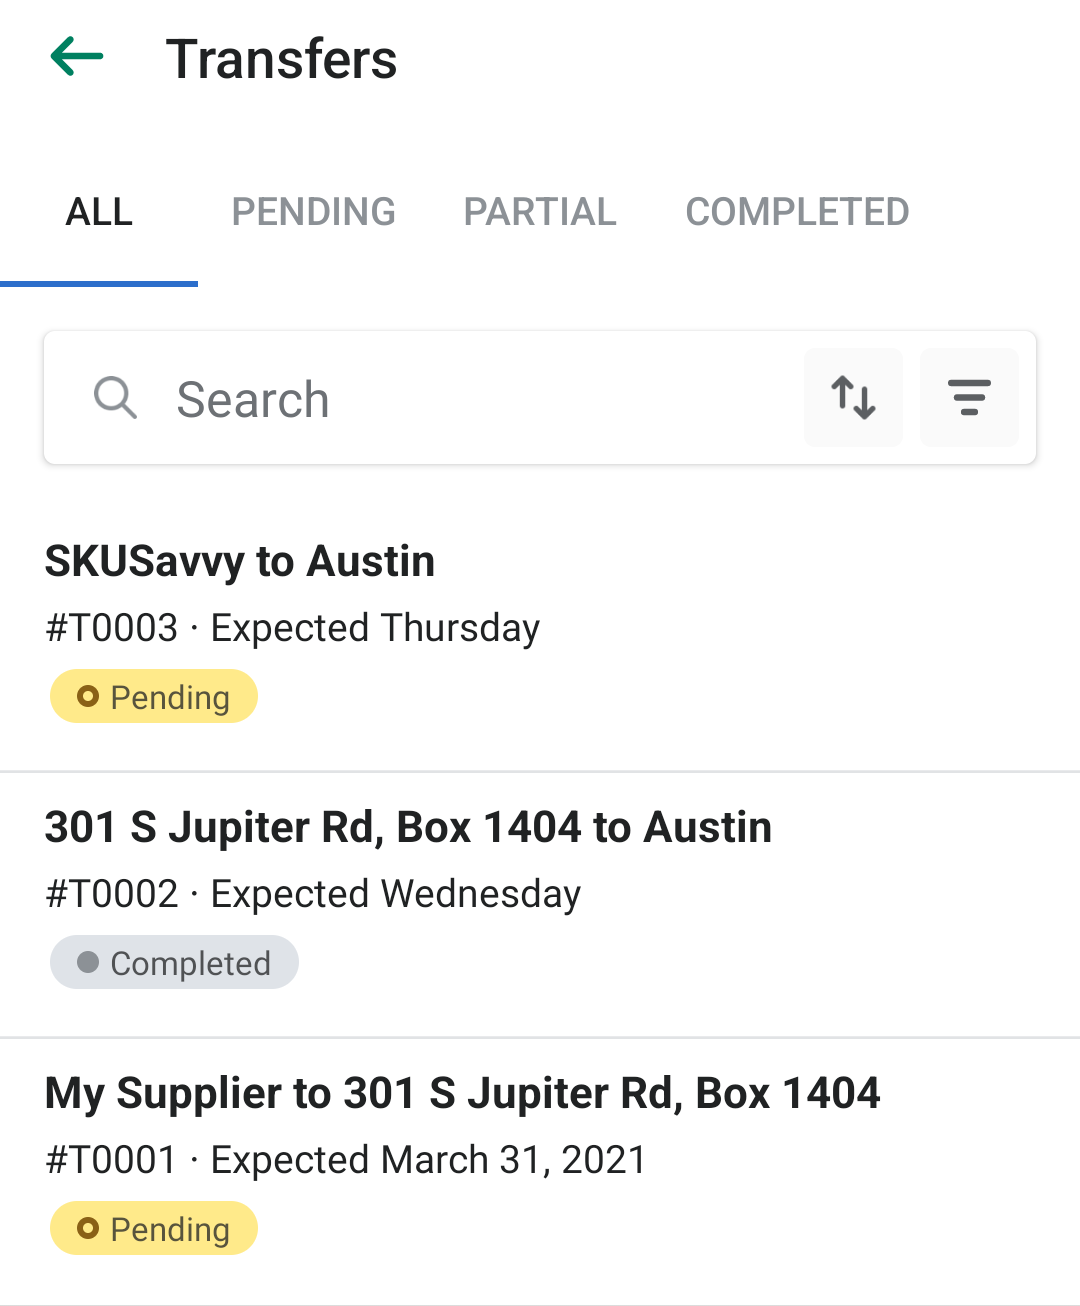
Making a transfer is akin to cross-docking in a typical warehouse management system. Within Shopify, transfers enable you to bring new inventory into a location from vendors and suppliers. To initiate a transfer you'll click into your products > transfers. This section shows any pending transfers and the status of the transfer, as well as the check-in status of the transfer. Once you check-in the transfer of inventory from a supplier or another warehouse the quantity of inventory will be added to that location to which it was checked-in to. You should use transfers because they help you maintain the supply and informs your employees of incoming product so decisions can be made with regard to this inventory.
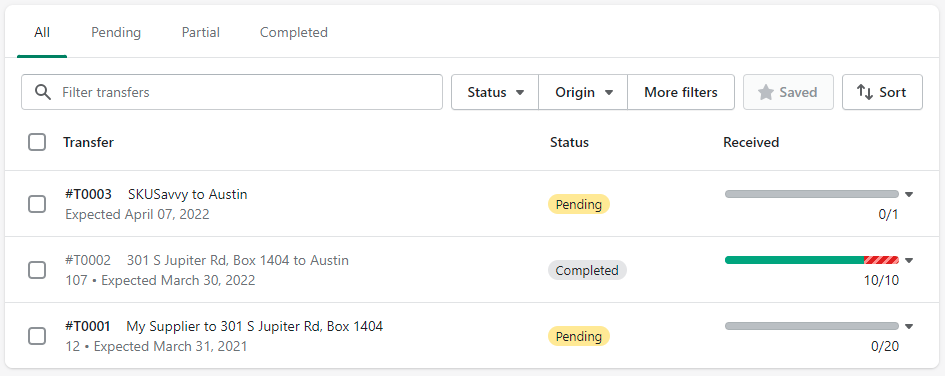
Once you select or create a new transfer you'll have the ability to add products to the transfer, assign the supplier, add in an expected delivery date, and more. This is to help you keep track of expected arrivals and make your supply chain operate simpler. In more advanced systems like SKUSavvy, the purchase order (here a transfer) is generated based on sales volume, order history, and lead time, so the purchase is automatically created to match this. Below is the format for setting up a transfer:
1) Origin location, supplier, vendor
2) Destination location
3) Product selection
4) Quantity of items to add within this transfer
5) Estimated arrival date
6) Tracking number for the shipment
7) Shipping carrier used
8) Tags for the transfer
Adjustments & Returns
Managing individual changes within your Shopify inventory is done through an adjustment to the inventory directly within that location. Returns are done on the individual order and can be returned to the same location the order was shipped from, or to a new location you might use solely for returns. Making adjustments will enable you to provide a reason for the adjustment when recording this so it can be tracked. You may also use this as a method of counting your inventory periodically throughout your warehouse by producing an inventory report then making the adjustments within the Shopify inventory management app. Inventory adjustments can be made on incoming, on-hold, or available inventory quantities though each has its own method. See what this looks like below.
Making an Inventory Adjustment
Click into products > inventory
Select the correct location to make the adjustment
Search for your product to make a change
1) Select the inventory settings
2) Make a quantity adjustment
3) Select a reason for the adjustment
Save the adjustment
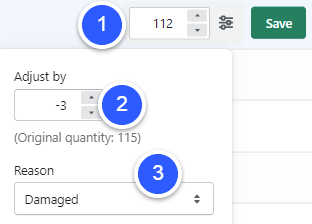
Making adjustments to incoming and committed values are done in the transfers or via pending orders, respectively.
Returns
Making a return and receiving that inventory through the Shopify inventory management system is done on the order itself. You could of course accept this product back and make an adjustment for the inventory, though this would be bad practice. To complete the return, simply find the order within your Shopify orders tab, select the order, and hit return items.
Click into the order > return items
1) Products within the order
2) Quantity purchased and quantity to return
3) Reason for the return
4) Return label options
5) Create the return
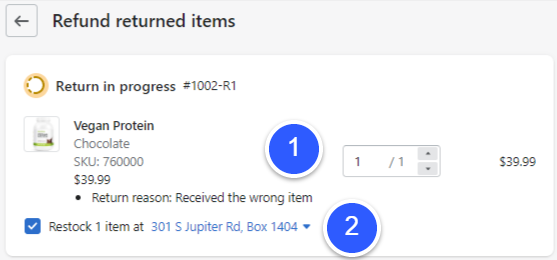
Once you have initiated the return (or your customer has initiated the return through return software) the order will be pending a refund and completion of the return. Once you have received the items for the return, simply mark them as complete and select which location the inventory should be added back into, unless the quantity is damaged or otherwise in which can you can choose not to restock the return.
1) Quantity of items received from the returned order
2) Choose to restock the item or not, and which location the returned inventory should be stocked at
Expired, Damaged, and Stolen Inventory
Shopify does allow ways to deal with each of the types of inventory adjustments, though there is no good way of tracing this back to the exact inventory or the position of that inventory within the warehouse. Each type of inventory disposal may have different types of workflows that may range from company to company. For Shopify merchants, this part of the inventory management system is relatively weak. Of course, for damaged or stolen inventory you can make an adjustment and provide the reason as such. This will be recorded as part of your inventory records and reports and can be traced back to the order (if returned) or the transfer (though it will be hard to tell where this exact lot would be if you aren't using bin locations).
For merchants in the food and beverage industry, this part of the Shopify inventory management system might present some challenges. Without clear tracking of the lot number and an assigned location within your warehouse location, you will not have clear visibility into lot tracking and tracing. What you can do is provide lot numbers when creating an inbound transfer in the notes, and each time a transfer arrives, simply create a label or put it within a bin that has a marked expiration. This job is made much easier with a proper inventory system like SKUSavvy. Within SKUSavvy you would place a purchase order with a lot number and upon arrival, the system will ask for an expiration date and lot number and will provide a bin location so that it can be locked to a specific location and traced back to individual orders, location, and other specifics of that lot.
Barcoding
Using barcodes on products is a good idea for any business. If you haven't already, be sure to get barcodes made for your products. You can use the GS1 database to create new barcodes and get an official UPC (or another format) barcode assigned to your items on a globally recognizable database. It is also common for suppliers to make the product and package it in such a way that there are barcodes on every item. Again, this is an area where if you're getting pushback from the suppliers, it's generally a sign that this supplier is not a high-quality supplier. For your sanity, you should work toward having every item barcoded. As you scale and take up more room and need to use scanners to identify the correct orders, barcodes will make your life a whole lot easier.
To utilize barcodes within Shopify inventory management, you'll first enter the barcode into the product variant within your store. You can optionally scan the barcode to add it to a variant by going directly within the Shopify app and selecting inventory > product variant > barcode scanner. This will bring up a camera-based barcode scanner. If you are attaching the barcode for the first time it will ask you to save the barcode to the variant. If you already have a barcode attached to that inventory item, the item details will be brought up for you.

Fulfill Orders 2-3x Faster
Get a demo today
Advanced Shopify Inventory Management
The part in our guide where we start to get into the areas at the edge of what's possible with Shopify. Not surprisingly some of these inventory management tools require an advanced Shopify plan, Shopify POS or you may need to pay separately. For many of these advanced tools you'll inevitably come to the conclusion that it might not be worth the upgrade for your current requirements. In other cases, you might realize even with the tools available for inventory management from Shopify it's time to think bigger with inventory planning. Each merchant is going to have a different set of requirements, so finding the right solution should take all of these elements into consideration. Here are a few advanced Shopify inventory management methods to improve the accuracy, accessibility, and efficiency of your inventory.
Use this link to upgrade or add any of these apps to ShopifyStocky Shopify Inventory App
The true update to basic Shopify inventory is Shopify's own Stocky app. Stocky will require a Shopify POS plan which may put it out of the cards for a lot of people. Those who are using Shopify POS pro will have Stocky available to them for free, though some of the functionality is a bit of an overlap between the two systems. Stocky however is purpose built to handle the purchasing through suppliers, forecasting of inventory requirements, check-in of items, and movement of items around the warehouse. Stocky truly is the basic Shopify inventory management platform with more on the purchasing and inventory detail side of things. Below are the primary key features of Stocky.
Purchase orders: Create and manage purchase orders from one place. Communicate more effectively with your suppliers and vendors, and have a clear view of what’s coming in and when.
Demand forecasting: Receive recommendations on your products based on your rate of sales. Know which products are the most profitable and which you should re-order when.
Receiving: Give staff full visibility across all your locations and warehouses. When stock comes in, your staff can use a barcode scanner to quickly and accurately receive and place inventory.
Stock transfers: Replenish stock quickly to meet customer demand. Transfer products from one location to another in Shopify POS or in your Shopify admin.
Stocktakes and adjustments: Enable your staff to conduct regular stocktakes by easily counting or scanning stock on hand.
Analytics and insights: Use in-depth reporting to make good inventory decisions. Access analytics such as low stock and best seller reports, stock on hand, ABC analysis, SKU/variant reports, and more.
Integrations: Integrated with Shopify POS Pro
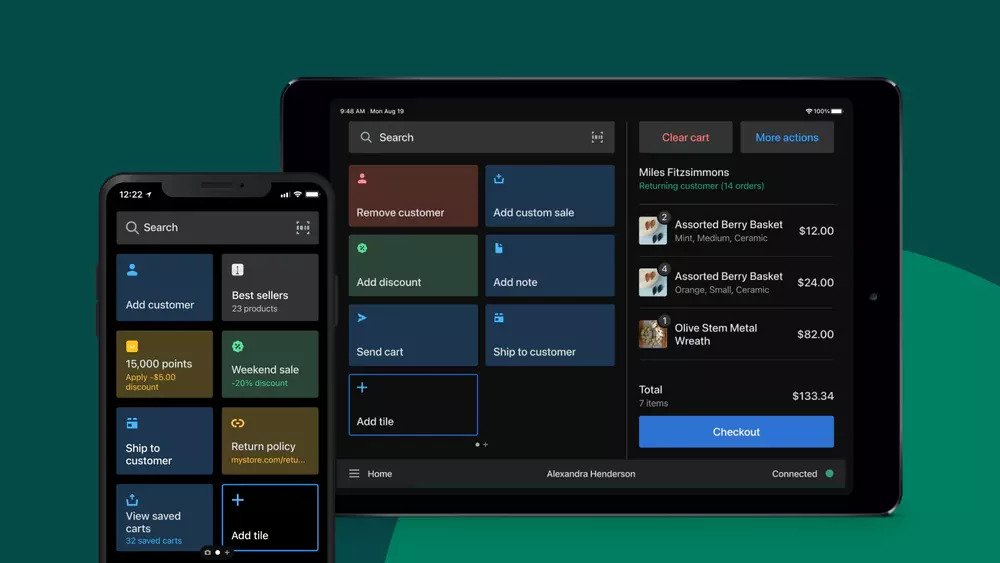
Shopify POS
If you operate retail stores with a Shopify website, it's likely you have considered, or are already running Shopify POS. Using this platform as part of your inventory management efforts can help you in a few places. First, Shopify POS is designed to accept payments for product within a retail location. Just like any other location you have within Shopify, each location on Shopify POS holds it's own inventory quantities and can make sales separately. All sales are tracked to the Shopify POS channel within Shopify, however you'll have a detailed interface to manage the retail side of things. Let's take a look at some of the key features of Shopify POS inventory management (there are more features, this is simply focused on the inventory side of things):
Purchase Orders - create purchase orders for suppliers or vendors
Demand Forecasting - use purchase history and seasonality to assemble purchase orders
Transfer Inventory - from other stores or warehouse locations and track the quantity received vs. expected
Low Stock Reports - receive low stock alerts when inventory drops below par levels based on sales volume and lead time
Sale Item Suggestions - get suggestions for which products are not selling so you can free up cash and inventory
Inventory Analysis - get reports on inventory to know which products are selling and what grade those products are in relation to other items
Stock Adjustments - make stock adjustments on the fly
Inventory Counts - use a barcode scanner to confirm physical quantities with system inventory quantities
Inventory Receiving - check-in product to your store and automatically upgrade inventory levels
Detailed Inventory Reports - get detailed reports on your inventory to identify trends within the stock
Inventory Tracking - keep track of every items movement and available locations or sales channels then make changes on the fly and get up to date inventory changes as sales are made
This of course is not the full extent of what Shopify POS will do, however it does cover the inventory management portion of things. Where Shopify POS will really help with is when you want to offer buy online pickup in store, or buy in store and ship home, or even to enable order fulfillment directly from the store for online orders. These features might make the compelling use case worth it for the price of Shopify advanced and POS plans, which will start to add up. The good thing about using all of these systems within one ecosystem is they will all work together so each locations inventory is updated, orders are allocated across your retail locations, customers have a seamless experience, and the clarity across all these channels is central for easier insight across the board.
Mobile Shopify Inventory Management
We've already gone through much of the mobile app for Shopify and the inventory management features contained there, but here we'll talk about a few other perhaps little know tricks the app can help you with. Did you know that the Shopify app will help with low inventory counts, or that it can actually fulfill and print orders. This plus quite a few more things are already within the Shopify app. Beyond what we've already gone over the Shopify app is most useful for updating inventory on the fly, so that it can be carried around in your warehouse to make adjustments. For companies that are fulfilling many orders daily, this can be a big advantage for you. Let's go through a few features that might be considered more advanced, though you'll still find that the amount of advanced Shopify inventory management features are not as extensive as you might think. To get the most out of your inventory management strategy, use an external solution such as SKUSavvy to get full functionality.
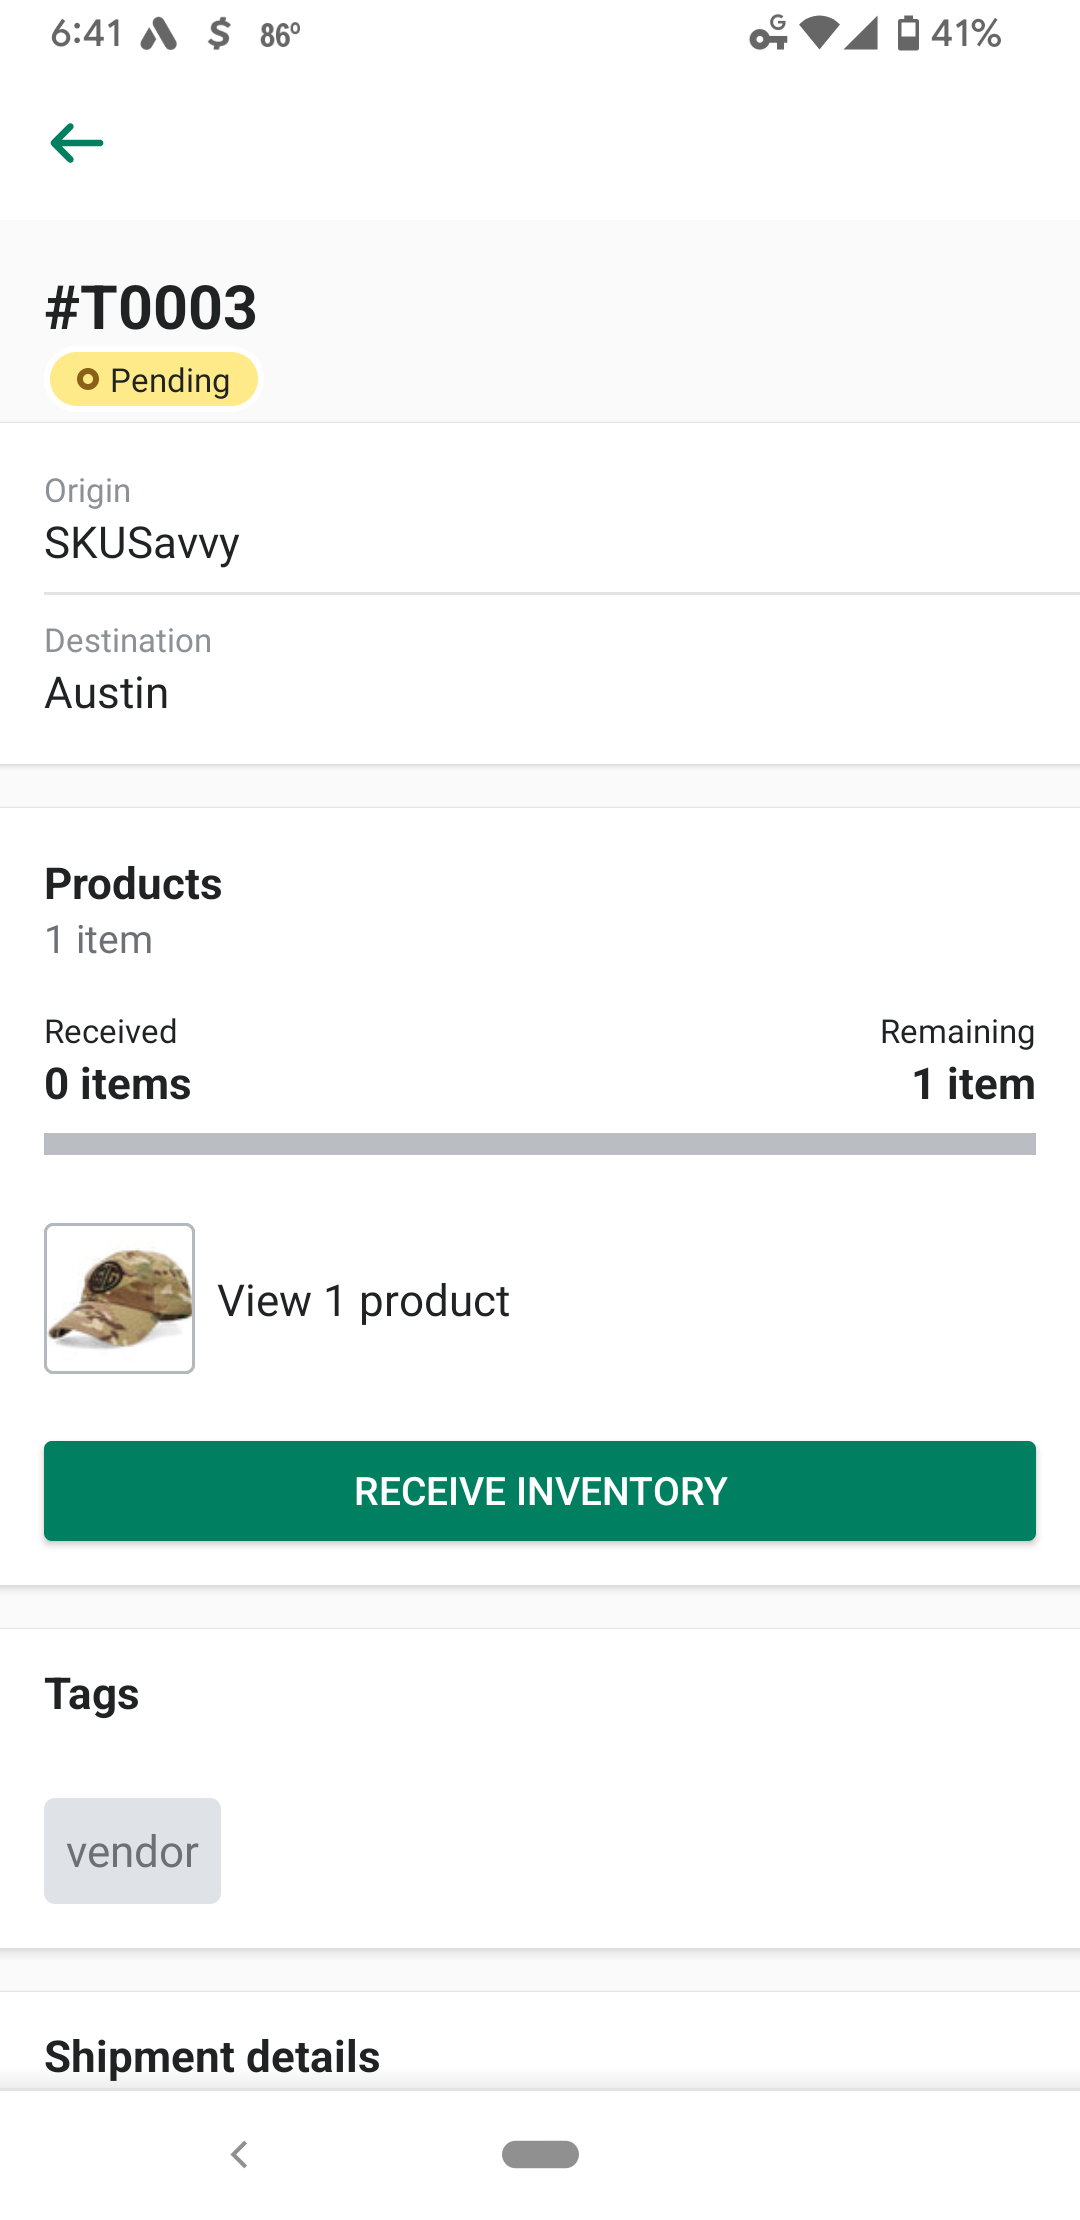
Transfers
Through the Shopify inventory management app you will be able to manage transfer, though you cannot create a transfer...strange but ok. To manage or check-in a transfer, simply go into the Shopify app, click on Products > Transfers and you'll see a list of transfers to adjust or check-in.
Low Stock Alerts
On the Shopify inventory management app you can also manage low stock levels and get alerts as to which products are low. Though there are no par values demand data for this in the regular Shopify app, you'll have an idea at least of items that are about to go out of stock so you can either keep selling while out of stock or to simply stock selling the item once the inventory is at 0. Within a more advanced inventory management system you will get automated updates as to when you should repurchase inventory to eliminate the possiblity of a stock out.
Shopify Flow For Inventory Management
In the latest release from Shopify is Shopify Flow, an automation engine for Shopify Pro+ (bummer indeed) customers. Using Shopify flow will enable you to select a trigger point like new order, high fraud risk, inventory levels, customer actions etc. then describe an action or series of actions the flow system should take once that event is triggered. In setting these flows up, you'll have many options since each trigger within Shopify is an action you can make a flow for. Likewise, with the events that happen after triggering an action, there are many different routes you can take with this. For this specific use case, we'll focus on some of the inventory management flows you could utilize to make automated inventory actions.
Primary Flow Features
No code automation engine with a editor interface to create your flows
Template gallery to get started with flows quickly
Can connect with app to include flows that take action based on the events of an app
Create multi-step if/then style logic within your flows
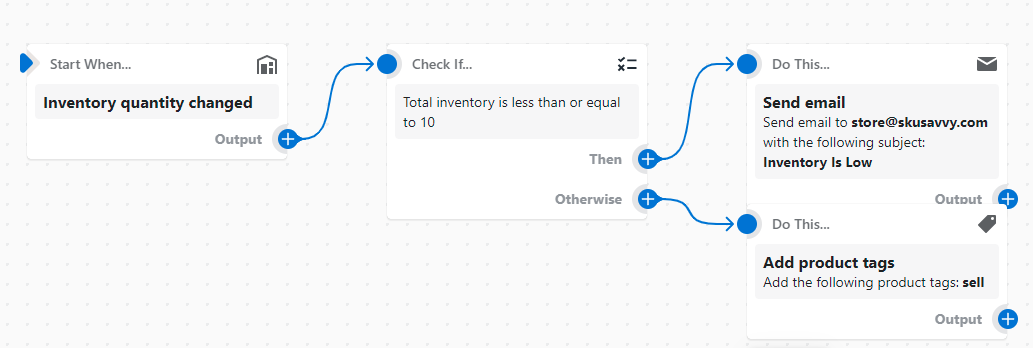
Examples of Flows You Can Make
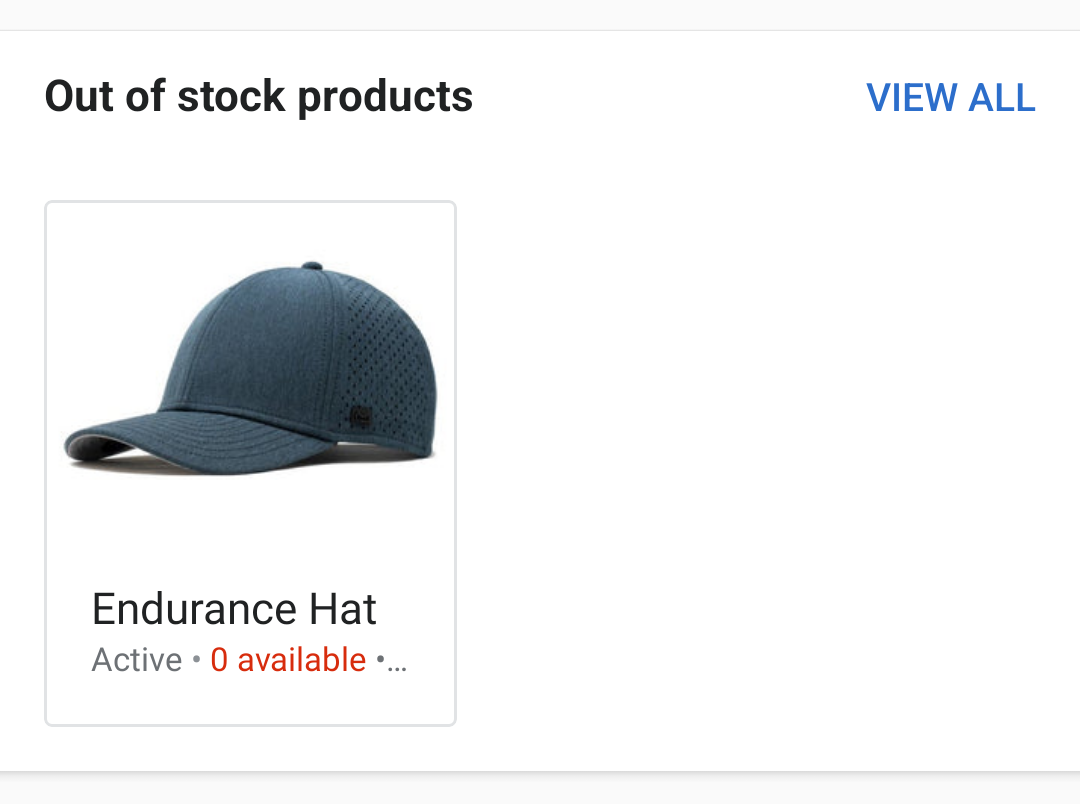
Tag products that drop below a certain inventory level
Email operations or suppliers about products that drop below a certain inventory level
Standardize tags for new SKUs added
Organize products by SKU into collections
Promote or demote inventory in search results based on inventory level
Get notified when demand for out of stock products increases
Out of stock notification for a specific location
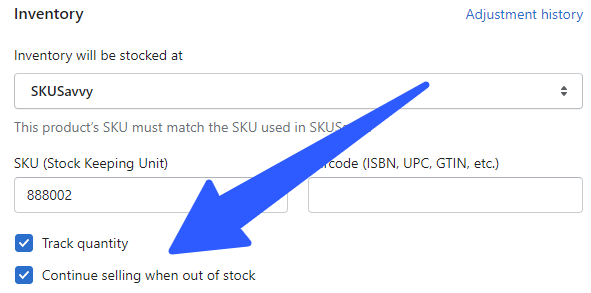
Selling Inventory When Out of Stock
Another feature of the Shopify inventory management system is your ability to keep selling items once the quantity has gone to zero. When you're out of stock and continue selling that product your inventory will go negative and you'll be able to see how many you'd need to cover the negative quantity through a transfer or purchase from a supplier. When you choose not to sell a product when the inventory is depleted, the product will automatically be removed from your storefront and customers will no longer be able to purchase. While this action by itself is not so difficult as to warrant a position in the advanced category, it does create further challenges when trying to manage the various scenarios that need to be taken into consideration. For instance, maintaining your inventory levels when accepting new orders for out-of-stock items can cause future issues if you haven't ordered enough inventory to fill demand, delays make customers upset, or surges in demand and supply make it no longer profitable to fulfill the orders. These scenarios are best handled with another inventory system that will order and alert you of low items before they go out of stock in true just-in-time fashion.
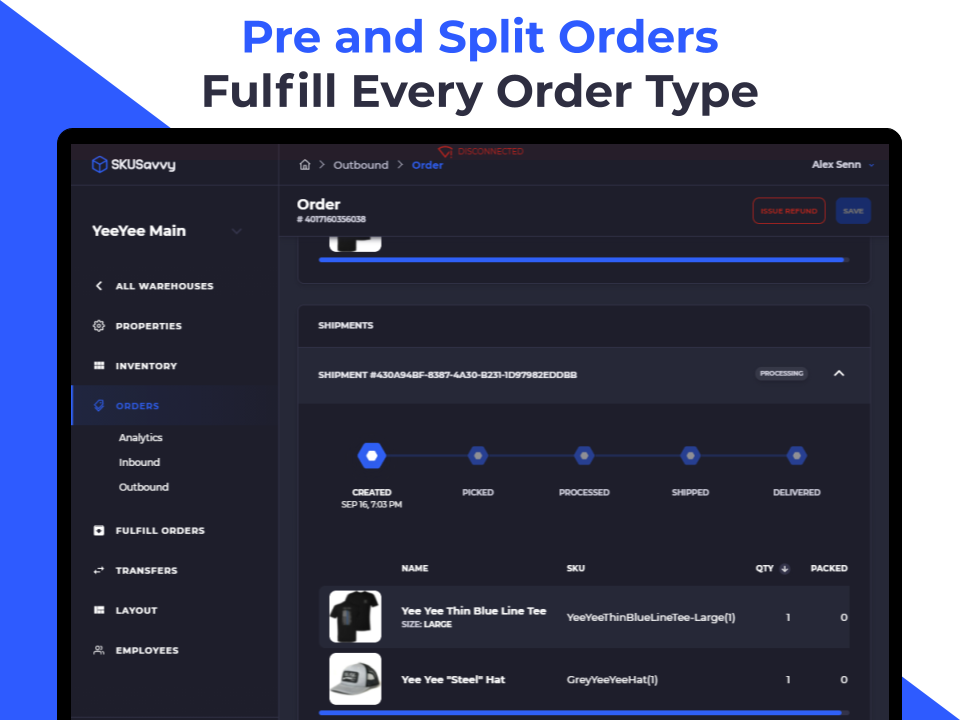
Another place merchants can utilize selling inventory when out of stock is when doing pre-sales of an item. This can be a good strategy so long as you pay attention closely to the out of stock quantity you are selling and don't oversell the incoming stock. In terms of inventory efficiency, this is not the best way to manage this process. One issue that arises is when you need to manage the pre-sales but your customers have ordered other product which is still in stock. In this case, you need to split the fulfillment between the out of stock items, and the in-stock items, or hold the shipment until the full order can be fulfilled. These scenarios are the advanced situation that arises relatively early on in the inventory management process but they become important quickly. To better manage this process we created a split fulfillment process within SKUSavvy which will take your pre-orders and split them into two shipments so one can be fulfilled while the back-stock item is held and automatically opened once the new stock arrives.
Extras
Shopify inventory management will provide a whole lot of benefits to you as a small merchant. This of course can be expected pretty rapidly by adding in new tools and systems that will dramatically increase your overall efficiency. Something we did not cover in this is the reporting and monitoring side of things which provides visibility into all of your small daily actions keeping up with inventory. In this section, we'll explore a few quick and efficient wins within the scope of managing your inventory better.
Inventory Management App
The whole point of this guide is to give you all the information you could want to know about the Shopify inventory system. Throughout, you've likely noticed a few areas that as a growing merchant you can clearly see might not properly address the challenges associated with managing a large inventory. For situations like this, you need to go beyond Shopify inventory management. Even Stocky as the successor/upgrade to inventory management will only get you so far. For true inventory management, you'll need things like automated purchasing, bin management and employee role assignment, UOM conversion, kit creation, bin to bin replenishment rules, packing materials usage levels, digital picking, and more. Here are some tools included within SKUSavvy to compare that with the Shopify inventory management system:
Purchasing automation based on demand, lead times, and past order history
Employee role and task management directed work, and undirected work
Visual warehouse layout and organization with bin management
Zones and areas for staging and management of lots, outbound, inbound, quarantined or awaiting check-in
Generate and print barcodes, bin labels, packing slips and shipping labels on the fly
Work across any device
Establish bin to bin replenishment for automatic allocation of storage inventory to replace pick bin as they are depleted
Quickly view inventory across all locations and get granular bin location quantities
Route orders to your warehouses without any limit and set rules for which location should receive the orders
Manage vendors, products, costs, and purchase low inventory quickly
Assemble digital pick lists with visual location identity of every item within the batch
Automate the packing and shipment workflow with clear instructions on box size, contents/quantities, and shipping label purchase
Optimizing for Retail Inventory
Shopify is an excellent eCommerce system and one of the largest out there in terms of merchants, ecosystem, apps, and volume. That said, Shopify is used by a lot of merchants who are also running retail stores. Shopify POS is the answer for the storefront and payments side, but it offers merchants only limited feature set for what a retailer actually needs. We went through Shopify POS and Stocky which are the answers for inventory management in a retail environment. With retail stores managing inventory becomes very challenging if you aren't able to properly decide which store the online orders come from, and which stores hold what inventory for in-store purchases. It is simple is theory, and difficult in practice which is why you see a lot of questions related to retail stores when evaluating or beginning a Shopify store. Let's look at a few things you can do to optimize your retail inventory to work with Shopify.
Maintain Single Use Locations
Many of the most successful retail eCommerce operators separate their inventory management into a consolidated location for online fulfillment and storefront locations for walk-in shoppers or buy-online-pickup-in-store. Keeping a degree of separation between the two will enable you to keep the focus for each respective channels
Warehouse as a Supplier for Stores
To keep inventory accurate, the most basic element is to make sure system quantities and physical quantities match. This is easier said than done though it doesn't have to be so hard. Instead of simply transferring inventory between locations create a cross-dock within the system and go through the flow provided by Shopify, SKUSavvy, or whatever inventory system you are using. Lots of times this process goes unchecked and causes issues because it wasn't tracked in the system.
Make Sure the POS is Connected with Shopify
If you aren't using Shopify POS make sure that the POS you do choose to use has a connection with Shopify so that it can be added as an additional location of your Shopify store. You can still maintain separate availability of inventory while gaining the benefit of the POS you select.
Enable Buy Online Pickup in Store, Ship from Store, Local Delivery
These options are surprisingly popular amongst consumers so enabling them will only help you in capturing this customer. Of course, maintaining the logistics behind each of these actions is equally important. We've talked about a few of these methods and you should aim to offer each one whether through retail locations or a central warehouse.
Leverage Your Store Presence
The above tactic is the technical way of connecting your store locations with your online storefront. This point is about the physical store. Make it announced, known, and show it off. People have an inherent trust when you give them real details about your brand, who the people are, where you're located, what your store looks like. These all provide a more 'real' brand to your customer base so you should utilize it.
Fulfill from Stores
Whether or not you choose to offer buying online for in-store pickup you should still consider fulfilling online orders of any type from your store locations. With most inventory systems this will not be a big task to add a new fulfillment location. This works well in cases you've got more space in the store than you need for the store itself, or you get more online sales than you do offline sales. You could even offer this space to another merchant who will utilize it to fulfill from.

Optimizing Inventory
When you finally have the operations running *smoothly* you can look at your reports to see just how far you still need to go!! In all seriousness, this area of inventory management is where billions of dollars in a company's annual budget are spent to shave fractions of seconds off any process they can. Here we're not going to be quite as picky, though there are major improvements that can be gained through small changes. In this section we'll outline a few quick notes on what's possible.
Way More Inventory Optimization Tactics & ReportsMost of the inventory optimization tactics boil down to a few key metrics that you should watch and actively improve, alongside the technology necessary to be able to get these reports and finally the know-how or equipment to achieve the desired result. Here are a few methods to use to achieve this depending on where you are choosing to focus your optimization efforts on:
Choose one category of optimization you want to achieve. Initially this might be inventory accuracy, then it might be order cycle time, and then you might focus on order accuracy. Look objectively at where most of your problems come from and start there
Select the right metrics to focus on for whichever area of inventory optimization you are looking to tackle.
Inventory Accuracy
Out of Stock Items
What percentage of items are backstocked?
Quantity Present
Physical count vs. system count
Days on Hand
Number of days left of stock based on sales volume
Inventory Carrying Costs
Are items staying for a long time in your warehouse?
Cycle Time Metrics
Receiving Cycle
Time from arrival to final bin in the warehouse
Order Cycle Time
Time from order placement to being ready for shipment
Orders Picked Per Hour
Get a measure of warehouse productivity
On Time Shipping Percent
Number of orders that are shipped/received orders
Order Accuracy
Fill Rate
Order percent that shipped on time with all line items
Order Picking Accuracy
Quantity of orders that are picked correctly
Rate of Return
How many orders are being returned inaccurate?
Perfect Order Percentage
How many orders went out without error?
Considerations
We are coming to the close of this guide, which may be enhanced over time and as new features come to the Shopify inventory management platform. Our hope is that this guide will serve as something to be used for new Shopify stores, existing stores, and super fast-moving stores that want to make the most of what Shopify can do. Of course, there are always ways to improve upon the current status quo and that's why combining Shopify inventory management with SKUSavvy or any other number of software out there to handle pieces of your operations flow can make a huge difference in how quickly you scale. Here are a few other considerations you can make to maximize what you can do within the Shopify ecosystem and beyond.
Warehouse
When you first start out with a warehouse and begin scaling your storefront it's hard to admit that the first thing you should do is invest into the right material handling and equipment. Getting your warehouse setup right from the beginning is one of the lowest hanging fruit. Dare I say it's almost always worthwhile even to borrow money to have the warehouse properly setup with racking, flow track, conveyance, and material handling equipment. Of course, this requires a certain volume and many of the readers here may well be above that threshold but I'm sure many would agree early investments make a world of difference down the line. Being able to scale from 1000 orders per month to 30,000 orders per month can oftentimes be squeezed out of the same warehouse given enough size and efficiency of the equipment used to manage this process. Below are a few resources for keeping up with the warehouse optimization through the equipment and material you choose to use.
Layout, Racking, Flow Track
For a smaller warehouse you'll need racking. Make sure you utilize the height of your building to get the most out of the pallet positions you are working with. Make sure when you setup the racking in conjunction with your pick space that you utilize an efficient layout. It's worthwhile to get a contractor to help you here if you don't have experience. FLow track is slightly angled racking which can hold cases or single and you load from one end and pick from the other. Product is loaded into the back and can typically hold 1-2 or more days or supply on one flow track.
Packing Stations
Your packing stations are where the magic happens so make sure you enable employees with everything they need to do the job right. Provide measuring tapes on the table if needed. Get tape rolls made with specific markings on them, find efficient package material so you can limit the number of box sizes you are shipping in. Take extra measure to limit steps or make simple actions obvious so eliminate small errors and sloppy work.
Using a 3PL
When you're a fast-growing brand it can become very overwhelming to fulfill all the orders in-house. In times like these, you may choose to employ a third-party logistics company to come in and manage all or part of the orders. Using Shopify custom fulfillment or as we talked about an app provided by the 3PL will enable you to pass over some of the fulfillment processes while still being able to grow your own fulfillment. Selection of a 3PL is a whole other topic so we won't get into too many details, though there are a few tips we've pulled from our friends over at OTW Shipping.
OTW Shipping (3PL)Are your products complex or simple? The more complex items you have (kits, multi-UOM, subscriptions, etc.) the more important it will be to get good pricing and use higher volume to get these rates
Are you items heavy or bulky? Storage costs are typically assessed on the pallet or bin position. Additionally, you should look for a 3PL closest to the majority of your customers so you can reduce shipping costs
Do you orders require inserts, custom boxes, tape? If so, you'll be paying more for this customization of packaging and you may need to consider a few different 3PLs
Are all products barcoded and properly packaged by the supplier? Missing barcodes, inaccurate items, wrong packaging or relying on your 3PL to package items will all cost significantly. It's important to negotiate and arrange everything you need your product to have so that your 3PL can focus on fulfilling orders not fixing product
Links
Big Warehouse Improvements Through Small Changes - YouTube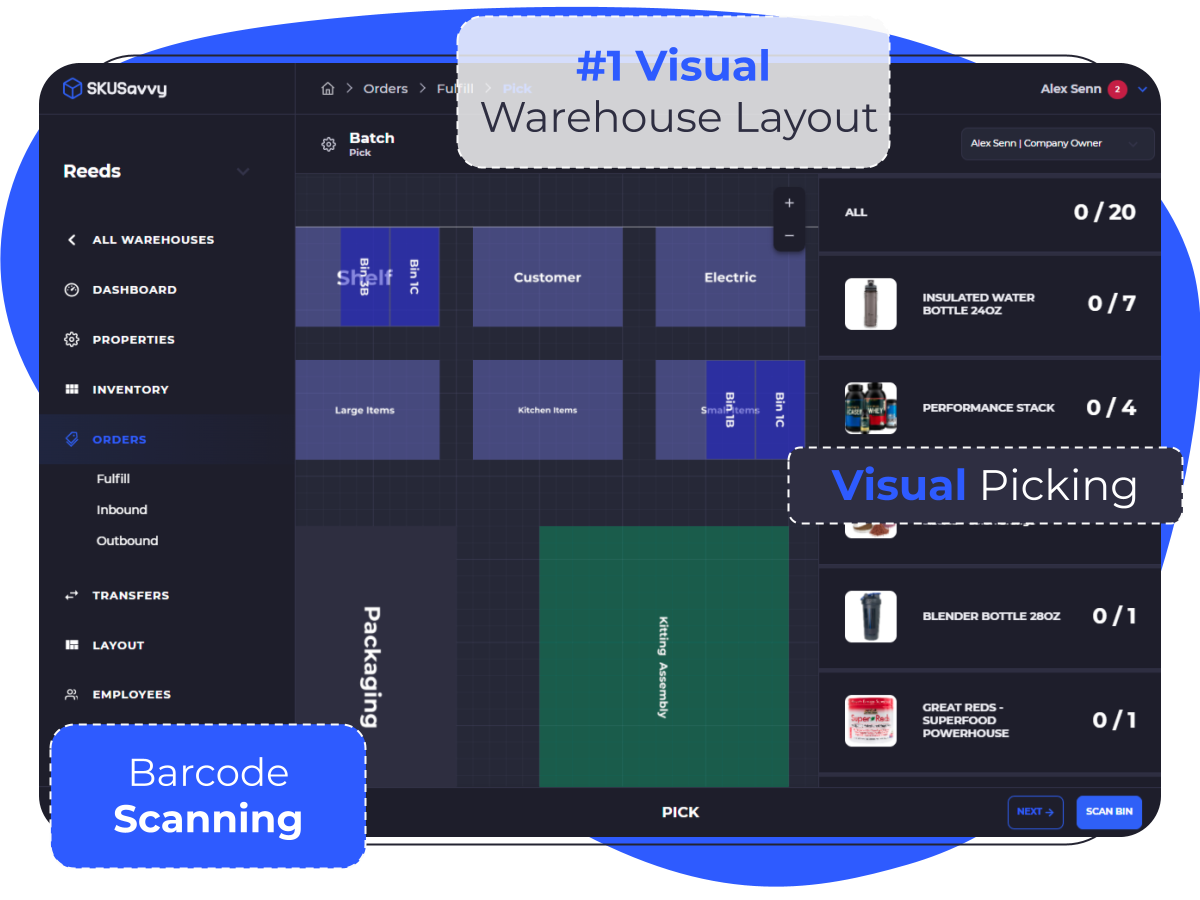
Start Your Fulfillment Journey with SKUsavvy and Leverage Tools for Modern Operators

About the Author
Alex Senn is a co-founder of SKUSavvy and has been immersed in retail/eCommerce technology for over 10 years. Starting out Alex built an eCommerce agency to six people working across Shopify, WooCommerce, Magento, Big Commerce, and other platforms. Creating new sites from scratch, repurposing existing sites, and creating specialty apps for merchants. In doing this Alex had a few clients ask about inventory and warehouse systems. In a deadening search for something modern and efficient for today's merchants, Alex built SKUSavvy with his business partner alongside the merchants who wanted it. Through this wealth of experience, Alex feels fortunate to provide new ways of helping merchants grow and scale their operations. To book a meeting with Alex, please visit the contact us page.