Hardware Setup
Here's a few tips on getting your hardware setup to work with SKUSavvy including printers and barcode scanners.
Hardware Requirements
To get the most out of your SKUSavvy account you will want to consider getting some hardware. The only required hardware is a printer for your shipping labels, though you can also get hardware scanners to improve scanning.
Barcode Scanner Requirements
By default SKUSavvy includes a camera-based scanner that will work on any device with a camera. While the camera does work well, it is oftentimes better to use a Bluetooth hardware scanner.

To be compatible with SKUSavvy, the hardware scanner you select must meet the following requirements:
Must have Bluetooth connectivity with whatever device you are planning to run SKUSavvy on (iPad Mini, Android tablets, iPhone, laptops etc.)
Must be able to set a prefix on the device from one of the following symbols: Tilde ( ~ ), Caret ( ^ ), Open Bracket ( { ), Asterisk ( * ), or Backtick ( ` )
Must turn on the hardware scan option within the configuration settings on SKUSavvy

Printer Requirements
If you already have a printer working with the device you intend to use SKUSavvy with, you can reasonably assume this same printer will work as is with SKUSavvy. The printers connect directly through the browser print dialog so there is no additional setup other than to make sure the printer is connected as it normally would be either through Bluetooth or directly wired connection.

To use a printer with SKUSavvy:
Printer must be connected to the device via WIFI with Bluetooth turned on, unless the printer is wired directly to your device
To use a printer with SKUSavvy on iPad or iPhone:
The printer must have AirPrint compatibility for the Apple device to print directly to the printer
You can optionally use a AirPrint utility installed on your laptop or desktop to connect an iPad or iPhone with a printer that does not support AirPrint so you can still print directly from the device
Setup Tera Scanner with SKUSavvy
If you purchased a Tera scanner from the recommended hardware page, here's some instructions on getting that set up to work with SKUSavvy. Typically the instrucctions across different models will be roughly the same, though the scan you need to make to enable the prefix might change. You can typically find this in the respective devices user manual.
1) Turn on Listening for Hardware Scans
Within your SKUSavvy configuration settings at the very bottom is a setting to listen for hardware scans. You will need to turn this on, and select the desired prefix. Here we will use the tilde prefix which looks like this: ~

2) Establish Connection with Scanner
Turn on the Tera scanner and ensure the Bluetooth connection is made between your device and the scanner just like any other device you'd connect with Bluetooth. Once connected you will see the scanner is paired with your device and if you open a notepad then make a scan with the Tera scanner you will see the barcode should populate on the notepad.
3) Add a Prefix to the Scan
Now that you have the barcode scanner connected and reading barcodes, were going to add a SKUSavvy supported prefix to the scan (~, ^, {, *, ` ).Tera HW0010
First scan this barcode which tells the Tera scanner that you are adding a prefix.
A) Scan to Add Prefix

Then scan this barcode right after which will add the tilde ~ character to all future scans.
B) Scan to Add Tilde (~)
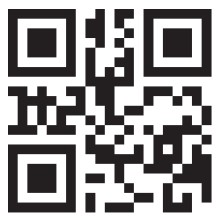
Now you should be good to go using the Tera HW0010 with SKUSavvy
Tera 1100D
First scan this barcode which tells the Tera scanner that you are adding a prefix.
A) Scan to Add Prefix
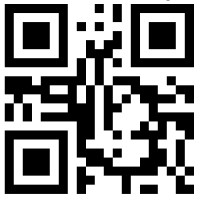
Then scan this barcode right after which will add the tilde ~ character to all future scans.
B) Scan to Add Tilde (~)

Now you should be good to go using the Tera 1100D with SKUSavvy
Tera 1300
First scan this barcode which tells the Tera scanner that you are adding a prefix.
A) Scan to Add Prefix
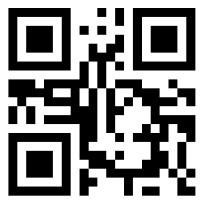
Then scan this barcode right after which will add the tilde ~ character to all future scans.
B) Scan to Add Tilde (~)
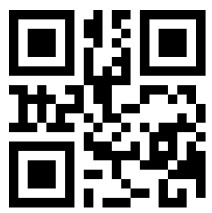
Now you should be good to go using the Tera 1300 with SKUSavvy