Products Guide
At the core of any warehouse are the products and inventory. Learn how SKUSavvy handles products and variants, units of measurement, kitting, and dimensions.
Product Information
Within your SKUSavvy account, all product information is held centrally and can be equipped across different warehouses. Every product can have multiple variants, barcodes, vendors, lot numbers, serial numbers, inventory, or kits associated with it. You can also hold dimensions across your variants which can be used to provide box size suggestions during fulfillment.
Products imported from a Shopify or other eCommerce storefront will come over with their variants attached in the same way.
Product Detail
Name
Image
Tags
Type
Digital / Physical Item
Perishable
Variant option names e.g. Size, Color, Flavor, etc.
Status (Active, Draft, Archived)
Meta fields
Variant One
price
SKU
barcode
dimensions (IN, FT, MM, CM, M)
weight (LB, OZ, KG, G)
Continue selling policy
Serialization
Option value e.g. XL, Red, Apple, etc.
Customs declaration
Meta field
Variant Two
price
SKU
barcode
dimensions (IN, FT, MM, CM, M)
weight (LB, OZ, KG, G)
Continue selling policy
Serialization
Option value e.g. XL, Red, Apple, etc.
Customs declaration
Meta field
Product Views
On the product view you can see all your products either grouped or flattened and shown variant by variant to see total inventory by SKU as well as see unit cost and price to sort.
Flatten any product or inventory view by selecting this icon
Note that a product may exist and not be shown within your 'Inventory' list. Once inventory has been added to the product it will show within the inventory list.
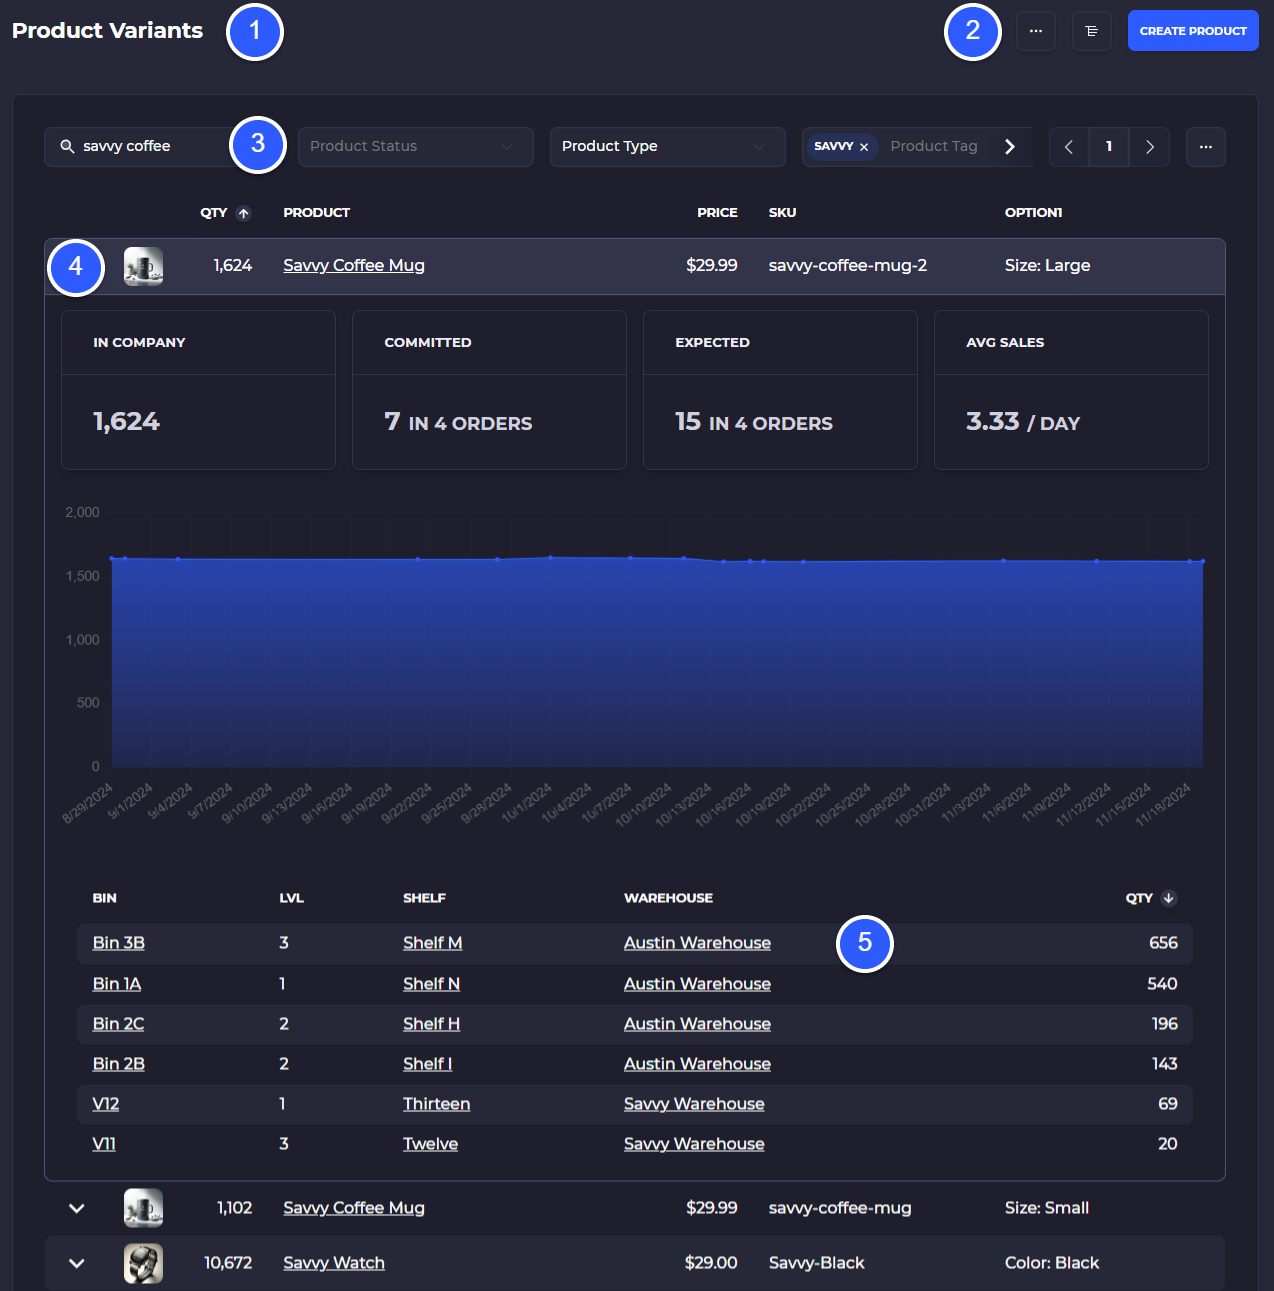
Grouped Product View

1) Make sure you are looking at the product view and not the inventory view
2) Toggle between the grouped and flat product list view
3) Enter and save filters for the table view. Filter by text, status, type, tags, price, cost
4) 3-dot menu will enable you to turn on/off and reposition table columns
5) View a product, tap on the caret icon to view variants and variant inventory
6) Tap on the underlined text to go directly into the product detail
7) View a specific variant of the product, tap to view this variant detail page
8) In company inventory value is total on-hand stock across all locations
9) Committed stock is inventory that is allocated to orders
10) Expected stock through purchases
11) Average sales per day for the variant
12) Bin positions and inventory quantity for the product
Flat List View
1) Product Variant indicates you are viewing the flattened list view
2) 3-dot menu will enable bulk actions such as printing product barcodes and adding dimensions to variants
3) Enter filters to the view, use the 3-dot menu to change column visibility and position in the table
4) Select the row to view this variant detail, tap on the caret icon to pull down inventory levels company-wide. Select the underlined product name to go into the product detail view
5) View inventory and bin positions for this inventory across your company
Product Navigation Menu
Using the navigation you can find your way through the product and variants, vendors, inventory, and orders.
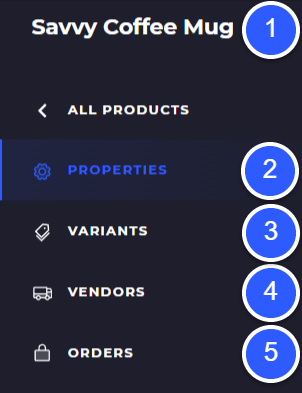
Product Navigation
1) Product name currently being viewed
2) Properties of the product like name, tags, perishable flag, status etc.
3) Variants of the product
4) View inventory across all variants and locations for this product
5) View all vendors carrying this product
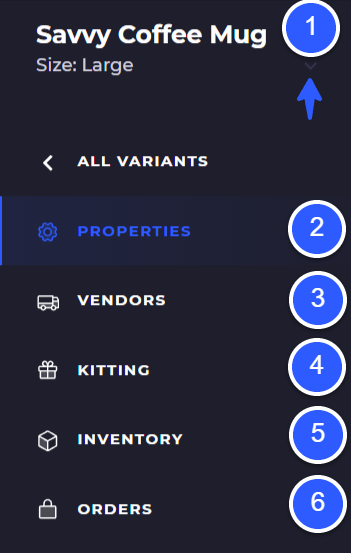
Variant Navigation
1) Click the dropdown to select another variant of the product
2) View the properties of a variant
3) View current vendors carrying the variant
4) View kits that include this variant
5) View the inventory across locations for this variant
6) View orders placed (committed stock) for this variant
Product Properties
When you click into a product SKUSavvy will show you the general properties of that product including inventory, variants, orders, and vendors. Below is the product properties view:
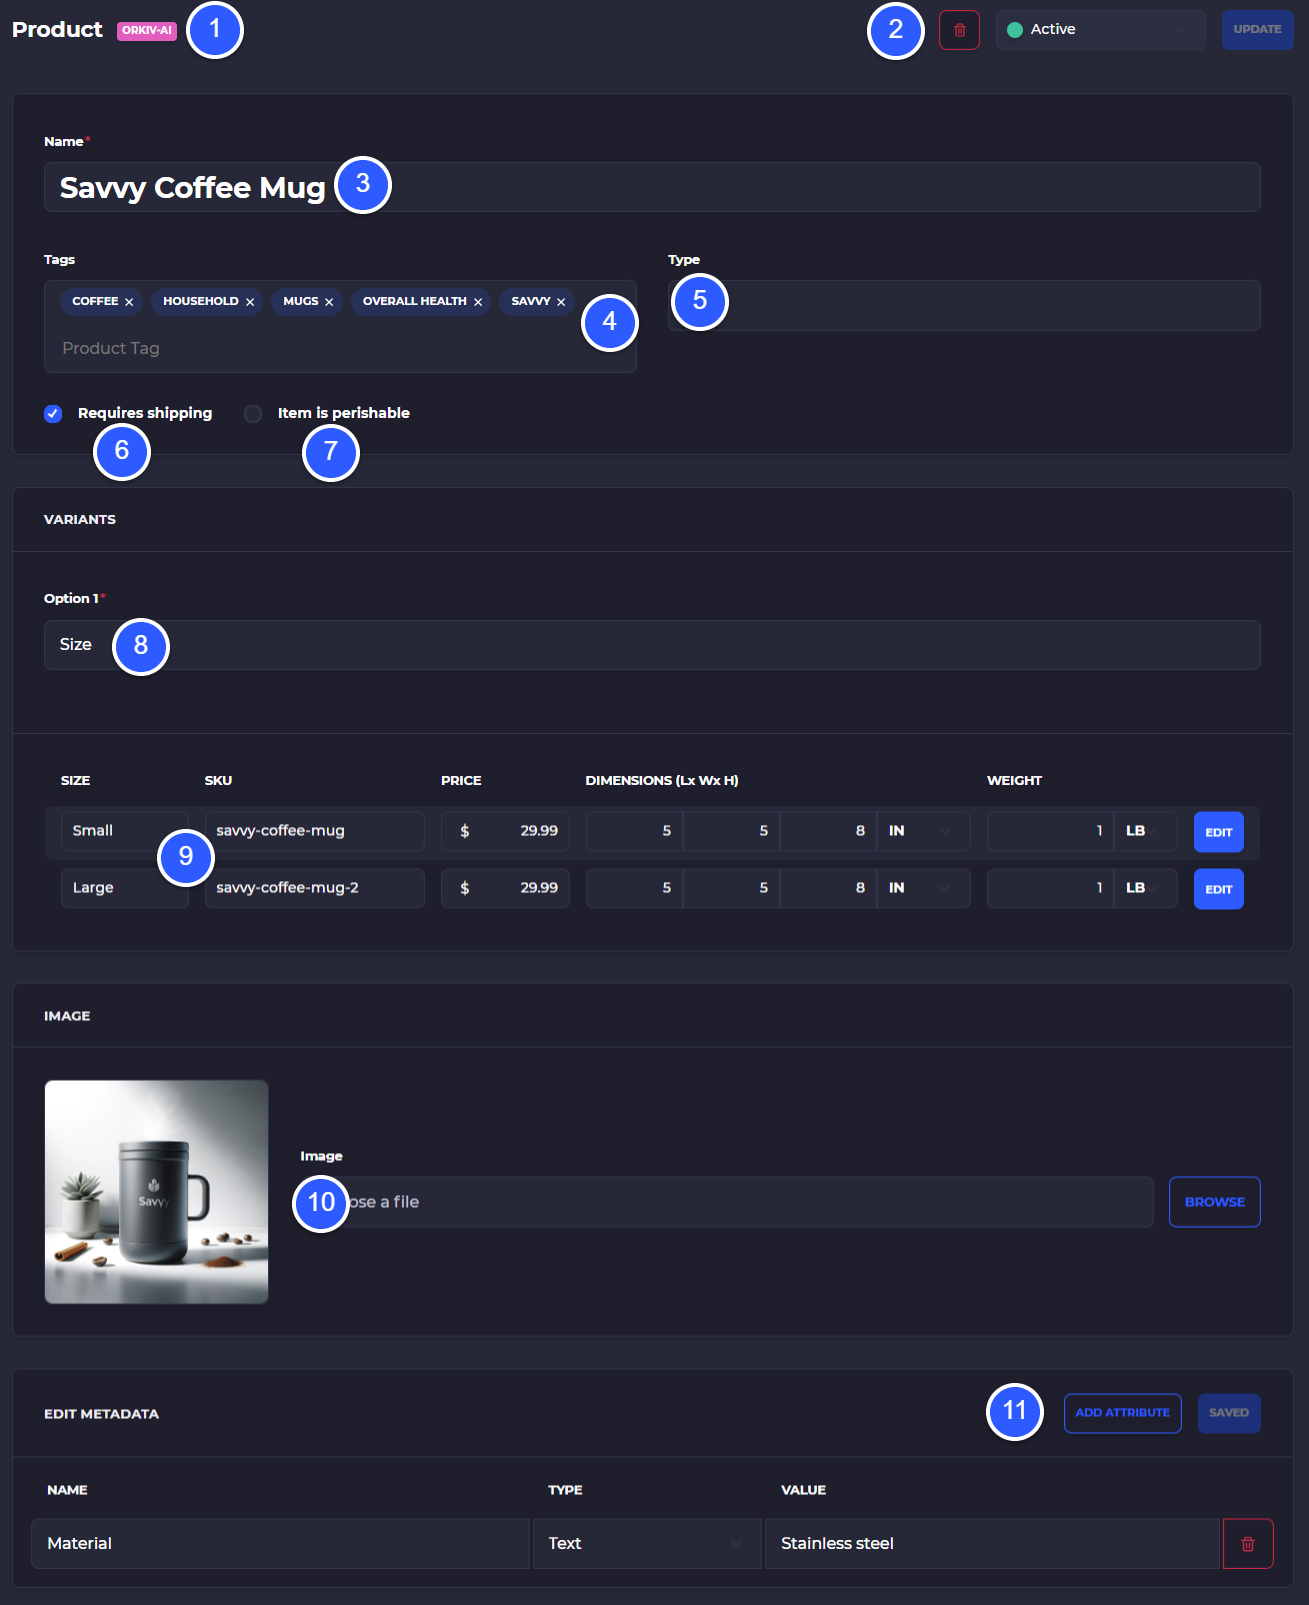
1) Click the Shopify product link to go directly to this product within Shopify (requires Shopify to be connected) - details edited in Shopify will show up in SKUSavvy in real-time
2) Delete the product (does not delete the product within Shopify) and view/update the product status
3) Set a product title (this can be updated in Shopify and received in SKUSavvy)
4) Product Tags: add product tags to enable sorting and pick batching by product tag.
5) Add a product type for further filtering, should be entered on Shopify
6) Requires shipping: indicate to SKUSavvy whether the item is a digital or physical product.
7) Set the item as a perishable item which will start requiring lot & expiration dates on all variants of the product
8) Add Options: you can add options to you products such as size, color, shape etc. on Shopify and they will show on SKUSavvy
9) Variants of this product. You can also add variants to the product. NOTE: new options and variants should be added on Shopify first and these will come over into SKUSavvy. View/edit the options, skus, price, dimensions and weight
10) Enter a product image
11) Add meta fields to the product
Product Variants
Once the variants table you'll be able to view all variants and make bulk edits to the variants.
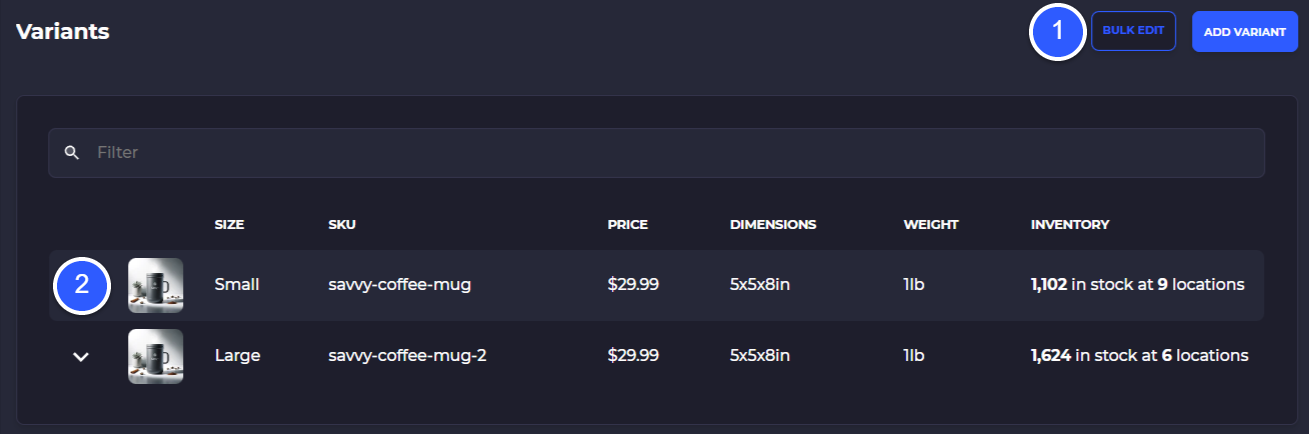
1) Bulk edit your product variants including price, length, width, height, weight and weight plus their units
1.b) Add a new variant to the product (will only show within SKUSavvy, you should add new products and variants to Shopify first if you are uploading new items)
2) Product variants table, click on one to view details of the variant, tap on the caret icon to show inventory
Product Vendors
This view will show you vendors associated with the product and the cost at which those vendors supply the product. This view shows vendors for each variant
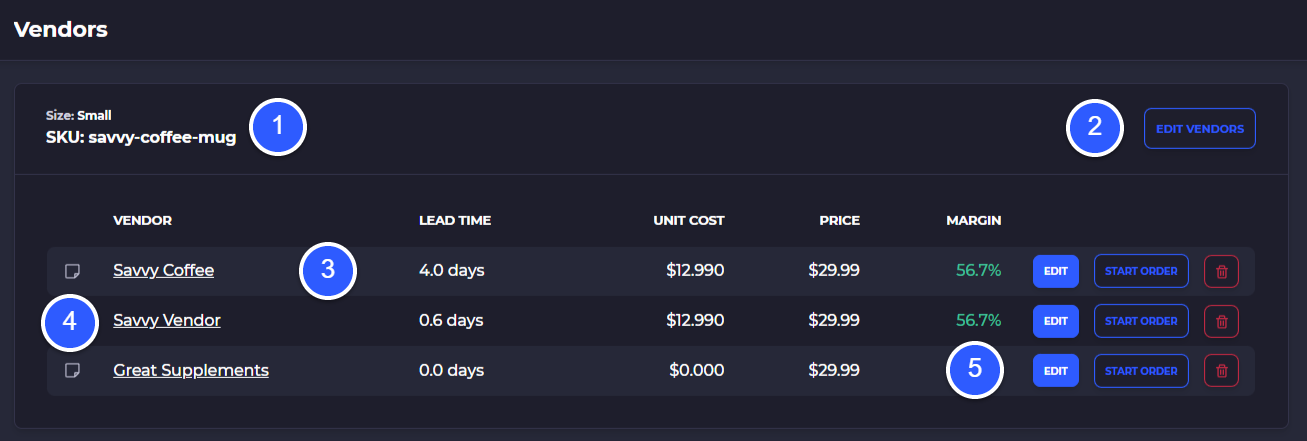
1) View each variant and the associated vendors
2) Edit/add vendors carrying this variant
3) View the vendors and the price, cost, lead time, and margin they are providing the product at
4) Add a note on the item which will show during purchase order creation
5) Edit the vendor association to change cost, step rules, and vendor SKU
Below is what shows when you tap 'Edit' on a vendor.
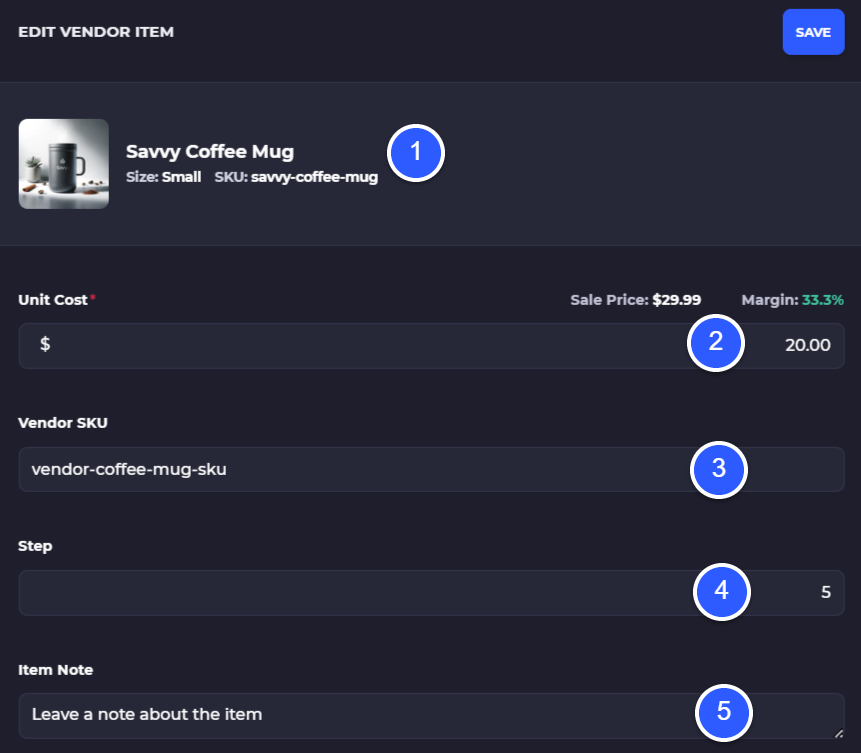
1) Product variant being edited
2) Unit cost for this vendor
3) Vendor SKU
4) Step count which this product must be purchased incrementally at such as in this case the step is 5, so this product can only be purchased minimum 5 at a time such as 5, 10, 15, 20, etc.
5) Item note, which will show during purchase order creation
Product Orders
You can view all orders across inbound, outbound, and transfers for a specific product which will show you detail and a chart of the orders over time.
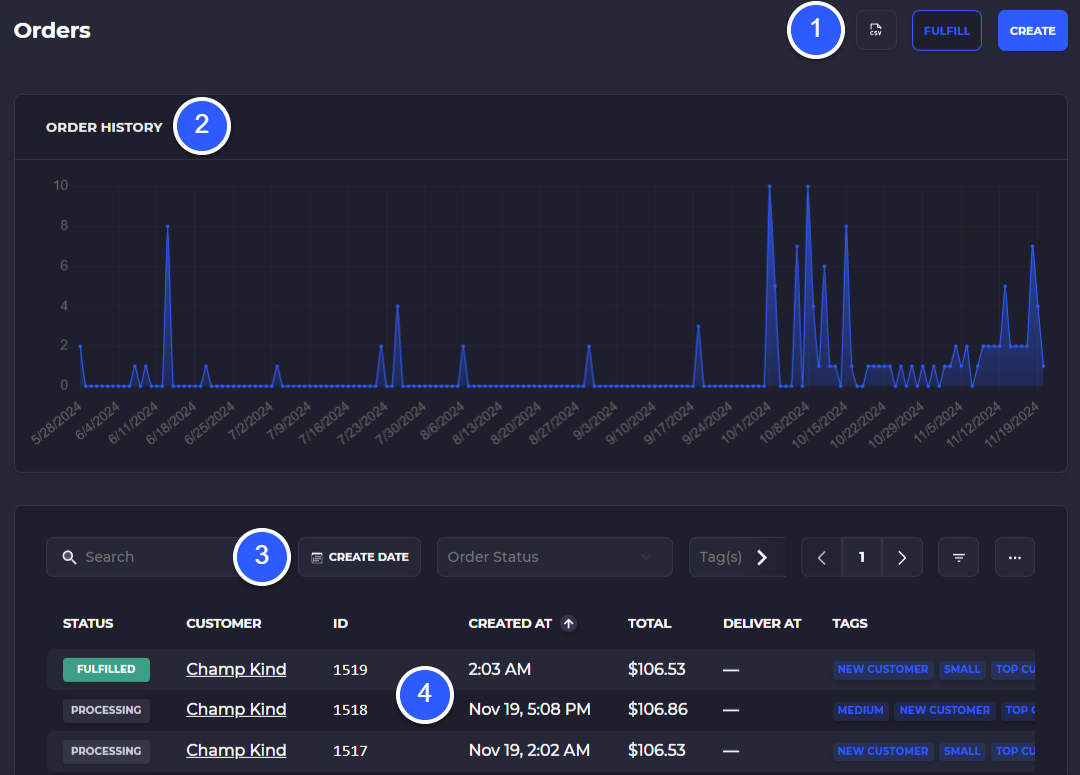
1) Export orders for this product, go into the fulfillment, or create a new order
2) View order history over time
3) Enter and save filters for this product
4) View orders, click into one to begin fulfilling
Video Overview
Product Variants
Every product is made up of variants. Think of this as a parent-child relationship since variants are treated as their own within an order. Product variants can have up to three custom options configured, such as size, material, and color. Variants also hold dimensions, price, SKU, barcode, and weight. In addition when dealing with serialized inventory or perishable stock the lot number or serialized code will be attached to a variant.
For example, you can have a sweatshirt with sizes small through x-large, each of those sizes could have a color associated, such as a blue x-large sweatshirt. In each of these variants, you can hold separate inventories across your warehouses.
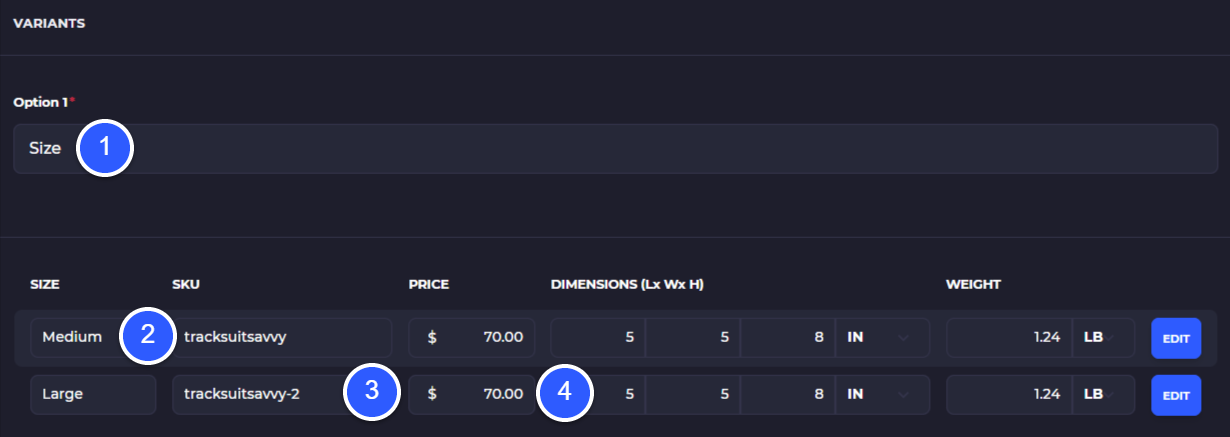
1) Change option name (plan to make product variant options on Shopify first if connected with Shopify)
2) Change option value for the variant
3)Edit option SKU
4) Edit variant information directly in the table
Tap 'Edit' to view and edit all product variant details
Variant Properties
Select a product variant to view details. Under the properties tab of a product variant, you can see options for the SKU, price, backorder, serialization, variant options, dimensions, barcodes, harmonized code, country of origin, and meta fields
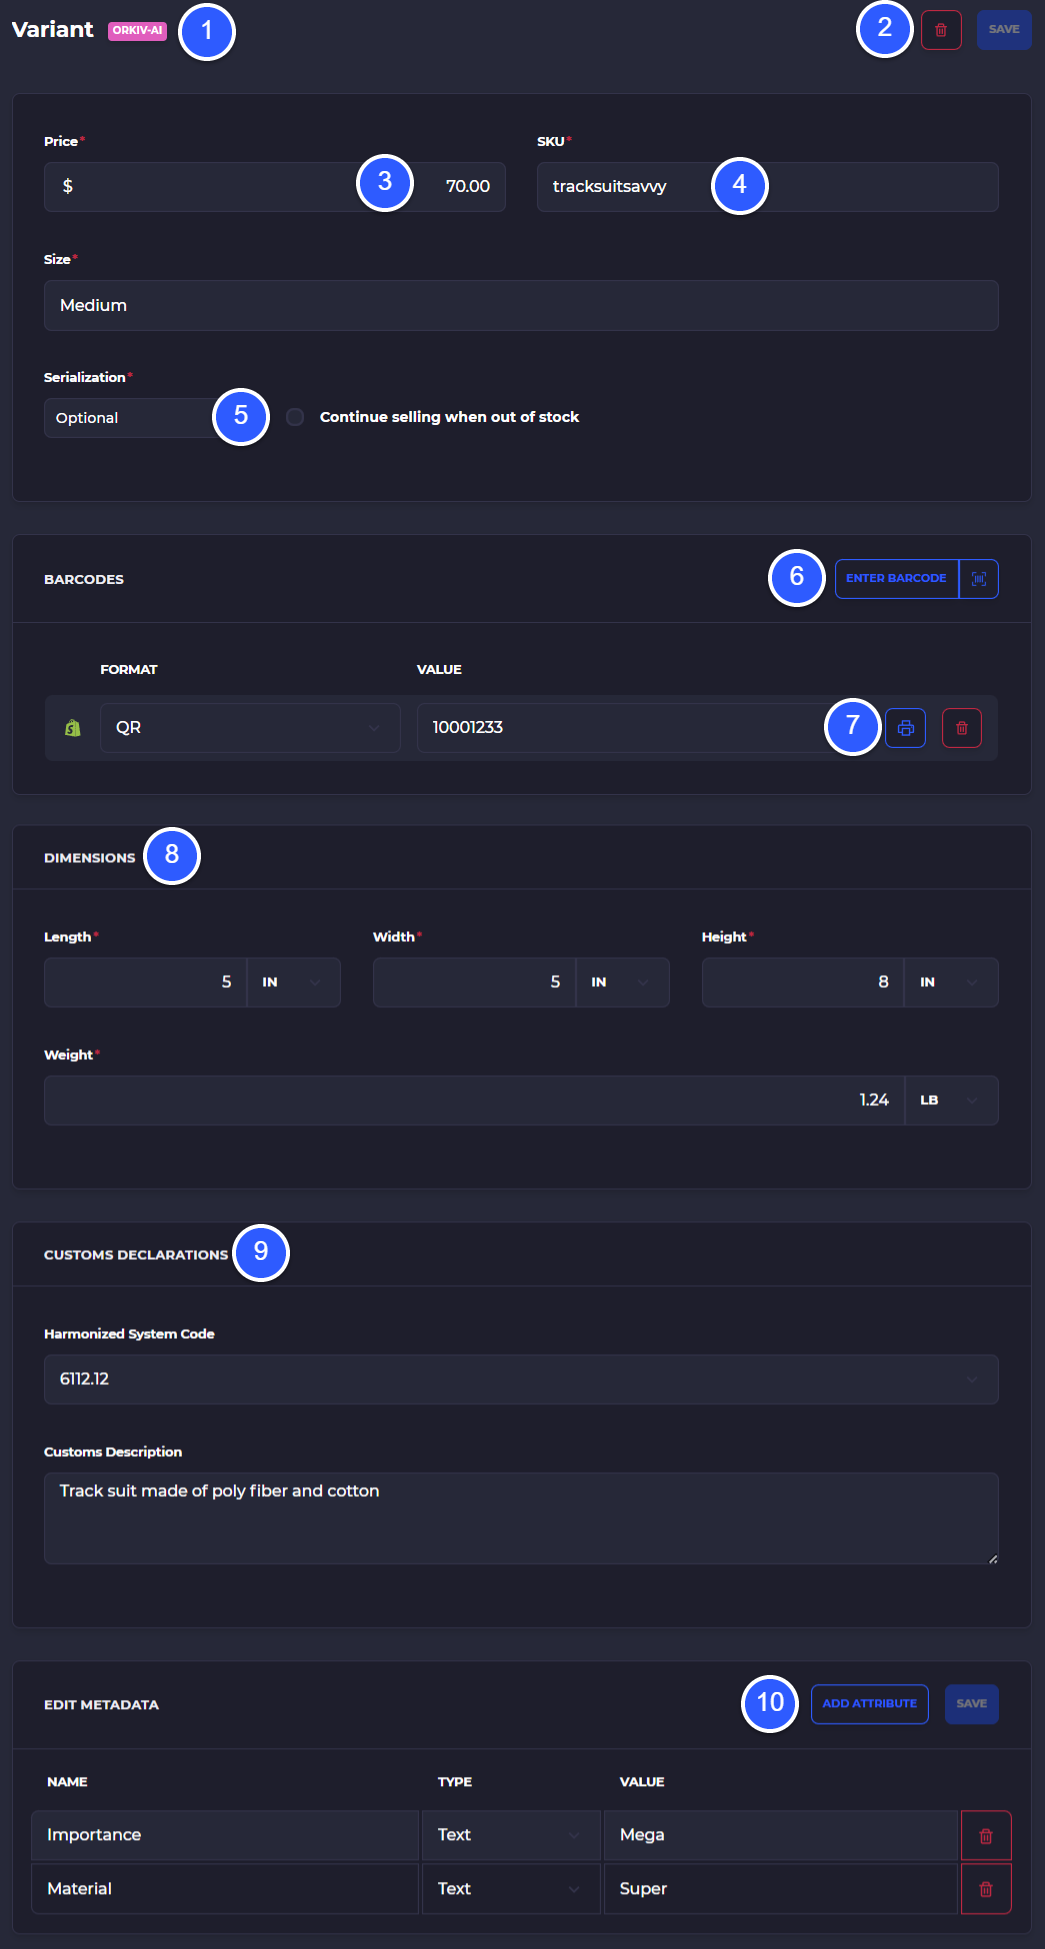
1) Within a product variant you can tap on the store tag to go directly into Shopify admin with this product variant already selected
2) Delete the product variant
3) Edit the price (this will update to Shopify)
4) Change SKU (this will update to Shopify)
5) Turn on serialization for the variant
6) Add a new barcode or change the existing barcode
7) Print a single variant barcode (hover over the print icon to view the barcode, if a barcode does not generate then your barcode value or format is not valid)
8) Add dimensions to the variant. This can be done in bulk from the product list view
9) Enter customs information to ship this variant internationally
10) Add new meta field attributes which can be added to your print templates or used from the API
Variant Vendors
While viewing a variant select the vendors tab on the left hand menu, you can directly add and change the vendor costs or vendor SKUs of a particular variant across the vendors carrying the item.
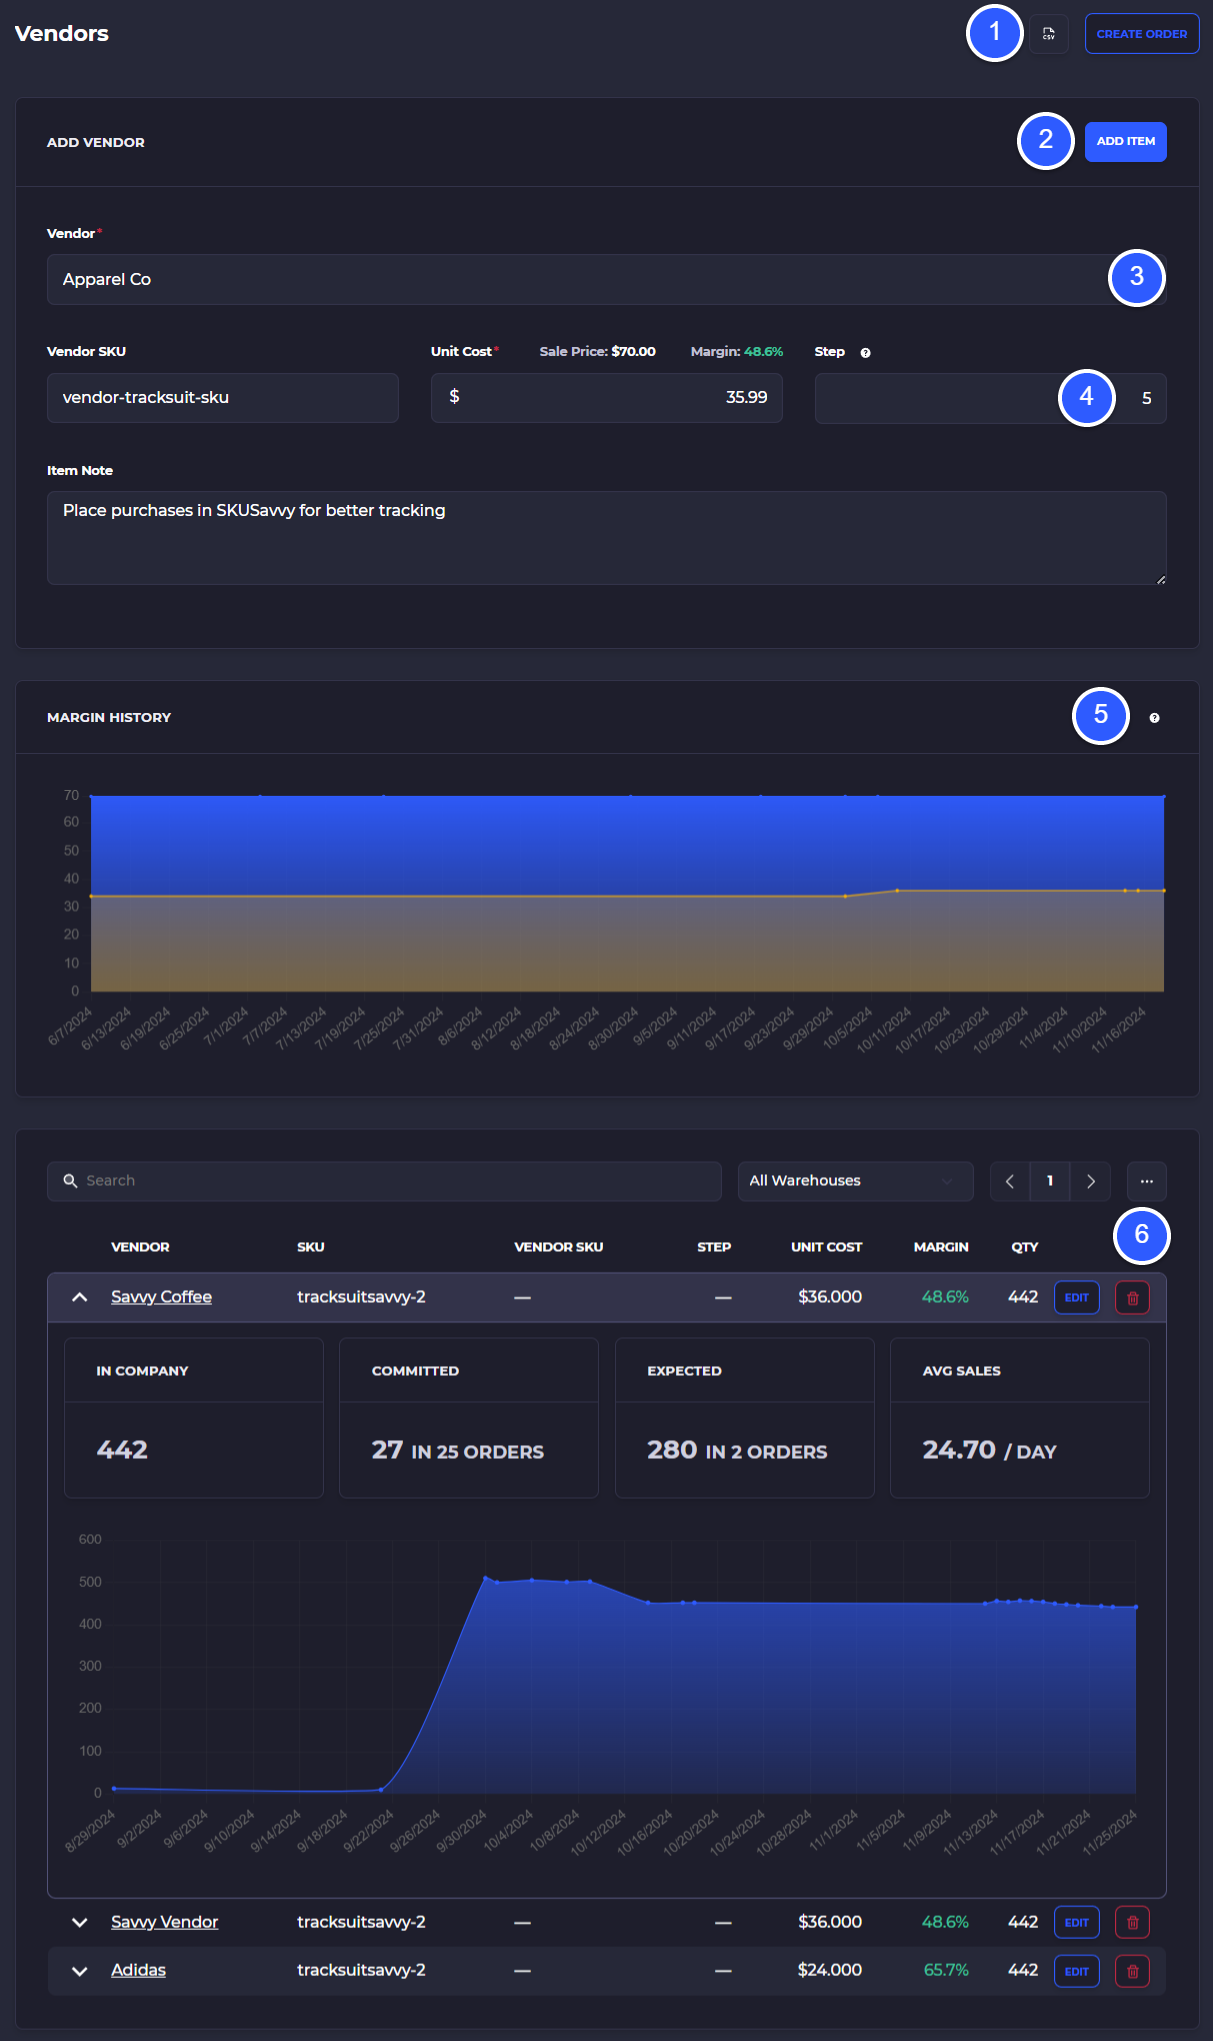
1) Export vendors and the cost details for a specific variant. Create a new purchase order
2) Add a new vendor to any product variant
3) Select a new vendor for this variant, add a vendor SKU, unit cost and item note shown on the variant during PO creation
4) Add a step count which will force a purchase in a multiple of this step count
5) View margin history over time
6) View existing vendors for the variant or make edits to the vendor variant relationship
Variant Options
If you've set up products on Shopify with their variants, this information will come straight over to SKUSavvy, variants, and options intact.
Adding product variants with multiple options can be achieved by clicking into a product, and adding options directly on Shopify. Say you have size as an option, and want to add color, you would 'Add Option' and title the option 'Color'. This now appears on all variants of the product so it can be available as a fulfillment option. You can set this up with any type of option such as size, weight, carat, unit, etc.
Barcodes
Every product variant must contain a barcode for it to be acceptable as a product throughout the fulfillment process. IF YOU DON'T HAVE A BARCODE go here:
You can also assign any pre-generated barcode to the product for situations that you may have a box of 1000 widgets and want to use one barcode on the outside of the box to scan this product.
To add a barcode go into a variant of the product. Once there you will see the option to 'Enter Barcode' or 'Scan Barcode' which will enable you to enter a barcode manually or using the phone's camera to scan the barcode of a variant and attach it to the product.

Entering a manual barcode will require you to select the correct format of the barcode from a dropdown. By scanning a barcode the system will detect the barcode type and the barcode will show up on the product.
NOTE: changing the barcode of an item on Shopify will create a new recognizable product barcode in SKUSavvy by default. You can change this from the configuration to swap the existing barcode
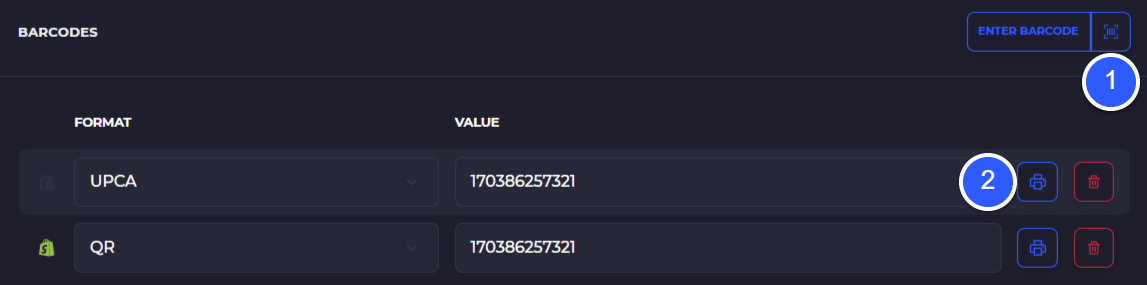
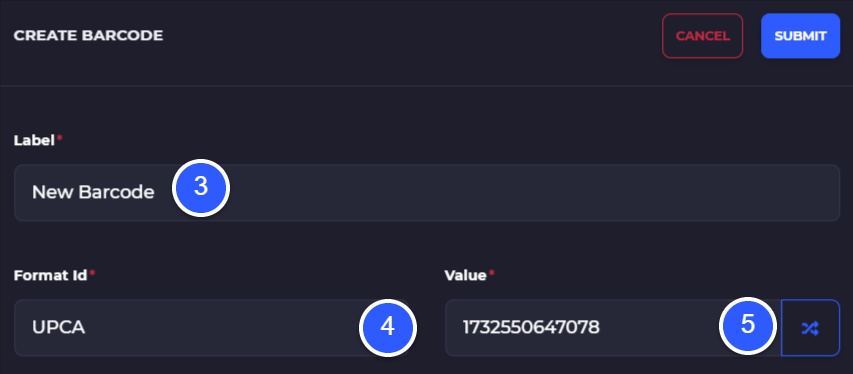
1) Enter or scan a new barcode to assign it (via the barcode icon) to the product
2) Print your barcode, or delete the barcode
3) Enter a label name for the barcode
4) Select the format for your barcode, the value must match the requirements for the format (QR is most lenient)
5) Enter the barcode string, must match the type of format selected for the barcode
Hint: QR codes are the most forgiving and will accept any data type, you can use this internally for the system for ease of use
Add Barcode from Scan
Using the 'Scan Any Barcode' feature you can detect any related information within the system or assign a barcode to either a product variant or bin. The Scan Anything button is located in the bottom left on computer, or within the bottom nav bar on mobile which will bring up the camera. Or, if you are using a hardware scanner, go to any screen that does not expect a scan (PO check-in, pick batch, etc.) and make the scan.
Once you scan a barcode that is unknown, you will see a screen where you can assign it to a product variant or bin.
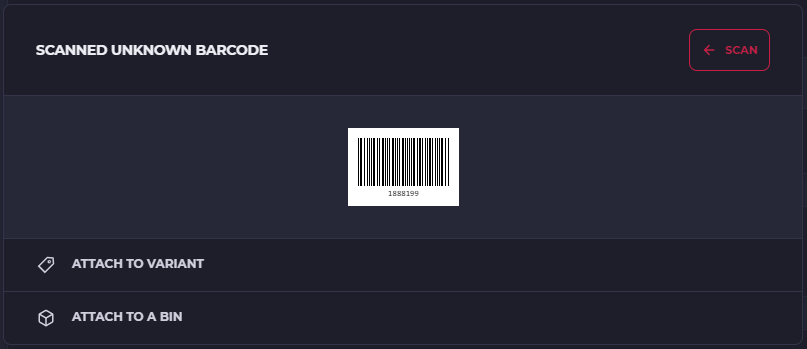
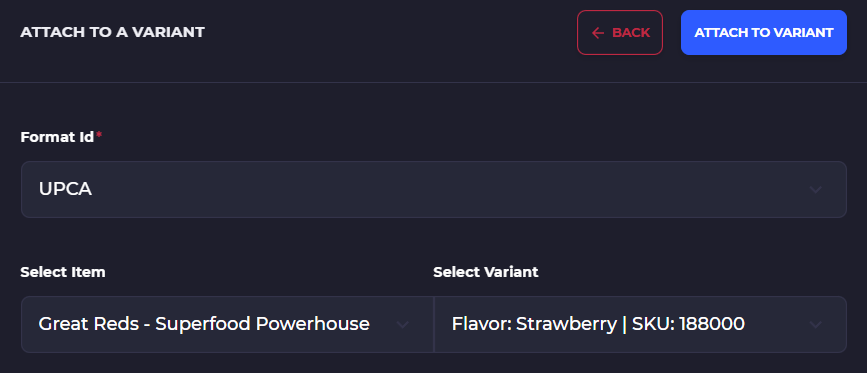
Now when you select 'Attach to a Product' it will enable you to select the product, and attach the barcode. Your next scan should pull up the product information. You can assign multiple barcodes to one product.
Backordered Product
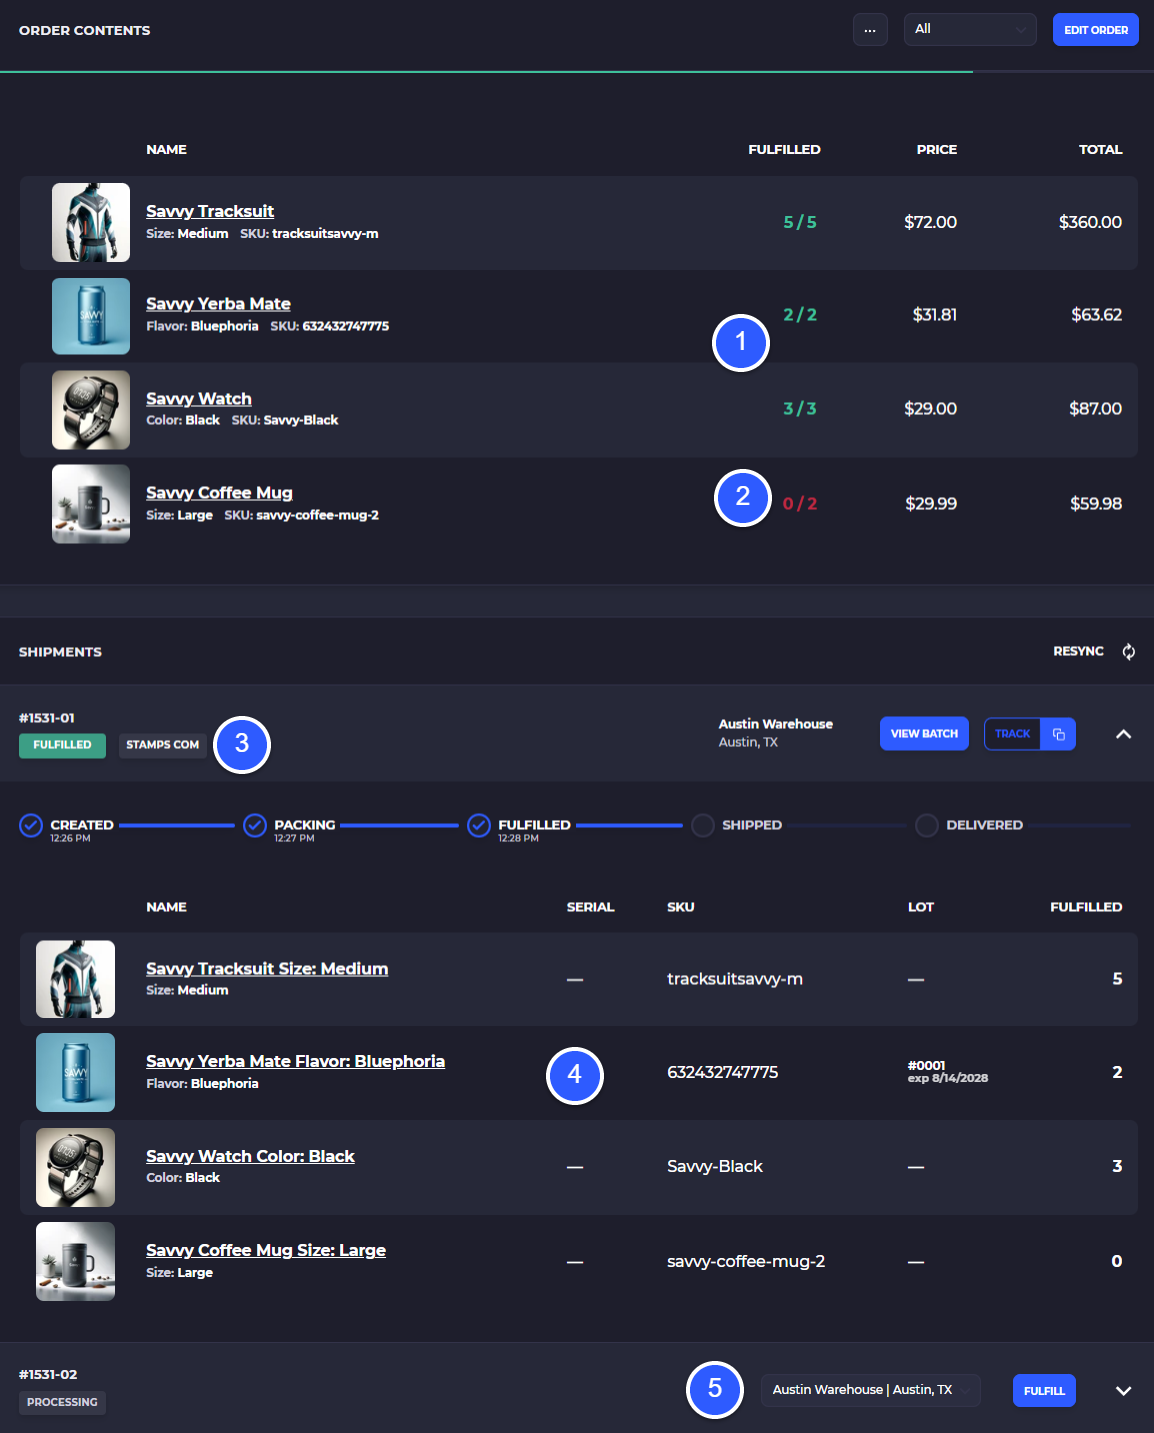
Backordered items prevent the shipment of an item. With this engaged, any orders coming through your Shopify or other eCommerce stores will need to be split into two shipments during fulfillment. The first shipment will handle available items to fulfill. The second shipment will remain open until the product is back in stock, at which point the orders will open back up and enable the fulfillment of the item.

Back-ordered products will be fulfilled and updated in Shopify or other eCommerce systems as two shipments.
Backordered products are unable to be picked and you should create two shipments within SKUSavvy so the existing orders in the system that were affected can be fulfilled once new inventory is checked in.
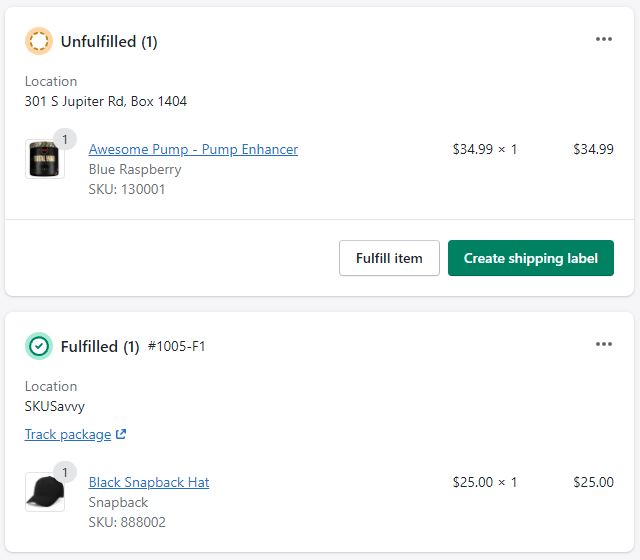
1) Within an order, you can view items that were not packed (in red), these are items that could have been on backorder
2) View items that were fulfilled in green
3)View the order number, and click on the shipment carrier lable to view tracking details
4) View items that were fulfilled as part of the split shipment
5) View and fulfill the secondary shipment created for when backorder inventory arrives
Inventory Levels
From the main admin once you select a product and go into a variant, that variant will have inventory levels available across all the warehouses currently holding inventory. You can view the levels, or click into an inventory level to view more specifics.
Inventory levels are associated with that variant, and within the inventory detail page you will see each warehouse location currently holding inventory for this item, as well as the bins within that warehouse holding the inventory.
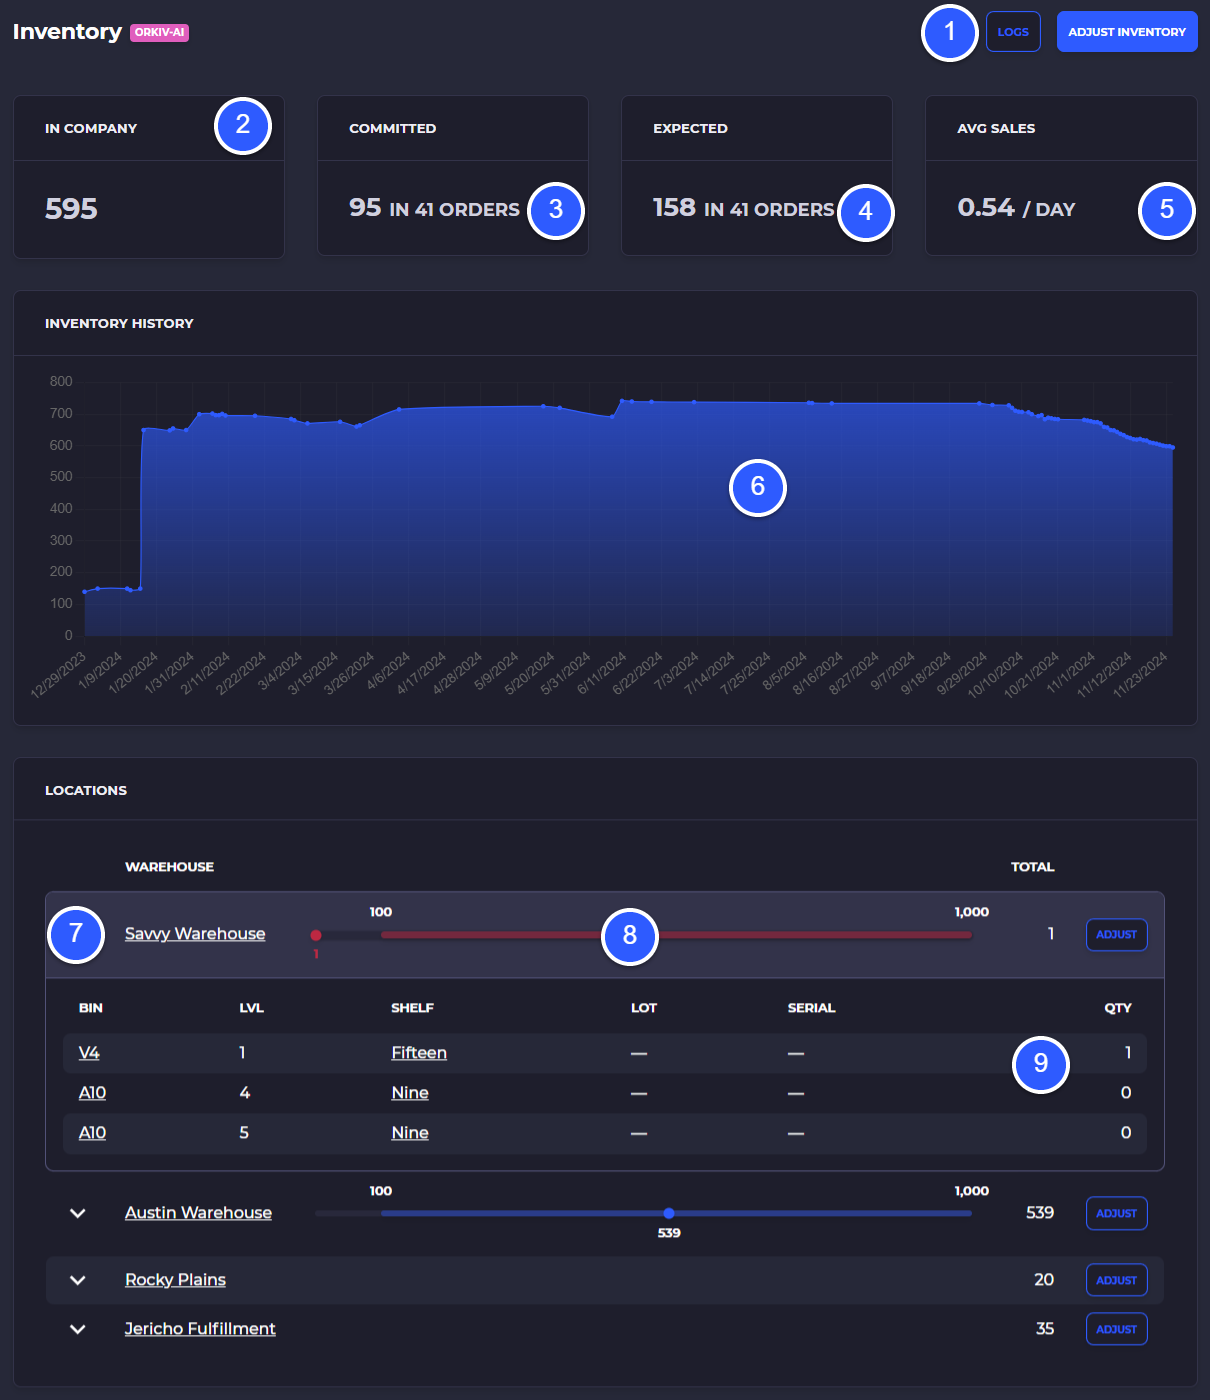
1) View inventory logs for this variant or make an adjustment
2) In company value is the total units available across all locations, inclusive of committed quantity
3) Committed inventory is the number of units for this variant promised to orders, tap on the committed value to view all orders this variant is committed to
4) Expected quantity is the number of units expected from purchase orders. Click on the expected quantity to view open POs on the variant
5) Average sales per day over time, tap on the sales/day to view a chart
6) A chart of the total inventory level for this variant over time
7) Tap the caret icon to pull down the individual bin locations of this variant at the shown warehouse
8) View the par levels for each warehouse
9) Individual bin locations and quantity currently held of the variant, tap on one to view
10) Click on adjust the make adjustments of this variant at the warehouse shown
Click on an inventory level for a specific warehouse location to reveal detail on the product such as total product available, in transit quantities, average sales per day, and individual location of the item in a warehouse.
Product Orders
By clicking into a variant you'll be able to view all orders associated with that variant. Click the menu on a variant, and select 'Orders' where a list of all past orders for this product will show up.
1) Indicating that to view this you should be within a product > variant then clicked on orders from the left hand menu and select between outbound (online), inbound, or transfer orders
2) Export all orders for this variant
3) View order history over time on a chart
4) View the status of each order, click on an order record to view order details
5) View the order details including ID, customer, warehouse it was fulfilled from, and the created at date of the order

Kitting
Putting several products together to form another item is called kitting. SKUSavvy enables you to kit products together so they can be picked as part of your normal fulfillment operations. Each kit is a recipe holding how many and of which products will go into creating another product.
Supported kit types:
1:1
1 to many
Many to 1
Many to Many
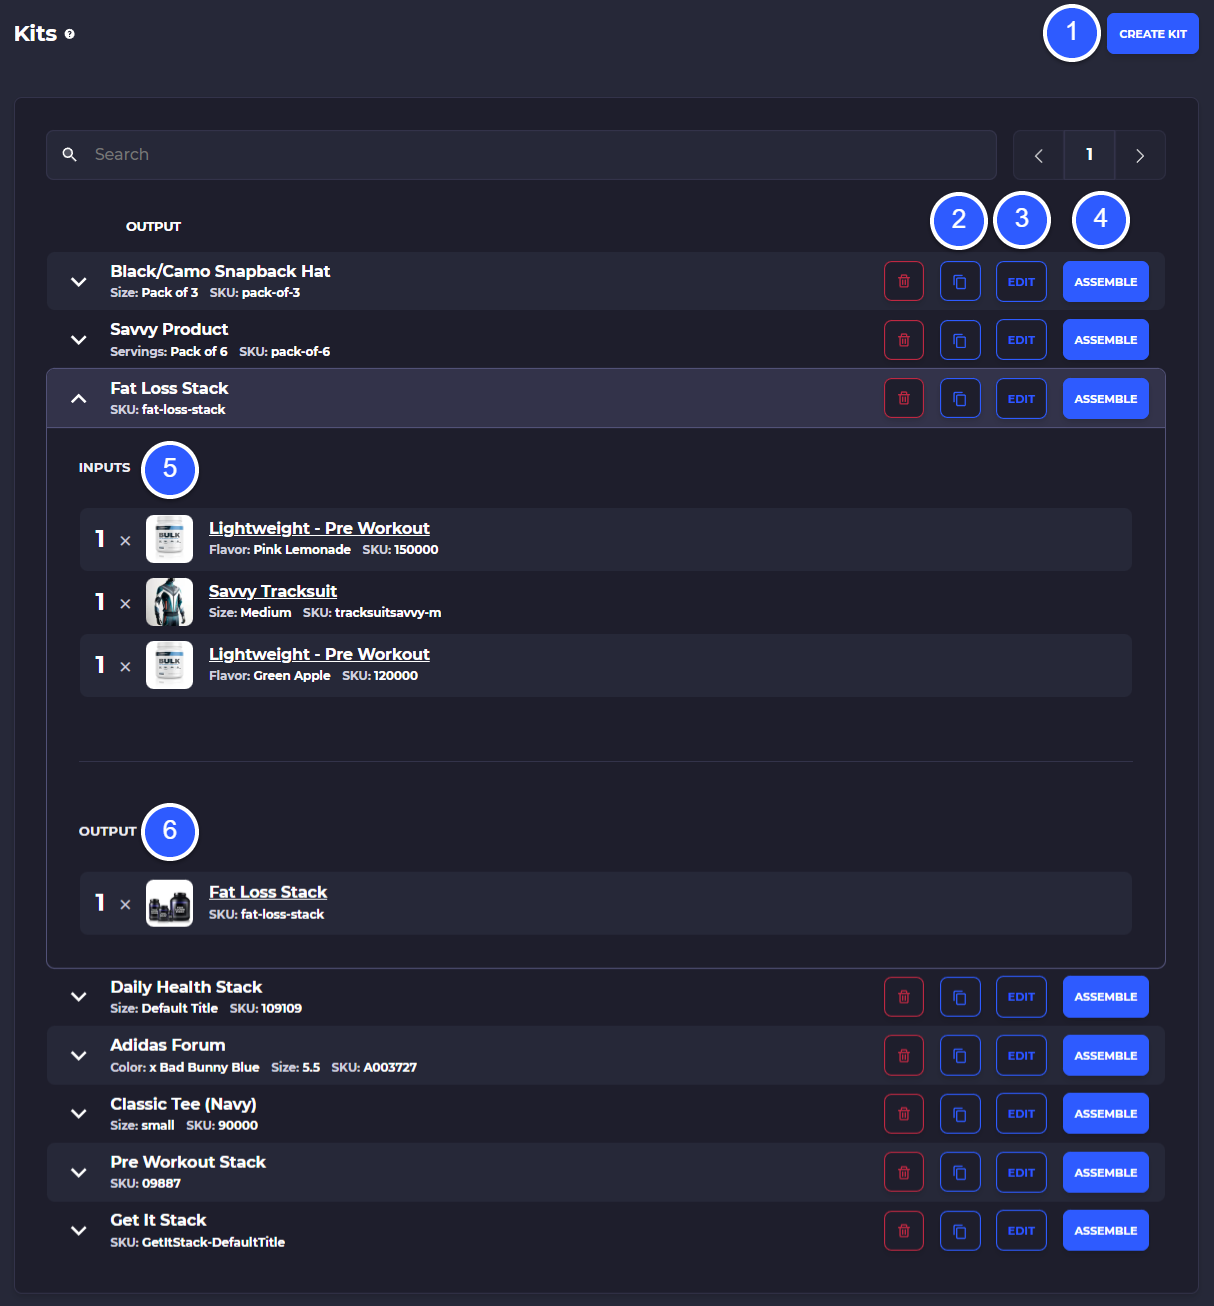
1) Create a new kit (Home > Products > Kitting)
2) Create a copy of an existing kit
3) Edit an existing kit
4) Pre-assemble the kit
5) View kits and tap on the caret icon to dropdown the kit recipe to view inputs and outputs
6) View the output of a kit
Once you create a kit you'll enter the ingredients (Inputs) and the product to create (Outputs). Within this kit, you can have multiple quantities of one item in the recipe, for instance, three of widget A, two of widget B, and one of widget C that makes up Widget Z.
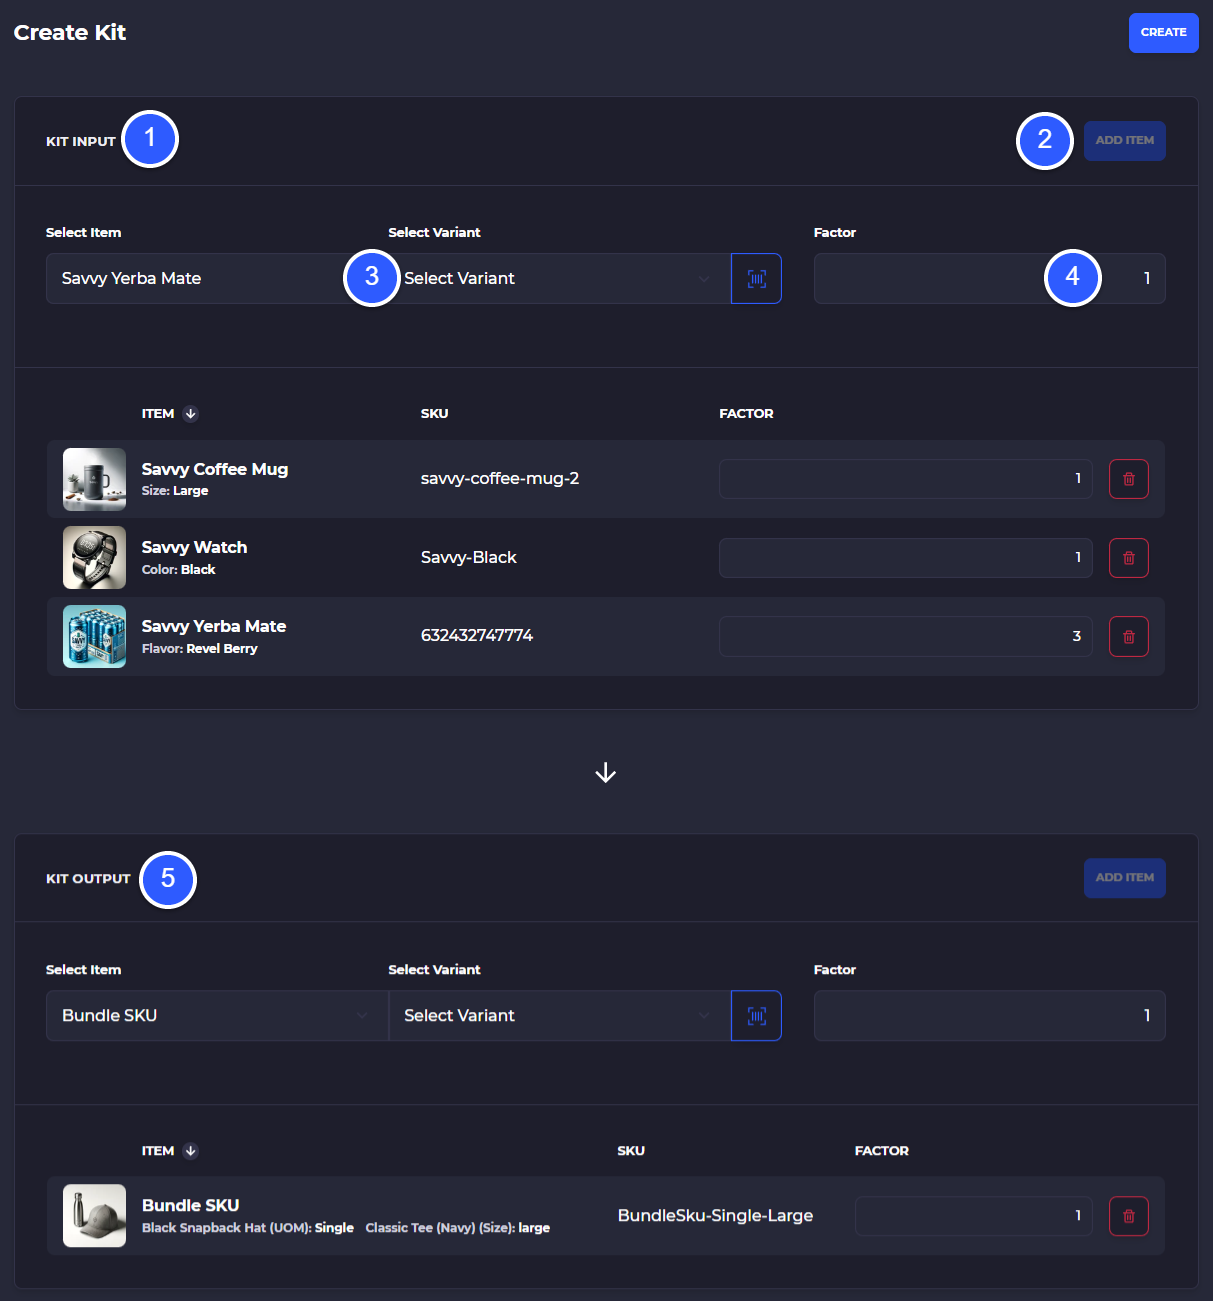
1) Kit inputs are the products that will make up the finished kit, these are the parts of the whole
2) Once an item is selected as an input, add the item to the input side of the kit creation
3) Select an input item from your product catalog
4) Select the factor for this item. This is the number of units required for this input to make a completed kit
5) Kit output is the finished kit after all the inputs are converted. Select the outputs the same way with a factor that represent how many of the output will be made when all of the inputs are converted
Once created, your kit will be available as a product that can be picked and assembled in any warehouse as well as during any pick batch if the batch requires a kit that has not gone through a conversion yet. Simply click on the 'Assemble' button and select the warehouse you want to assemble the kit in. Note that you will need to have inventory available for all the input components.
Units of Measure
Due to lack of of usage and the complexity to maintain units of measure SKUSavvy no longer supports this feature in favor of step counts on the purchasing side. Step counts enable you to set up required purchase quantities with your vendor such as 10 units in a case, so the step being 10 would force you to purchase in increments of 10 with the specified vendor.
Bulk Add Dims and Weight
You can add dimensions and weight to products within SKUSavvy from your product list. Filter products by search, price, tag, type and more to apply dimensions only to those products matching your filters.
1) Enter the filter criteria from your product list to narrow down which products you want to add dimensions/weight for
2) select the 3-dot menu in the top right
3) Select 'Bulk Edit Items'

4) View criteria being included for bulk dimensions
5) Set dimensions and unit for dimensions
6) Set weight and unit for weight
