Lots and Expiration Dates
Using lots and expiration date tracking within SKUSavvy provides workflows to store perishable items and ensure you have full traceability.
What is Lot Tracking?
Lot tracking is a method of recording that tells any party along the supply chain which production run finished goods are part of. Since all items within a specific lot are tracked throughout the warehouse, it's important to have traceability for any given lot. When a lot is checked into a warehouse, it's movement around the warehouse is tracked, so that at any time a lot of items can be removed for regulatory and safety or other defaults.
Video Overview
Enable Lots & Expiration Dates
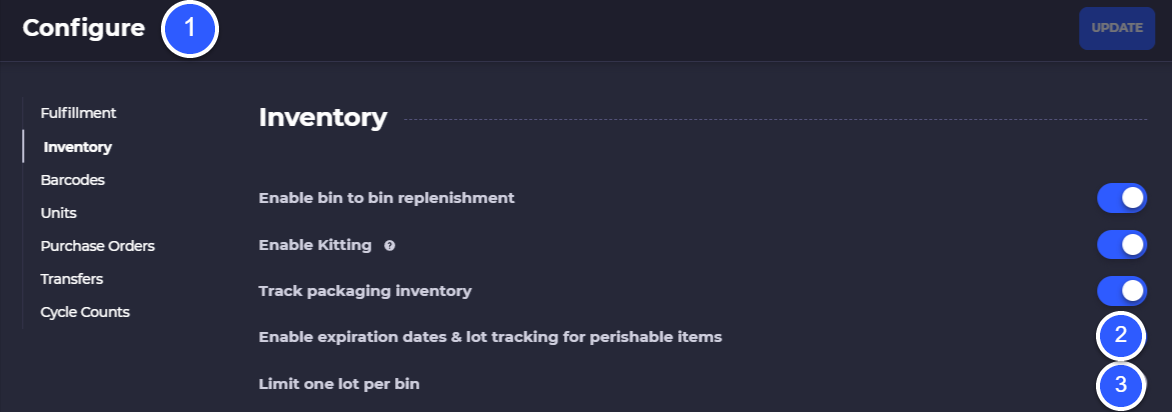
Within SKUSavvy you will need to enable lot tracking and expiration dates within your company toggle settings under Properties > Configure.
1) Go into your company configuration settings
2) Enable lot tracking for perishable items
3) Optionally turn on a setting that requires each lot for one item to be in a separate bin when turned on
Perishable Items
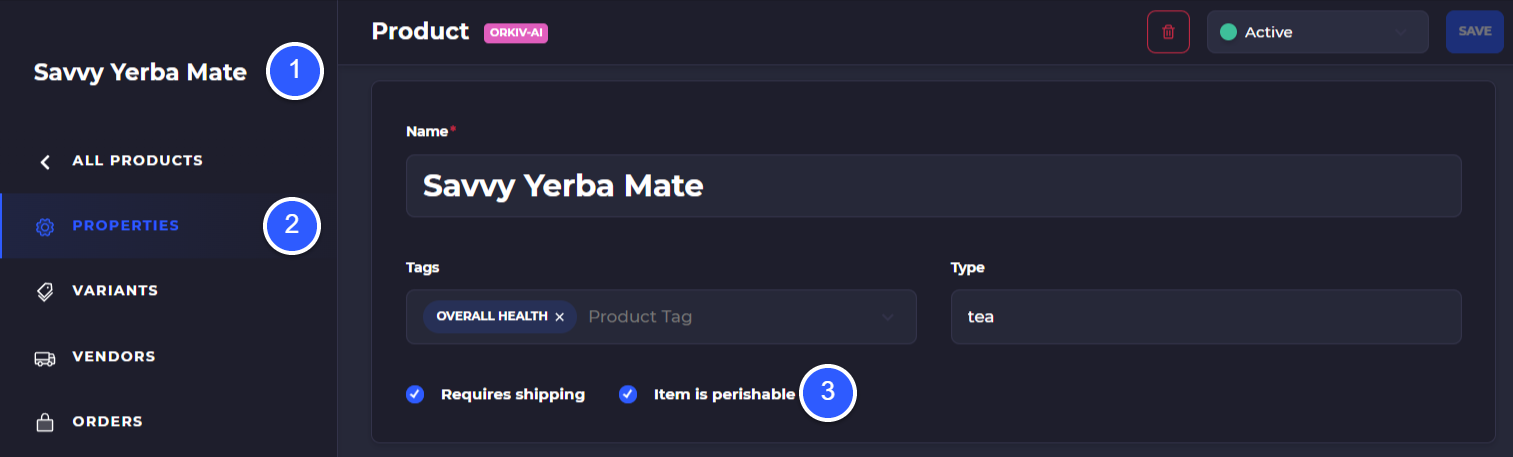
Once you've enabled lot tracking and expiration dates SKUSavvy will have a new option shown on products 'Perishable Item' which can be found on any product. Any product variant that is perishable needs to have this option selected for lot tracking to work properly.
1) Go into the product you want to on the perishable flag for
2) Select the product properties (ensure you are not looking at a variant, this is held on the product level)
3) Tap to mark the item perishable
SAVE
Assign Lots & Expiration Date on Check-In
To start the process of lot tracking and assigning expiration dates to new lots that enter your warehouse from a purchase order, create a purchase order in SKUSavvy - go into a Warehouse > Orders > Inbound
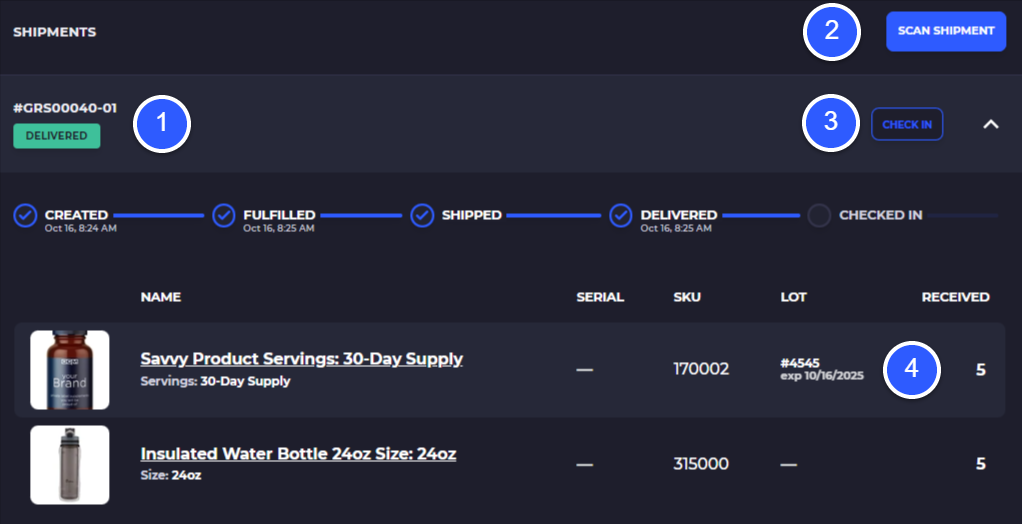
Now when the items arrived to their designated warehouse you can click on the PO containing your perishable items. Once in the order, you will see the details and the ability to 'Scan to Shipment' or 'Check-In'.
1) Purchase order details and status
2) Scan Shipment enables you to scan a document from a supplier, advance shipment notice, or any other barcode for the shipment
3) Check-In takes you straight into the order check-in process without a barcode assigned to the inbound order
4) Items currently checked in on the order with supplied lot information during check-in
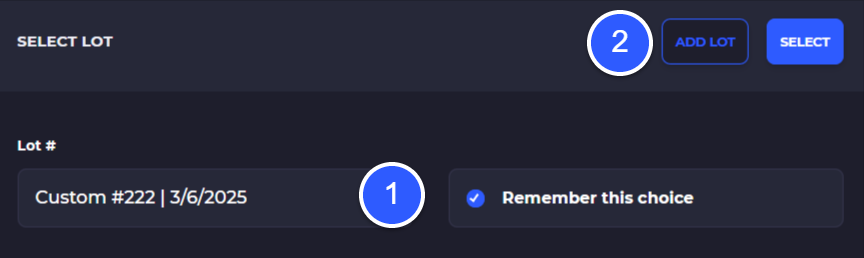
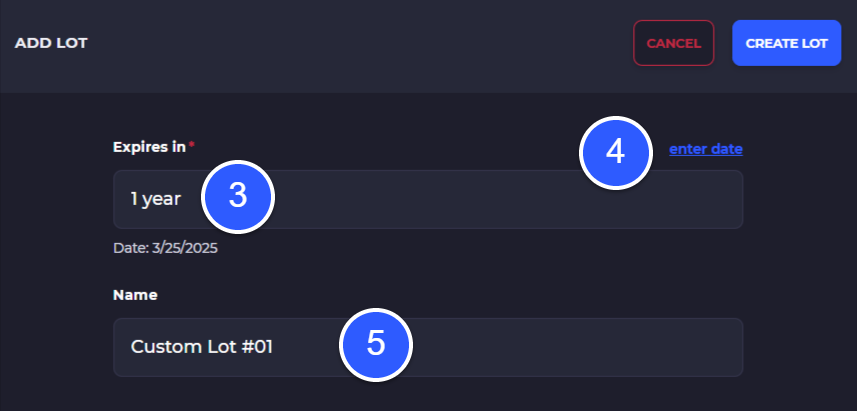
Once you've selected one of the above options you'll be brought to the check-in screen, where you can select 'Scan Item' which will bring up the camera to scan your barcode. Upon scanning and confirming the item count, a screen to enter the lot # will be shown. You can select an existing lot, or create a new one at this stage.
1) Search or select a previously used lot number (optional)
2) Create a new lot number and expiration date for this item within the purchase order (or on an ad-hoc inventory adjustment
3) Enter the expiration date in a written format
4) Enter the expiration date in date format
5) Enter the lot name/number
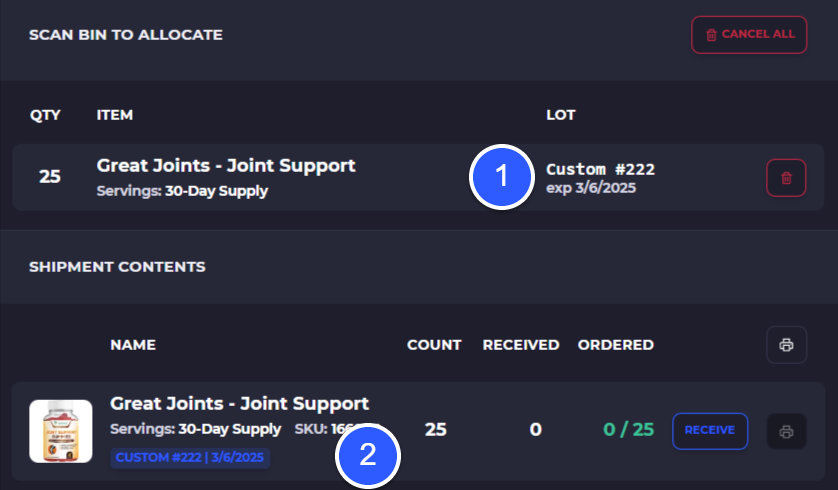
Now your item is counted and assigned a lot number with an expiration date. Next, this item needs to be allocated to your inventory somewhere within a bin location.
You can optionally turn on a setting to require each new lot for the same item to be placed in a separate bin location
1) Number of items within this batch that were scanned in. Click to show details
2) Allocate quantity received to a bin location via scan
Lot Traceability
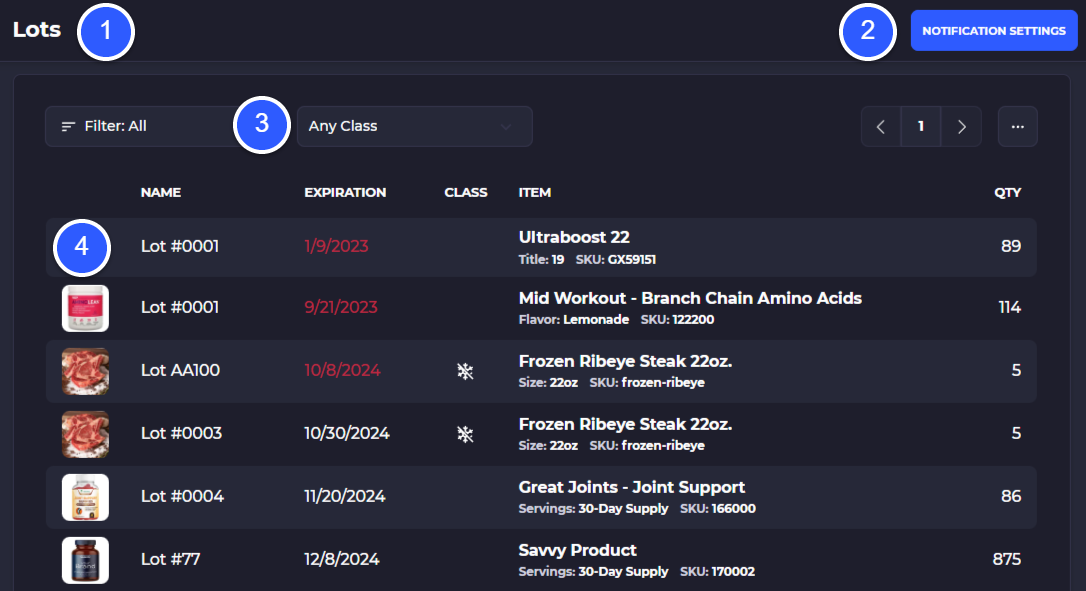
Finding all items contained within a lot around the warehouse is made easy within SKUSavvy by clicking into the Inventory > Lots module. It will show all individual locations of a lot located in bins or areas around your warehouse.
1) Go to your Inventory > Lots
2) Set up notifications to receive XX days before expiration
2) Filter by a range, expired, or all
4) Select a lot to view locations it is currently stored within SKUSavvy
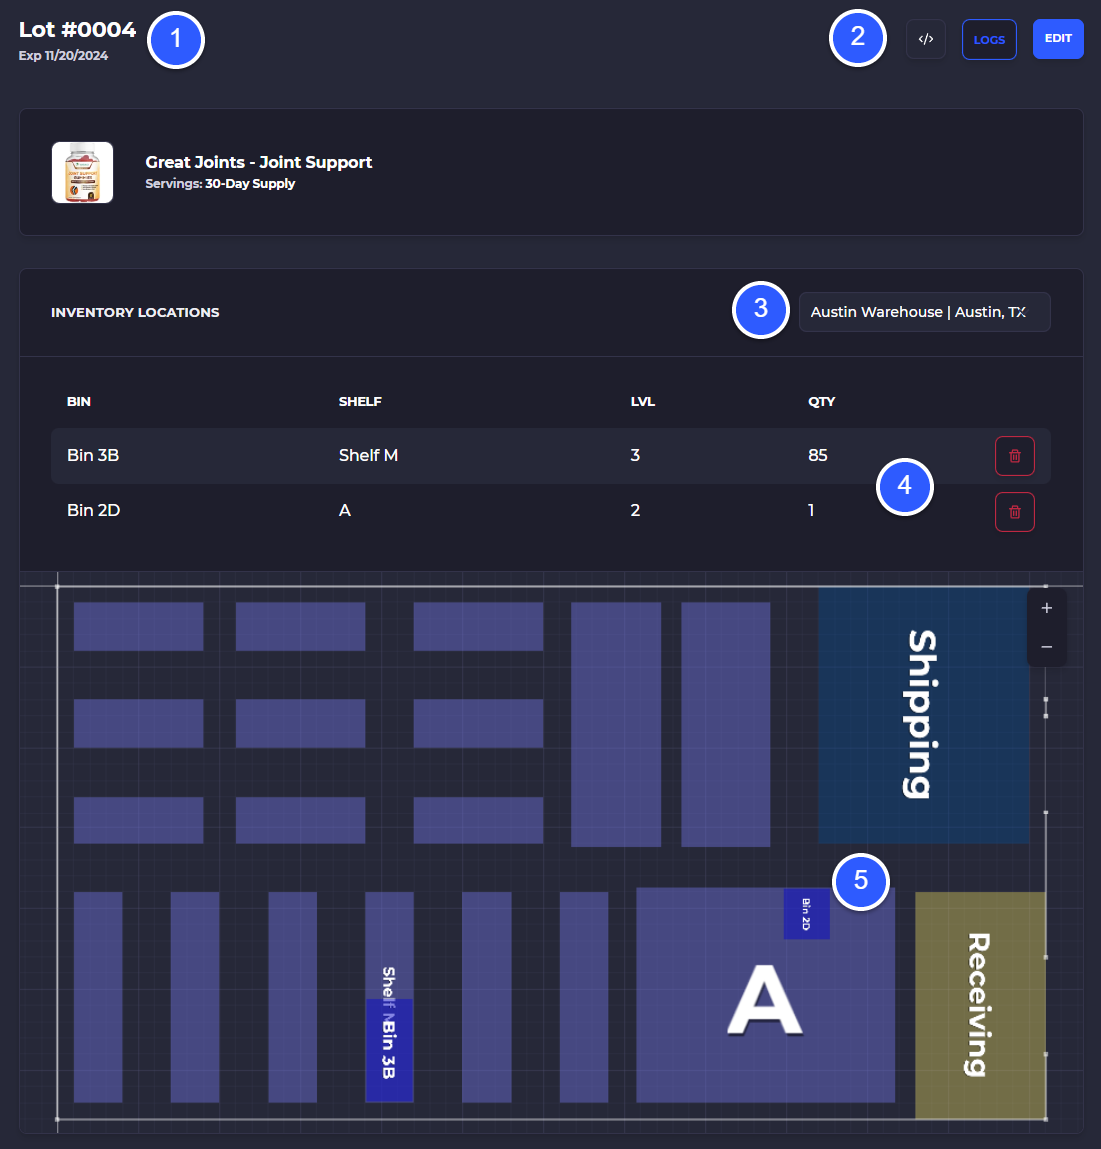
When you click into a lot you'll see each individual location on a visual layout of that particular lot and the expiration dates associated with it.
1) View the lot number and expiration date, you will see an alert if the lot has expired
2) View the logs for this lot to narrow down which orders were shipped containing this lot, here you can also add metadata or make edits to the lot
3) View different warehouses containing this lot
4) View lots for this item across different bin locations within the current warehouse and delete the different bin locations containing the lot
5) Bin locations holding this lot within the warehouse
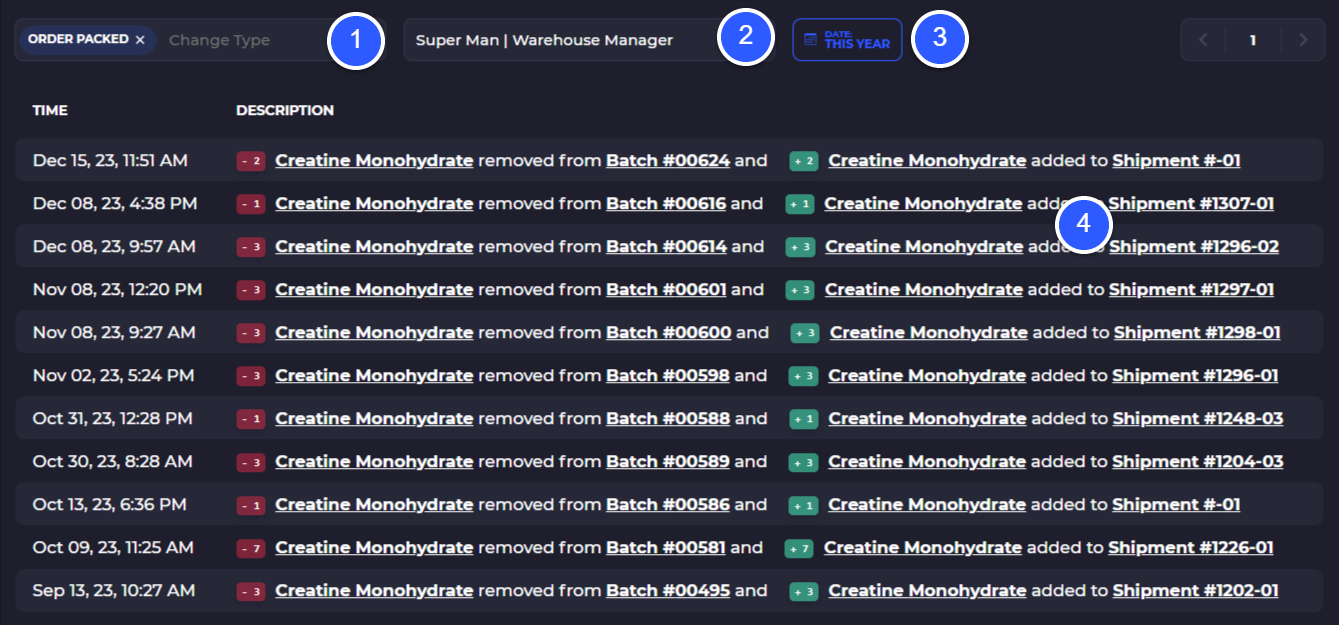
Recall Orders by Lot Number
If you need to recall a specific lot you can view the logs to retrieve all shipments created for a lot.
Go into a lot, then view logs to sort by orders
1) Sort by the 'Order Packed' to show all shipments made with this lot number included
2) Optionally narrow down the employee who made the changes
3) Narrow down the date range for the shipments made
4) Click on a record to view information including shipment number
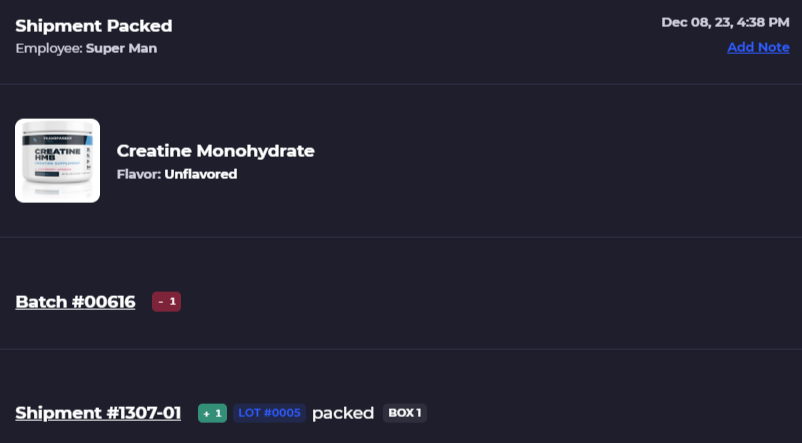
When you click into the record, all details are shown, with underlined wording being clickable to view that specific data
Related Docs
Inventory Allocation
Deploy your inventory to bin locations, make adjustments, and scan inventory in
Understand Purchase Orders
Learn how to create POs, check that inventory in, and allocate to bin locations