Purchase Orders & Check-in
How to create purchase orders within SKUSavvy then confirm the purchase order and check-in your inventory against the purchase order.
Purchase Orders Overview
Using purchase order management within SKUSavvy enables streamlined workflows and automated ordering of quantities. Here are some of the benefits of placing purchase orders in SKUSavvy WMS:
Creation of the PO: SKUSavvy WMS makes it easy to create purchase orders. You can create a purchase order from scratch or import an existing purchase order. SKUSavvy WMS also allows you to track the status of your purchase orders so you know when they are expected to be delivered.
Vendor portal for purchase order confirmation: SKUSavvy WMS includes a vendor portal that allows vendors to view and confirm purchase orders. This helps to ensure that there are no misunderstandings about what is being ordered and when it is expected to be delivered.
Check-in options: SKUSavvy WMS offers a variety of check-in options. You can check in items manually, by scanning barcodes, or by using a handheld scanner. SKUSavvy WMS also allows you to track the status of your check-ins so you know when items have been received and when they are ready to be put into stock.
Check-in scans: SKUSavvy WMS allows you to scan barcodes to check in items. This helps to ensure that items are checked in accurately and quickly.
Inventory allocation: SKUSavvy WMS allows you to allocate inventory to purchase orders. This helps to ensure that items are available when they are needed.
PO discrepancies: SKUSavvy WMS allows you to track PO discrepancies. This helps you to identify and resolve any problems with your purchase orders.
Replace Shopify Purchase Orders
SKUSavvy is meant to fully replace the purchase order workflow within Shopify and most other systems. Since SKUSavvy is a closed loop system it handles all tasks end-to-end along the entire inventory and warehouse management, fulfillment and replenishment lifecycle.

If you insist on still using Shopify purchase orders, note that you will still need to manually resync the inventory from Shopify within SKUSavvy, and then allocate the new inventory from your purchase order to bin locations.

SKUSavvy is the best replacement for Shopify purchase orders since it fully syncs all inventory added in real-time back to Shopify according to the location it is brought into.
Purchase Orders Video
Set Up Vendors
To create purchase orders you first need to set up vendor/product relationships. Your vendors hold products and the costs associated with that vendor. When you create purchase orders you will first select a vendor, then select the products to order from that vendor.
Create Purchase Orders
You can create purchase orders from several different places within SKUSavvy. Create your purchases from one of these places within SKUSavvy:
From the inbound orders table
From the vendor profile by clicking into 'items' on a vendor
From within a warehouse under orders > inbound
From within a product detail within the product vendors
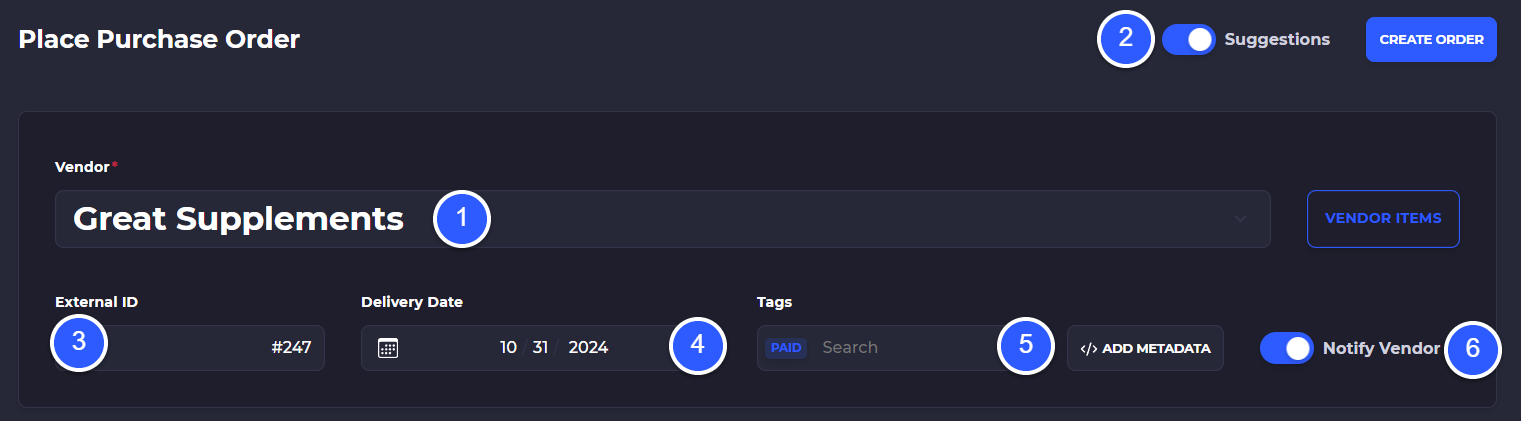
Select Vendor to Purchase From
1) Select a vendor to initiate the purchase order
2) Enable replenishment suggestions powered by min/max inventory par values, on-hand stock, committed stock, expected inbound stock, sales volume and lead time
3) Add an external (vendor) ID for the PO
4) Select a desired delivery date for the PO (show in the vendor portal when vendor communication is turned on)
5) Add tags and metadata to the purchase order
6) Optionally toggle vendor communication on/off for this PO
Filter Products to Purchase
1) Select all warehouses or a single warehouse to show stock for. Checkbox to show only in-stock items or all items
2) Select a sales date range for consideration in the automated replenishment suggestions. Apply the suggestions from the automated replenishment
3) All all matching filter criteria to the purchase order
4) Import the purchase order items for the specified vendor selected
5) Toggle between grouped and flattened item list view
6) Purchase order filter criteria
7) Scroll the filter bar over to expose more filters such as tags, price
8) Paginate or enter a page to show those items in the list (by default SKUSavvy shows only 25 items per page)
9) Items listed according to filters

Add All Filtered Products to a Purchase Order
If you click on 'Add All' SKUSavvy will automatically add an entered quantity to the products matching your filters. For example, if you filter to products with tag 'New' and between price $9.99-$100 and click 'Add All' you can select a quantity and SKUSavvy will enter that quantity for each of the products matching that filter.
1) Quantity you want to add to all products
2) Choose what to do if the quantity has already been added to the purchase
3) Add all to complete the action

View Item Forecast & Detail
If you have automated replenishment set up on your inventory items, SKUSavvy will show an option to 'Apply Suggestions' which will set the quantity to purchase
1) Click on an item to pull down details on that item
2) View the SKU, current inventory, unit type, cost (flattened list view shown)
3) Enter the quantity you want to purchase
4) Current inventory and min/max par values for the item
5) View item details such as on-hand (in warehouse) value, committed value (click on the quantity to view orders), expected inbound quantities (click to view), average sales

Place the Purchase
One you are satisfied with the purchase, you can complete the purchase to optionally send off the purchase to your vendor for confirmation, make order edits, or print the purchase order
PO Check-In
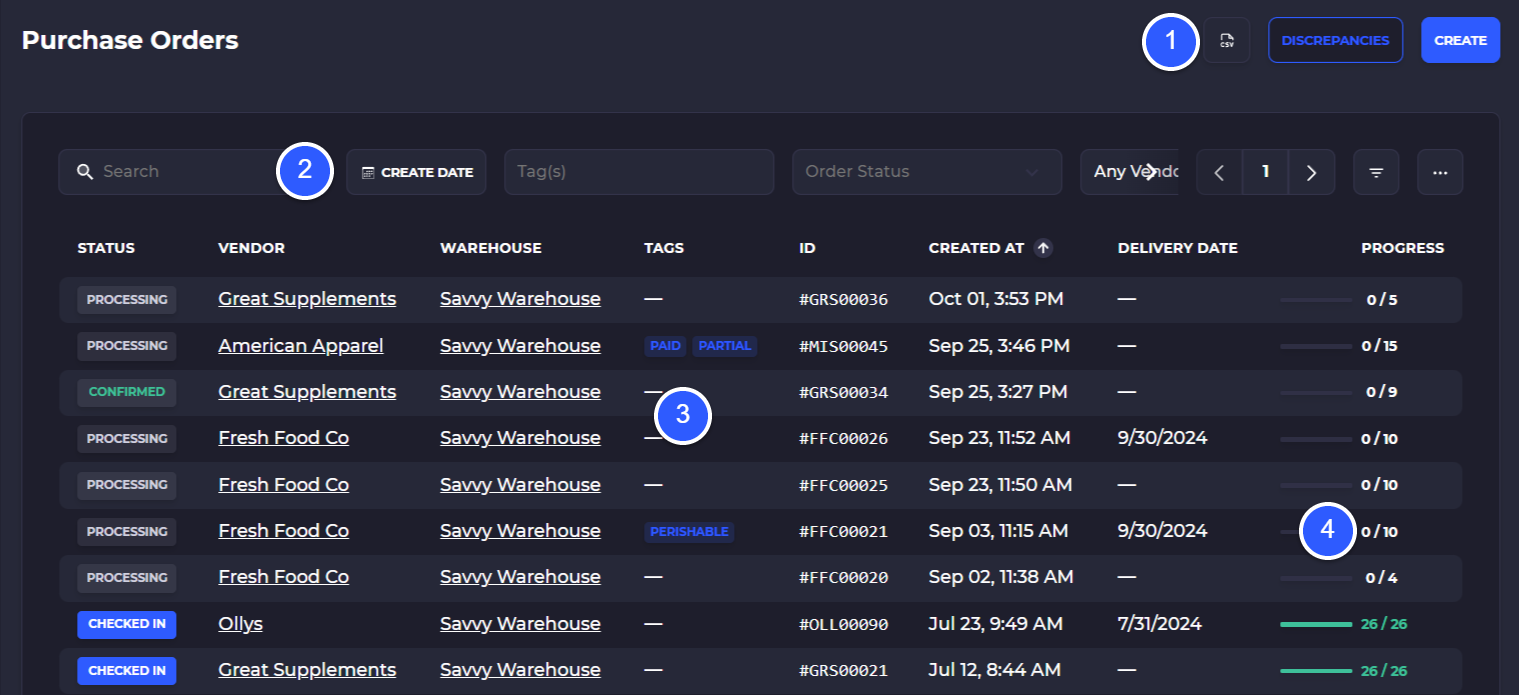
When inventory is received from a purchase order SKUSavvy check-in workflows enable you to count and allocate inventory to bin locations while also dealing with discrepancies. To initiate check in, click into the PO you want to check-in.
1) Export purchase orders and view past purchase orders that have a discrepancy between the quantity that was ordered and the quantity that was checked-in
2) Filter POs by date range, order status, tags, or vendor and save a default filter to the view so your table always loads with filters applied
3) Select a PO to view details
4) View the progress of the PO, hover over to show ordered vs. received quantities
Purchase Order Detail
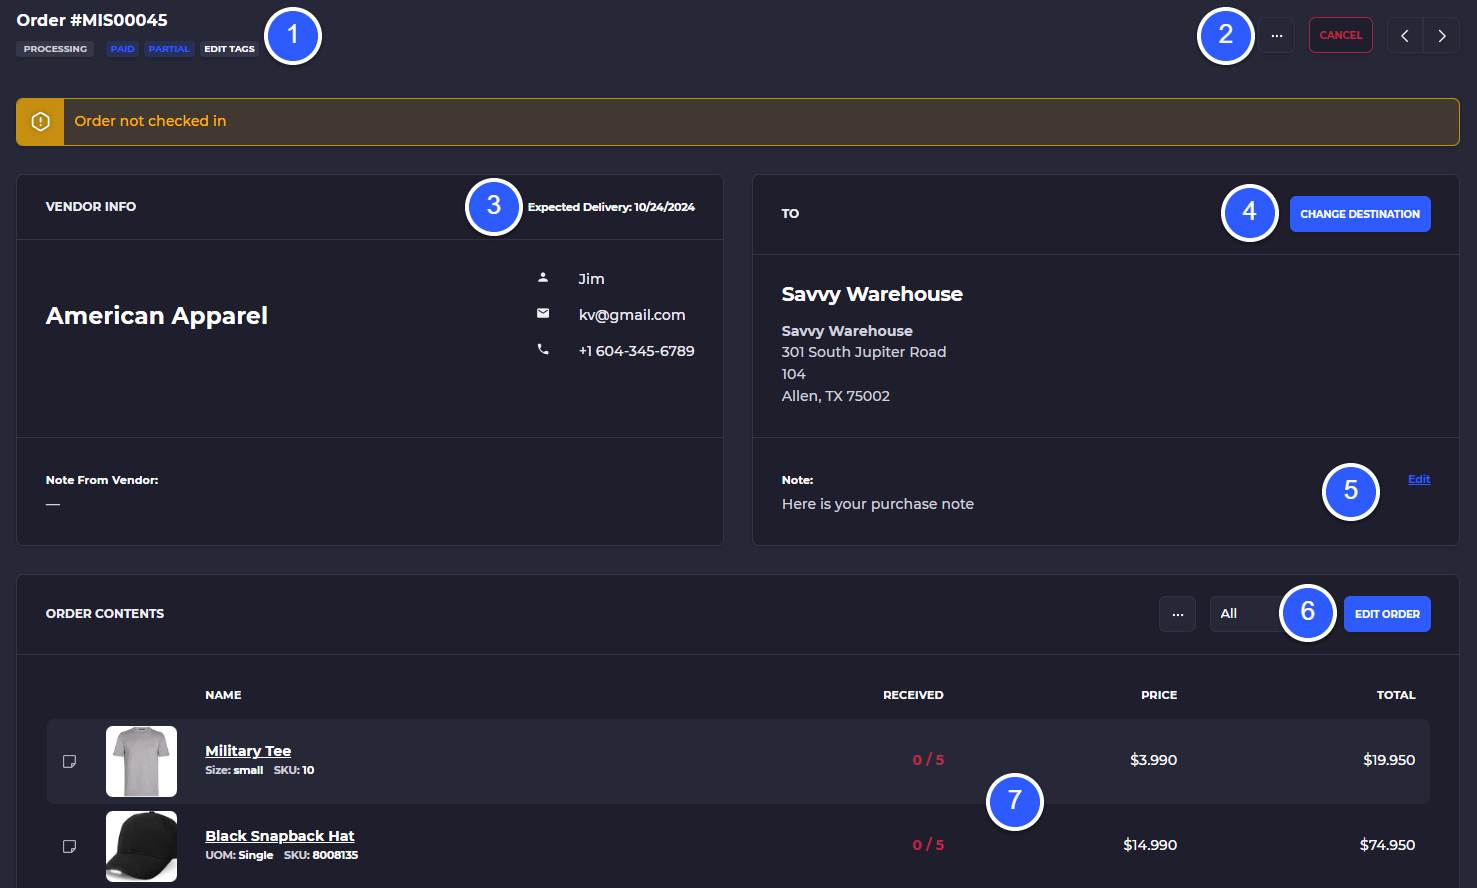
When you open the purchase order you'll see the information for the purchase such as the vendor, products and quantities and ability to edit or check-in the purchase order.
1) PO Number and order tags
2) 3-Dot menu showing options to: view PO logs, view order invoice, resend order invoice, duplicate PO, export PO. Option to cancel the PO
3) Change the expected delivery date of your PO
4) Change the destination address of the PO
5) Edit the note on your PO and view notes from your vendor (if using the vendor portal)
6) Edit the purchase order quantities and contents
7) Order contents and current status of the items being checked-in
Start PO Check-In
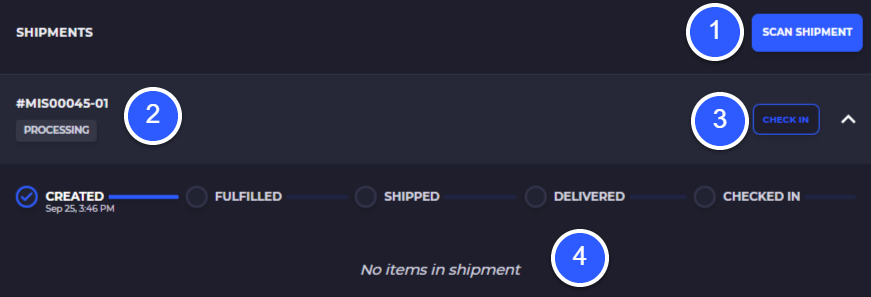
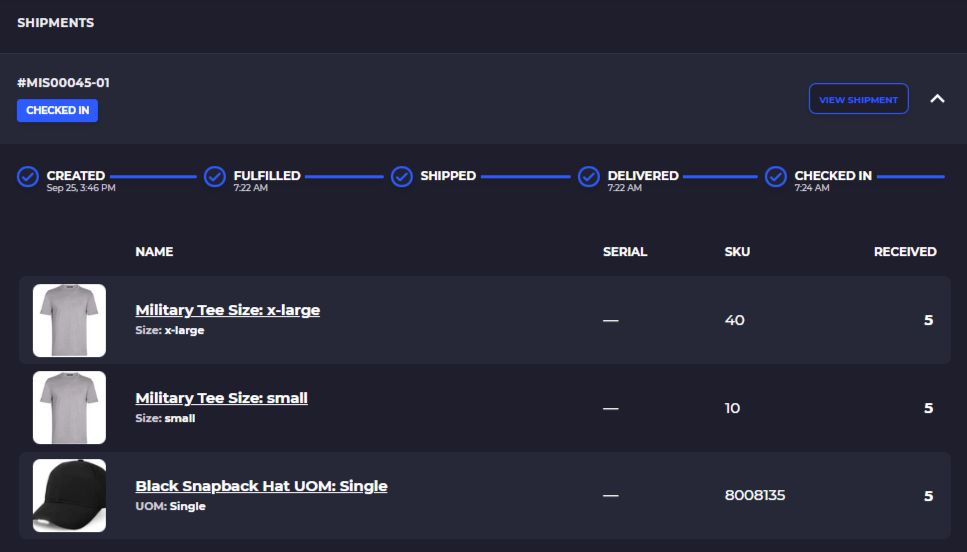
At the bottom of the purchase order are shipments related to the purchase order and a barcode scan to assign the PO with an ASN or other invoice from your vendor.
1) (optional) Scan the purchase order shipment to an ASN or other barcode so you can scan to come back to this exact PO
2) View the shipment ID for the purchase order
3) Check-in the purchase order - initiates the check-in
4) As inventory is checked into stock the timeline and items that have been checked in will be added to the shipment details
Completed PO Shipment Example
Scan and Count PO Items
This workflow enables you to count and check-in each item on the purchase order. There are several options for checking-in inventory. Once you've clicked 'Check-In' on your PO SKUSavvy will ask if you want to mark the order as delivered.

PO Inventory Count
1) 3-dot menu to bring up settings for check-in including: turning the layout on/off, showing the layout in 3d, turn on/off barcode scans, scan to bin on/off, enable printing, select a check-in label format
2) Assign the check-in contents to an area (marks the order delivered and places all contents in an area but does not enable the inventory to be pickable)
3) Current item(s) being received and the items that will be stored to a scanned/selected bin (must select 'Receive' on an item first for it to show here)
4) Current bin locations of the item being received
5) Print all item labels, or select the print icon next to a single item to print that item (must have already counted/received the item to print)
6) Item that has been fully counted and allocated to bins
7) Item that is partially counted, not yet received. Click on a counted quantity to make an adjustment to the counted quantity
8) Tap 'Receive' to count the contents and move it into the receiving action so it can be allocated to a bin
9) Scan or select a bin location for the current items being received

Check-In Settings
1) Turn on/off the layout
2) Turn on/off the 3d layout view
3) Turn on scans of the item to allocate (when using a barcode scanner, scans are contextual so no click are necessary you can simply scan an item, count, and scan to bin)
4) Scan bin to allocate instead of selecting a bin to allocate
5) After an item is scanned and counted this will immediately require a bin scan or entry to allocate
6) Ensure a single scan counts only for 1 unit
7) Enable printing of labels after an item is scanned/counted and allocated
8) Select your own custom check-in label

Remove Overcounted PO Quantities
If you've counted to many of an item on accident, SKUSavvy will let you remove that quantity from the PO. Once you have scanned to count the items if there is an extra quantity, simply click on the counted value and select the quantity you want to remove.
1) Tap or click the over counted quantity
2) Enter the quantity you want to remove (by default this starts at the total quantity counted)
3) Click 'Remove' on the modal box


Note that if you have already allocated stock from a PO into a bin there is no way to remove stock, so you should plan to go through a manual adjustment of stock
Allocation and Put-Away
SKUSavvy shows you a split screen view of the warehouse map and the PO contents so that you can see exactly where the items go within your warehouse at any time. You can select an item in the PO to view that items locations around the warehouse.
Click on 'Receive' to count the items in your PO and place them into the receiving area of the check-in. For an item that was already counted but has not been placed into a bin you can click on 'Allocate' to place that item and the quantity into the top part of the receiving interface so that it can be allocated to a bin location.
1) Click on 'Receive' to count the item on your PO and place it into the receiving position on the interface
2) If the item was previously counted but put-away was cancelled it will show with an 'Allocate' button next to it. Click on 'Allocate' to move it into the top for put-away
3) View the individual bin locations by clicking on an item record, these positions will also show on the warehouse map
4) View the counted, received (put-away), and ordered quantities for any item on your PO

Allocate Inventory from PO to Bins
As you receive and count the items on your PO, they will go into an allocation state above the item list. Any item listed in the allocation table will be allocated to bin locations in bulk. You can remove items and allocate them individually if needed.
When you've counted items on the PO the counted quantity become available for allocation to a bin, at which point the inventory is available for picking and added to your on-hand stock. You must have counted the stock first in order to allocate.
1) Items ready for allocation. You can add a single item or multiple items to be allocated although adding multiple items will allocate all items to the same bin
2) Remove an item from allocation, or you can cancel all items from allocation with 'Cancel All'
3) Scan or select a bin to allocate. If using a hardware scanner you can allocate all items simply by scanning a bin there is no need to press scan

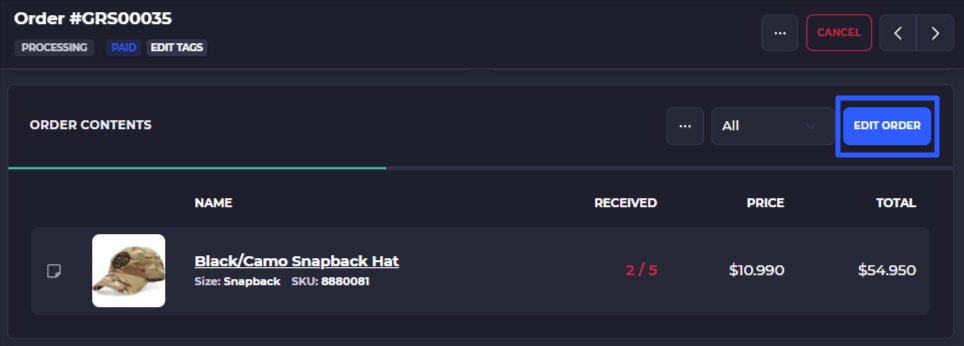
Edit Purchase Orders
You can edit any purchase order that has not already been checked in. To edit a PO simply click into the PO and in the top right click on 'Edit' which will enable you to adjust quantities or add items.
Check-In Separate Shipments on One PO
You may have vendors that send a PO in multiple shipments even though it is all part of one purchase order. This can be dealt with very easily in SKUSavvy by checking-in the quantity from the first shipment and completing this shipment which will open up a secondary shipment to continue checking-in on this shipment.
1) Once all the items from the first shipment are checked-in and allocated, click on 'Complete' to automatically create a secondary shipment for check-in
2) View the received, allocated quantities out of the total ordered quantities

Once you 'Complete' an inbound shipment SKUSavvy will open up the PO and show a secondary shipment at the bottom of the PO detail page.
1) View the previously checked-in shipment or reopen the previously checked-in shipment
2) Check-in a secondary shipment for the PO to go through the normal check-in process

Reopen a PO Shipment
If you've started checking in a PO and completed part of the shipment SKUSavvy will close that shipment out and open a new inbound shipment for the order by default for the remaining item quantities that were not received.

You can both reopen a closed shipment or continue on with a secondary shipment so long as the PO has not been fully closed out. To reopen a previous shipment simply go into the PO, scroll down to the shipments, and click on 'Reopen' which will bring you back into the previous shipment to continue checking in items.
Reopen Shipment
1) Click on reopen to bring you right back into the original shipment for the purchase order

Check-in Secondary Shipment
Secondary shipments act exactly the same as a normal check-in, simply click 'Check-in' into the secondary shipment. You will see the previous quantities that were checked in on the secondary shipment.

You can continue to check-in more shipments on a single PO and SKUSavvy will keep opening up a new shipment until the PO is closed out.
1) Next to the PO number is the shipment number, select the shipment number dropdown to toggle between the shipments
2) View the totals for the PO of what's been received vs. what was ordered

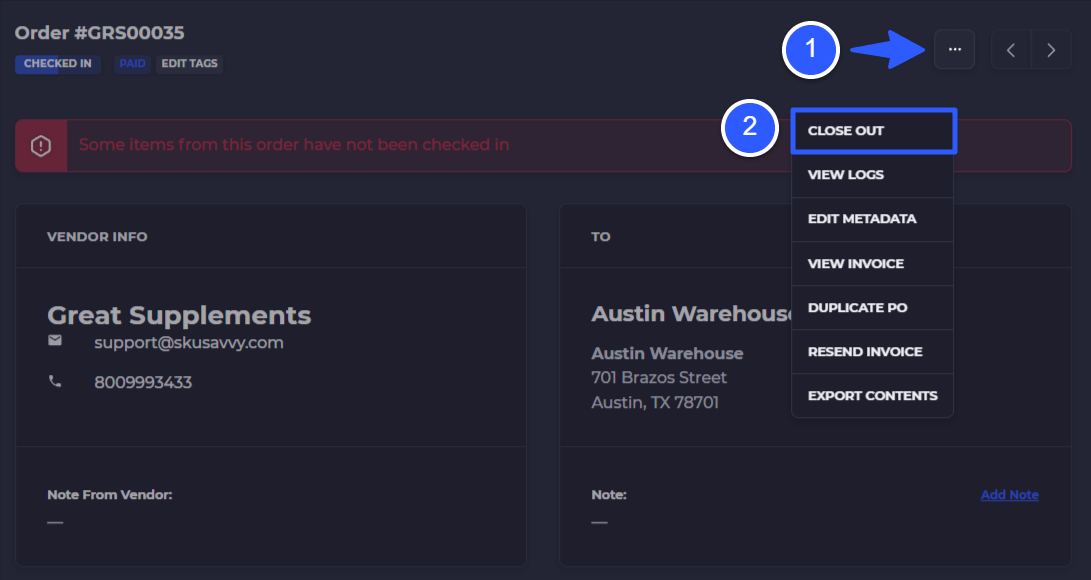
Close-out a PO and Record Discrepancy
If you've checked-in a PO but didn't receive all units you were expecting you can close out a PO and record the discrepancies. To do so, go into the PO detail (not check-in page) and click into the 3-dot menu. In the 3-dot menu list you'll see an option to 'Close Out' the PO. SKUSavvy will ask you if your sure and alert you that this will record the PO as one with discrepancies.
1) Click on the 3-dot menu
2) Click 'Close Out'

View PO Discrepancies
You can view all your POs that have a discrepancy recorded by going into your inbound orders and clicking on the 'Discrepancies' button.

Discrepancies only show you purchase orders that have been completed without all units being checked-in.

Set up Automated Replenishment
Set up SKUSavvy to make automated purchase order quantity suggestions based on current inventory, committed stock, expected stock, sales volume, and lead time.
Recommended Hardware
Leverage SKUSavvy to its full potential with the right hardware for printing and barcode scanning. These are the devices we've seen work the best for other SKUSavvy power users.
On this page
- Purchase Orders Overview
- Replace Shopify Purchase Orders
- Purchase Orders Video
- Set Up Vendors
- Create Purchase Orders
- PO Check-In
- Scan and Count PO Items
- Remove Overcounted PO Quantities
- Allocation and Put-Away
- Edit Purchase Orders
- Check-In Separate Shipments on One PO
- Reopen a PO Shipment
- Close-out a PO and Record Discrepancy
- View PO Discrepancies