Warehouse
Learn how to control the layout and storage of inventory around your warehouse then add inventory and move items around.
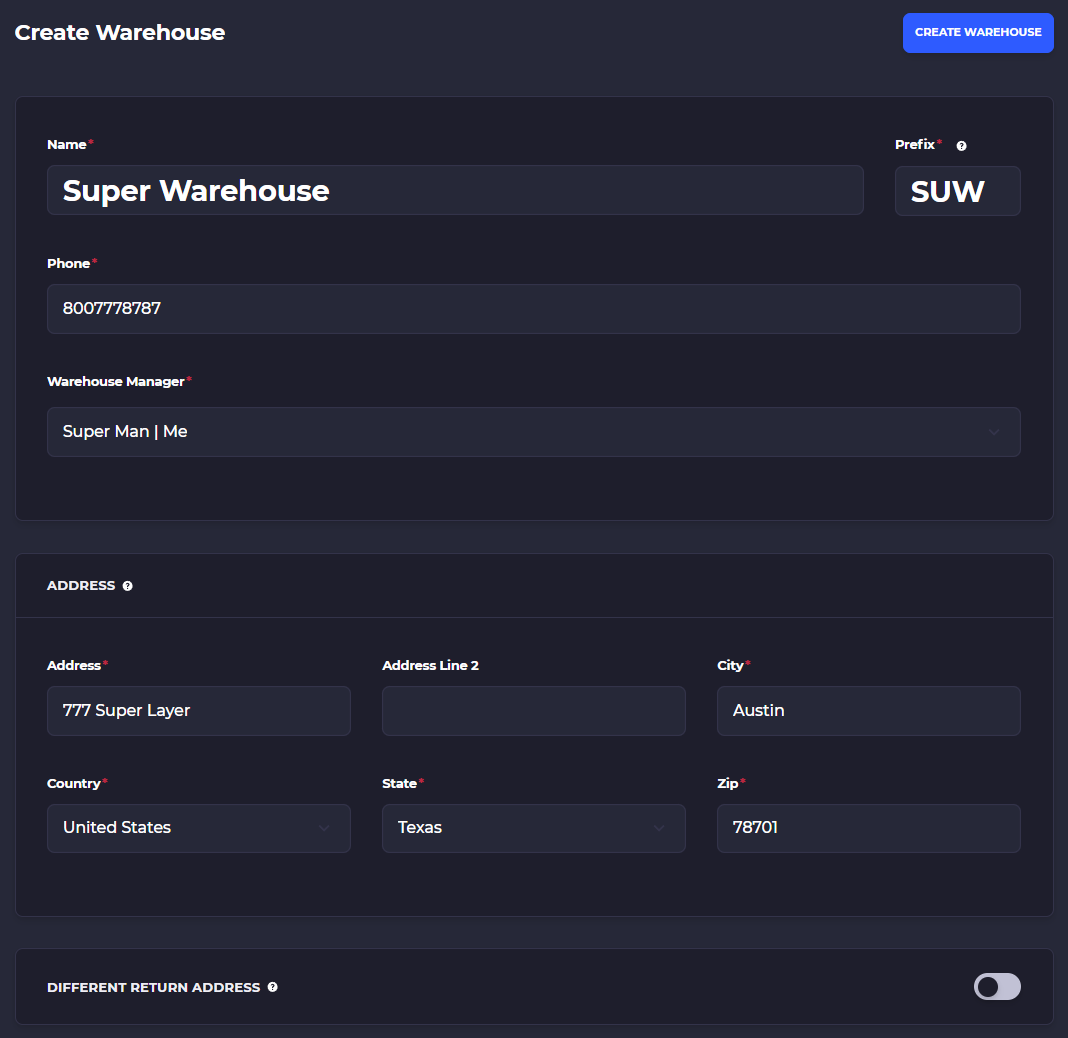
Warehouse Details
Each warehouse in your network will have independent data for employees, inventory, kits, orders, and transfers. Within the main warehouse properties settings, you will set an independent address, manager, and return address (optional) for shipping and management purposes.
Separate Return Address
Each warehouse within SKUSavvy has an optional return address, in the case that you are returning to a centralized warehouse. Enable this by checking the box at the bottom of the warehouse property settings.
A different return address changes the address printed on your shipping labels
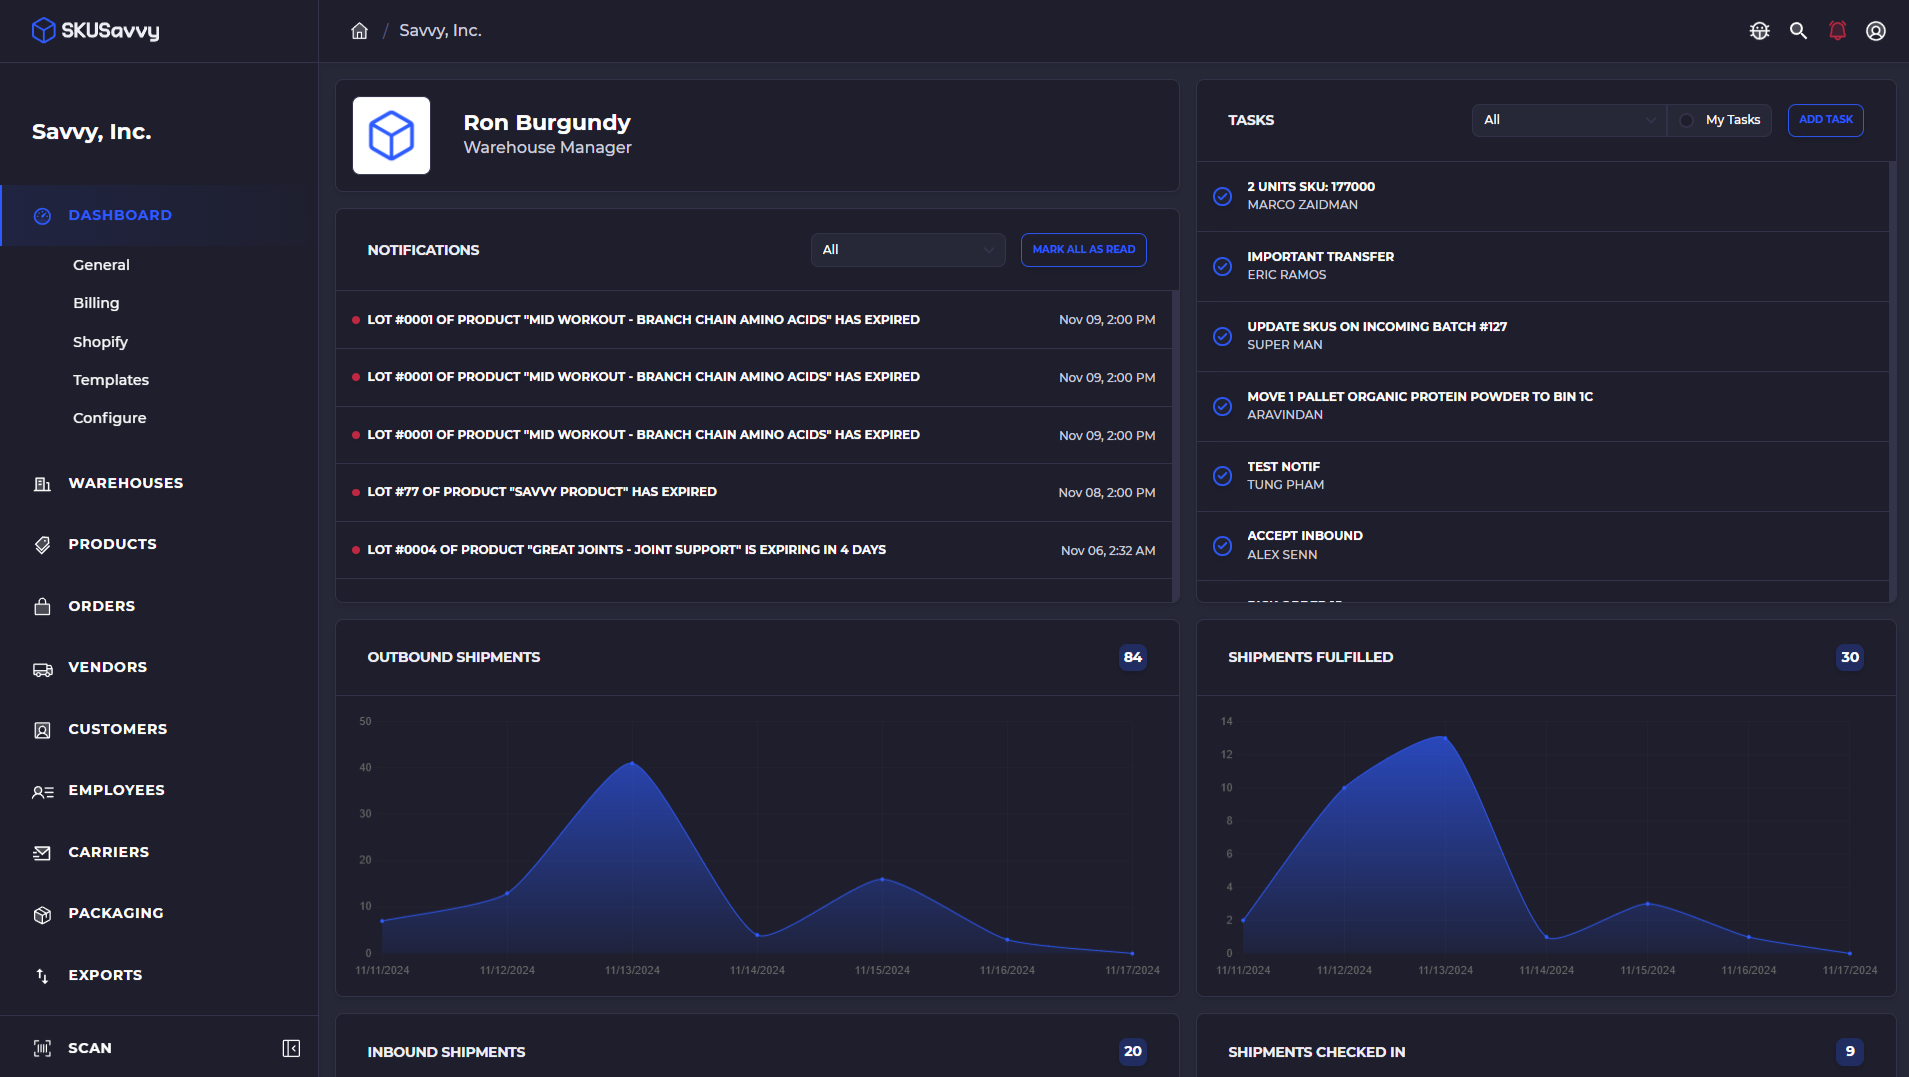
Company vs. Warehouse View
Important to keep in mind is the difference between the company and warehouse view within SKUSavvy. The company view holds all information across all your locations, stores, products, vendors, employees, inventory, orders, customers, and packaging. Within the warehouse view, only the information necessary for that warehouse is shown such as inventory, orders routed to the warehouse, employees assigned, packaging available at the warehouse. See the difference in each view below:
Company View
Notice the view below which is your main company dashboard. Important to note is the left side menu, which displays general information accross all warehouse locations.
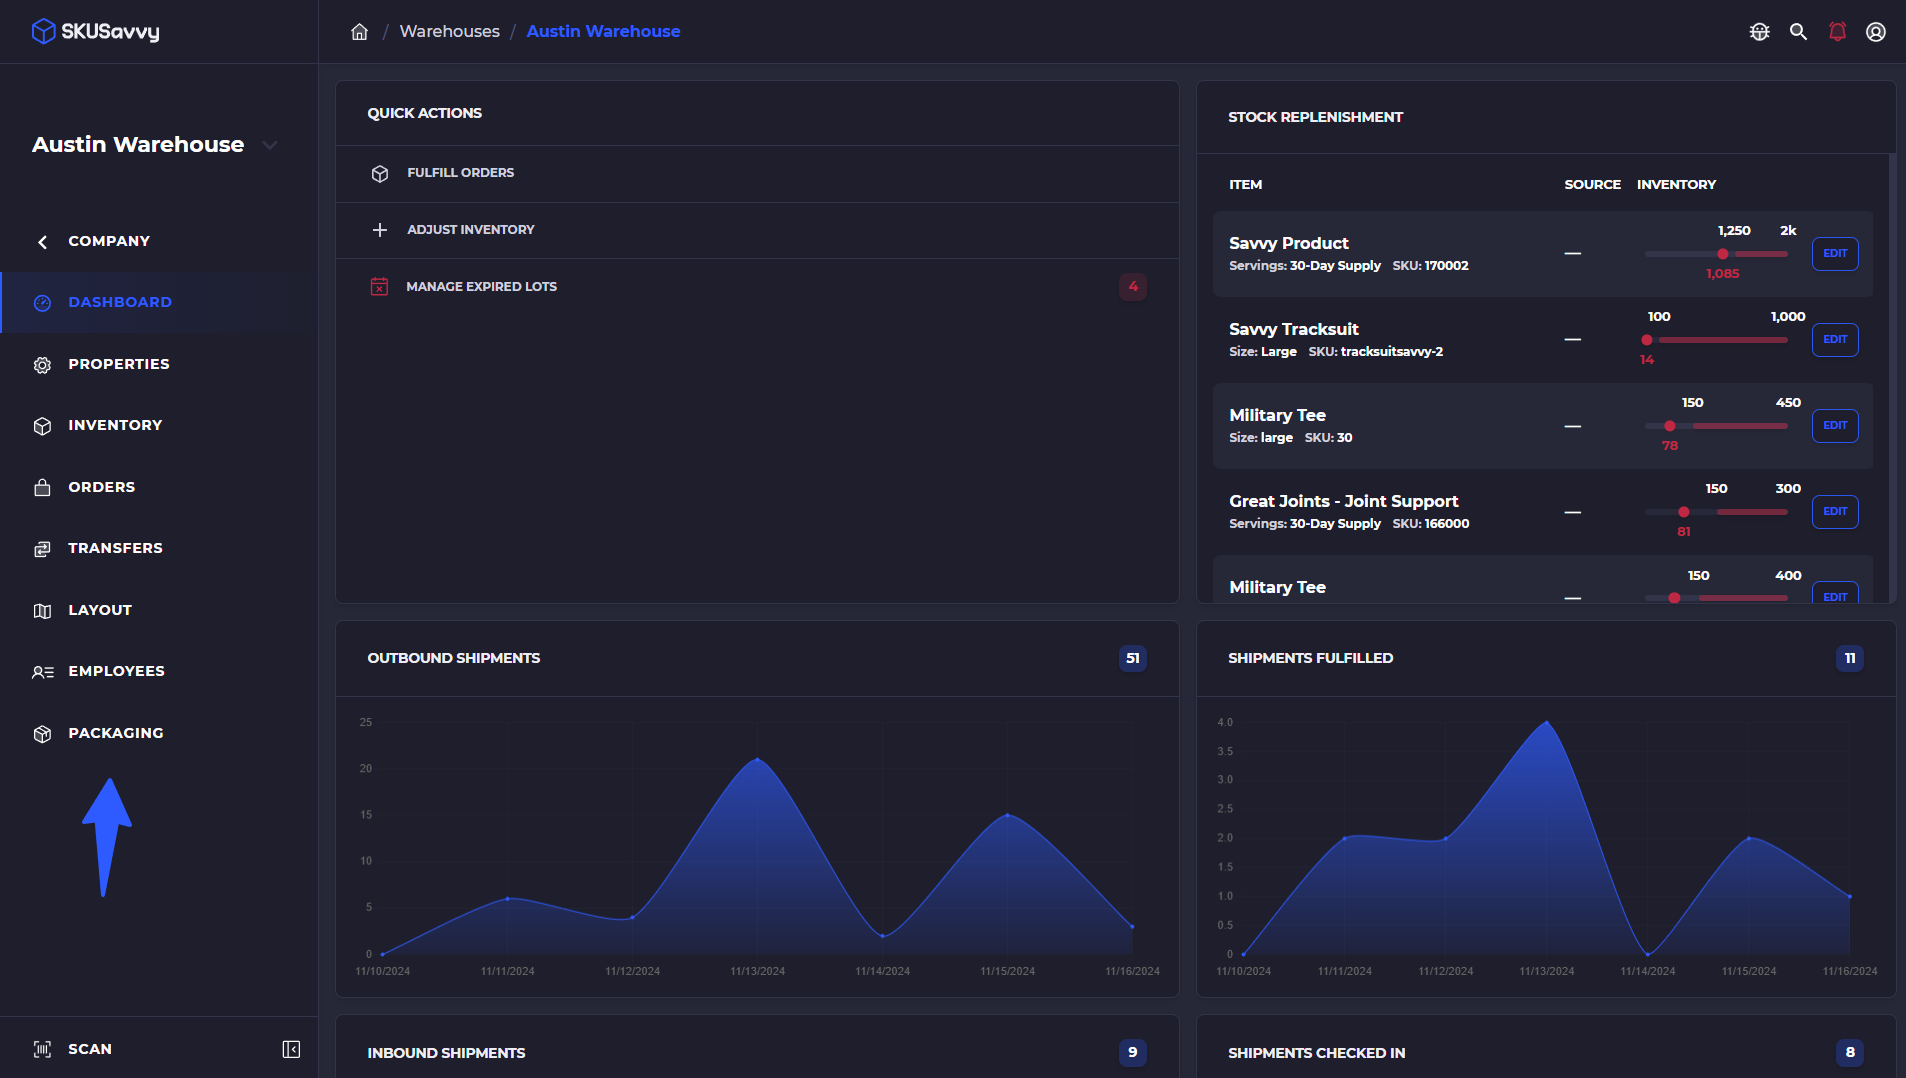
Warehouse View
See below the difference of the left menu as well as the warehouse name listed. This shows that you are now within a warehouse and all data shown is relevant for that warehouse alone.
Shopify Locations
When you connect Shopify each of your locations sync over as warehouses within SKUSavvy. Inventory currently held within Shopify will also be brought over into the warehouse - though you still need to allocate that inventory to bin locations for it to become active available inventory within SKUSavvy.
If you create a warehouse before connecting Shopify, you must link your warehouses in SKUSavvy to Shopify locations during step 4 of the connection process.
Import New Location
If you've recently added a new location to Shopify and now want to bring that location into SKUSavvy you are in luck. You can do this by going into the Shopify connection and selecting 'Add Location(s)' which will bring in your new location and give you a way to connect existing warehouses in SKUSavvy.

Select your new location to import

1) Choose whether or not to reuse a previously created warehouse in SKUSavvy
2) Enter a new location name if needed
3) Set the previx. This can only be done ONCE and each prefix MUST be unique
4)Enter the address information

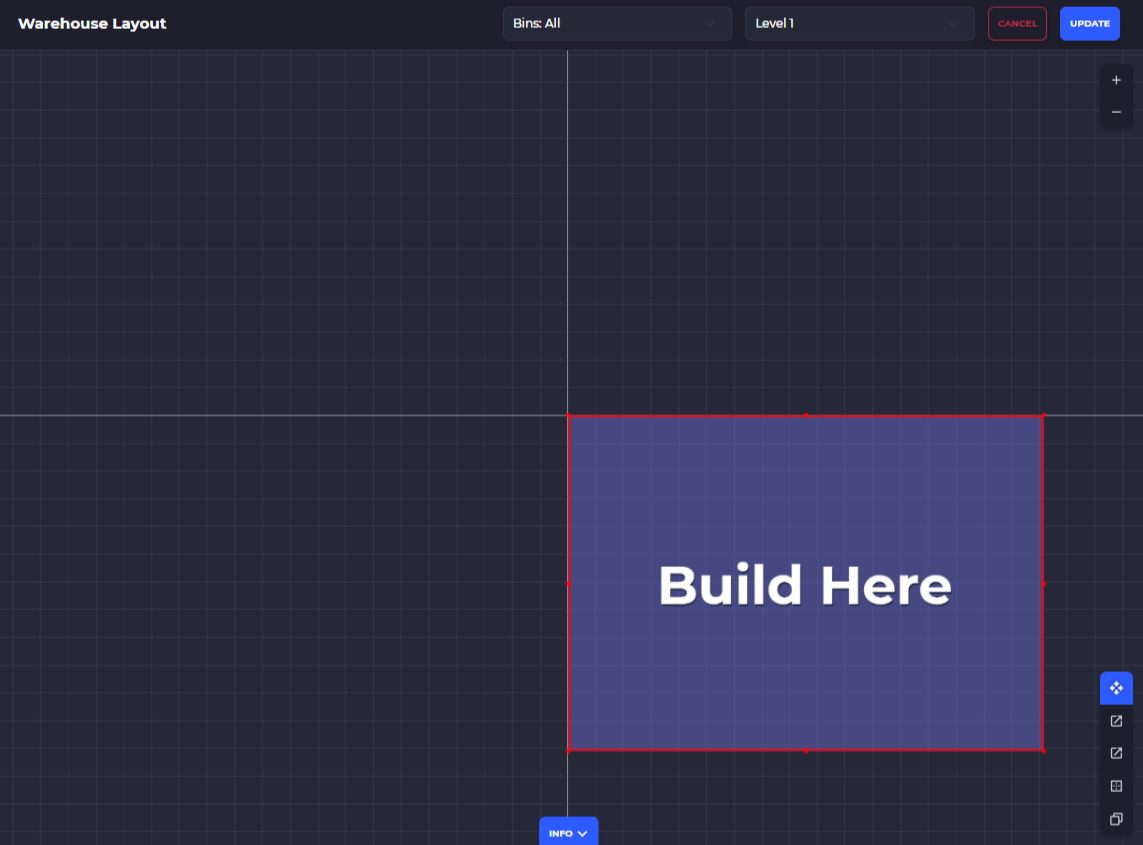
Warehouse Layout
At the core of every warehouse within SKUSavvy is a visual warehouse layout tool. This enables you to add shelves, bins, levels, conveyance, walls, docks, packing tables, staging, and more on one grid layout. More specifically this will help you visually locate inventory, orders to fulfill, bin to bin replenishment tasks, and to pick routes.
Tips for building a 3D warehouse map:
1) Build in the bottom right quadrant of the map ONLY
2) The map can be in any unit dimension you want
3) Plan to make your warehouse map slightly bigger on the screen
3D Warehouse Map Tutorial
Layout Tool Interface
To create a new layout, there are a few things to keep in mind. Here are some of the main elements to know about the interface and how it is best used.
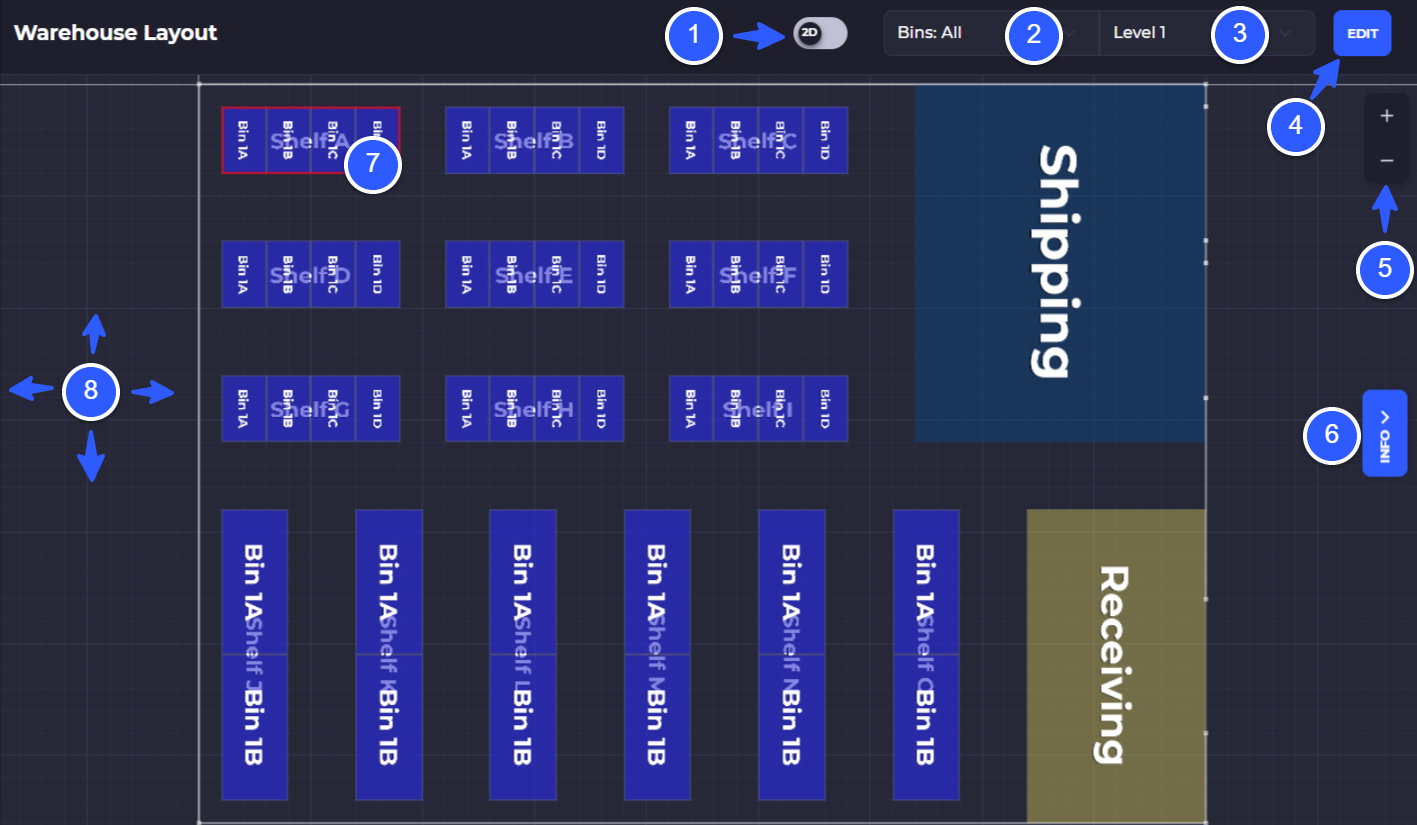
1) View layout in 3D (not available in edit mode)
2) View warehouse bin locations according to whether or not they have products within them or not
3) Level of the warehouse you are viewing (think of this as shelf level). Each bin is held on a level of a shelf so one level to another on the same shelf can have different bin sizes (or you can use the bulk tool to copy a bin level to another level on that shelf)
4) Edit Button - must be selected before you can move and add anything to the layout
5) Zoom in or out - this can also be done by using the zoom in or out similarly to Google Maps, you can also pinch to zoom on mobile
6) Information panel which shows shelf details, bin details, or area details
7) Selecting a shelf will show all bins on the shelf. Once a shelf is selected, you can click again to select the bin
8) Drag the canvas to move where you focus. If you are in edit mode and grab a shelf or bin, you will move the item
Edit Mode
Once you hit the edit button everything on the layout becomes movable. If you select a shelf, you will be able to resize it, move it, or change the shelf information.
Hot Keys
Use these shortcuts on your keypad to simplify the warehouse layout creation
Ctrl + C | copy a bin or shelf
Ctrl + V | paste a bin or shelf
Ctrl + Z | undo actions
Hold Shift + Select elements | will enable you to select multiple elements at once to move them around on the map
Up, Down, Left, Right arrow keys | when elements are selected this will enable you to precision move them
Drag a bin from one shelf to another shelf to reassign that bin
Edit Mode Interface
On the lower right side of the canvass are five helpful tools for creating new elements for your warehouse. Follow the guide below to learn about the SKUSavvy visual warehouse layout creator.
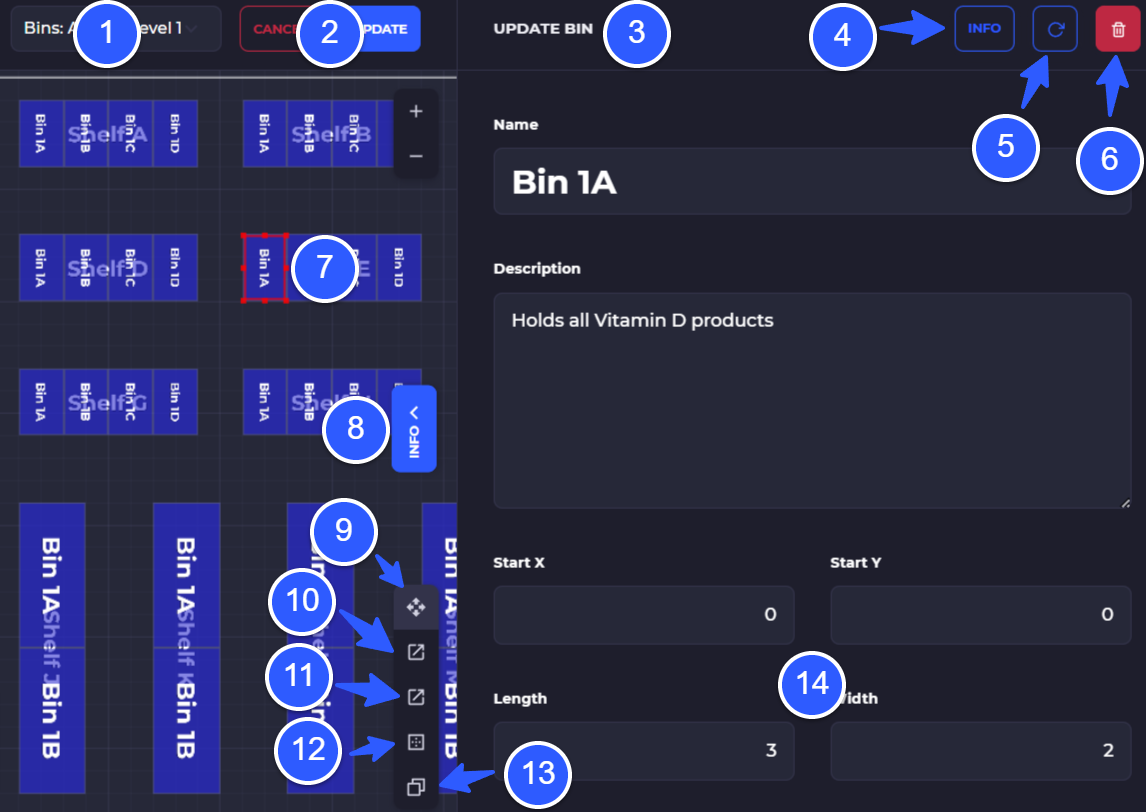
1) Choose to show all bins or just filled/empty bins. Select a level of your layout to view - each 'layer' is one shelf level in a top down view, select a level to view bins on that level across all of you shelf units.
2) 'Cancel' your edits or 'Update' and save edits
3) Information panel showing relevant information for a selected shelf, bin, area, wall/door
4) View information specific to the selected element (brings you to that elements detail page for instance to view/move inventory from this bin to another bin)
5) Rotate the selected object 90 degrees clockwise
6) Delete the selected element
7) Currently selected element (highlighted in red) select and drag on the edges of the element to change the size
8) Show/hide information panel
9) Drag/pan and select elements on the map with this tool engaged
10) Create a Shelf or Bin - shelves hold bins, bins will be drawn on top of a shelf and on the level currently selected. Shelves have levels which correspond to the next layer up, you must set the level and update the layout before placing a shelf on that level (you can duplicate bins from one level to another on the shelf)
11) Create an area which can represent anything in your warehouse that does not hold pick inventory. Areas can hold purchase orders that have arrived but have not been checked-in
12) Create wall/door to indicate boundaries or interior walls
13) Access bulk tools for copying bins from one level to another and auto generating bins for a shelf
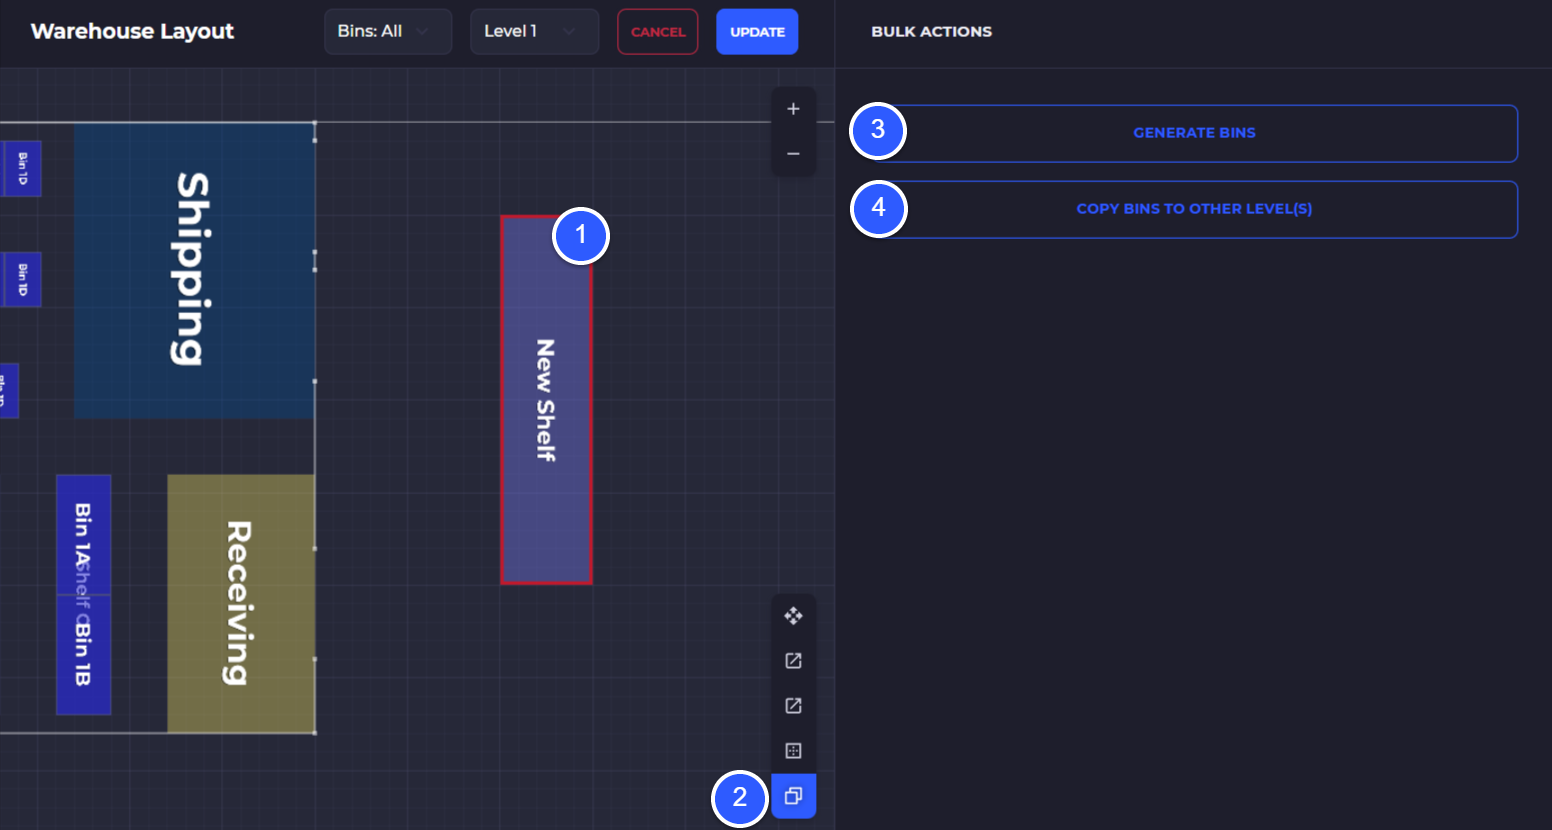
Generate Bins for a Shelf
1) Select a 'Shelf' or multiple shelves by holding shift + click, then click on the duplicate icon
2) Bulk tools icon
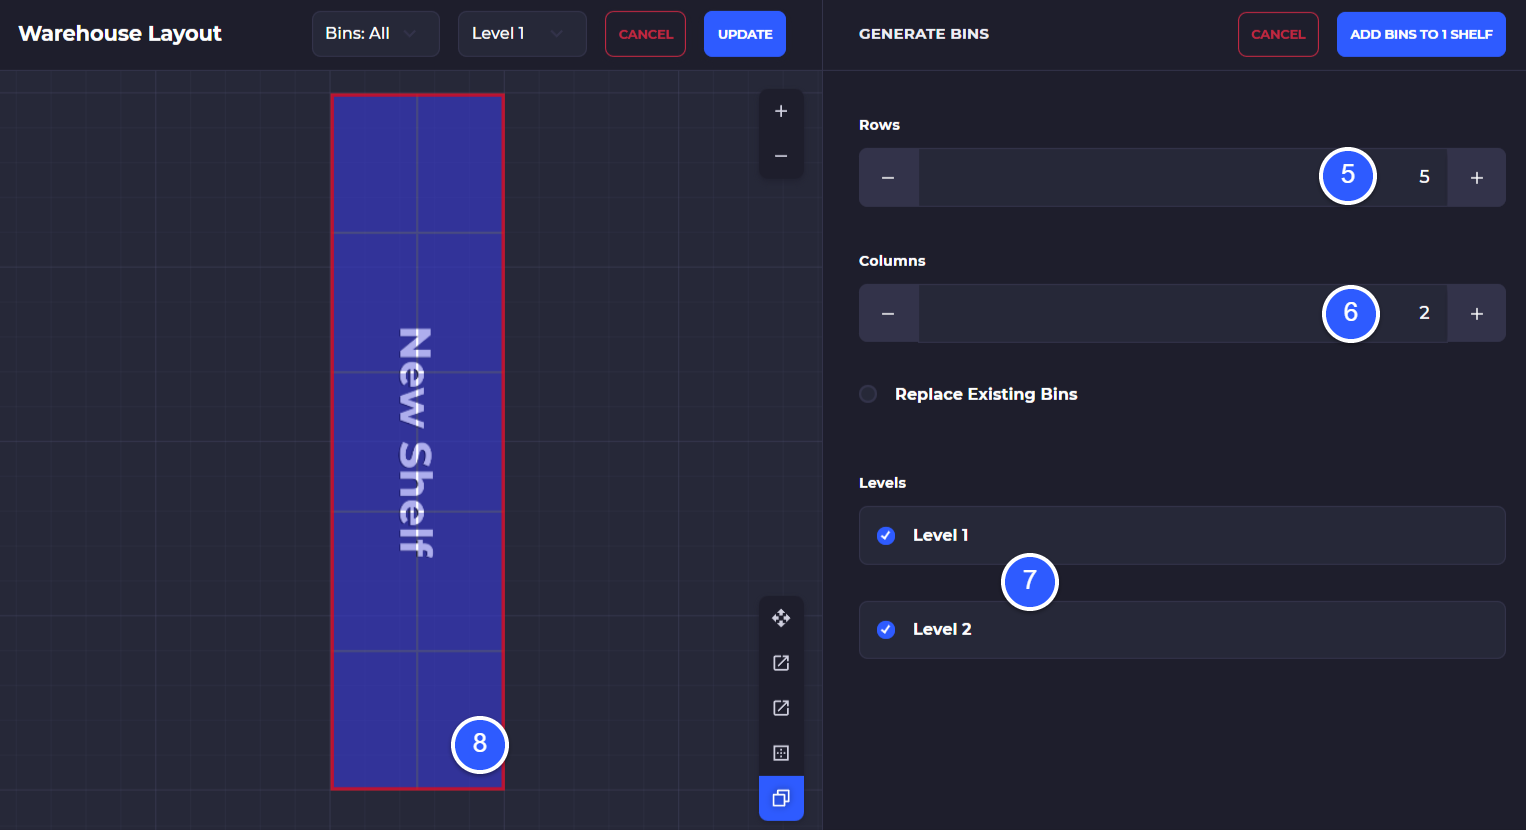
3) Generate bins
4) Copy bins from one level to another
5) Enter the number of rows to divide bins equally
6) Enter the number of columns
7) Select which levels you want to generate bins for
8) What the shelf will look like with the new generated bins
Click 'Add Bins to 1 Shelf'
Copy One Level of Bins to Other Levels
1) Select a 'Shelf' then click on the duplicate icon
2) Select the shelf level you want to copy bins from
3) Select which levels on the shelf you want to copy bins to
4) Choose whether or not to replace existing bins with the new bins being created (if not overwriting you may have multiple bins on a single level)
5) Press copy to create the new bins, then you should rename or bulk 'Generate bin Names'

Generate Bin Names
Anytime you have many bins on one shelf, if you are able to use the built-in bin name generator you can have SKUSavvy create all bins on a shelf. This is helpful if you've just duplicated bins from one level to another as well.
1) Select the shelf, and click into the details, for the shelf you want to generate bin names for
2) Click generate names which will override any names you already have on the existing bins for that shelf
3) View and edit bin names
Bin 2A for instance is a second level bin (2) on the left-top position (A). For the 3rd bin on a shelf sitting on the 5th level you could expect the name to be 'Bin 5C'

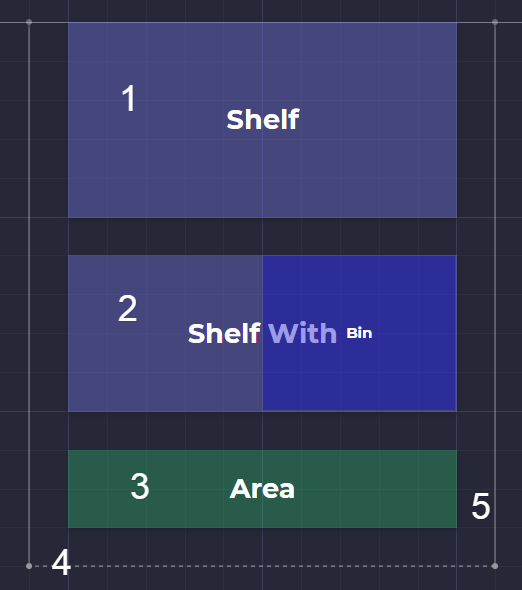
Layout Elements
Each of the different elements (shelf, bin, walls/doors, areas) will carry relevant information about that element. Within each element, you can view related items, position on the canvass, and the level it's on.
1) Shelf
2) Shelf with a Bin
3) Area
4) Door
5) Wall
Shelves
1) Shelf info, rotation, and deletion
2) Shelf name
3) Description of the shelf
4) How many levels does the shelf have? Think of a level as one row of a shelf
5) X and Y starting coordinates of the shelf on your layout canvas
6) Width and length of the shelf (adjusts in real-time on the canvas)
7) Generate bin names for bins currently in the shelf
8) Bins already located on the shelf (click to view one)

Bins
1) Bin info, rotation, and deletion
2) Bin name
3) Bin description
4) For bins, this is the canvas start position X-Axis (horizontal) and Y-Axis (vertical) and for bins, this is the X and Y coordinates from the top left corner of a shelf (the bin is within a shelf)
5) Height and length of the bin (bins must reside inside the confines of a shelf)
6) The level on the shelf that the bin resides
7) Edit inventory in this bin
8) On a bin you will see a list of products currently in the bin and their quantity - click 'Edit Products' to change the products and quantity held within the bin

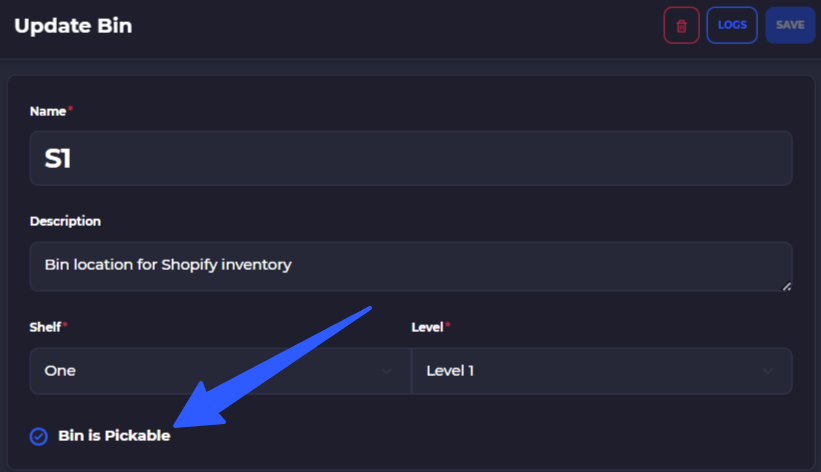
Enable/Disable Picking from a Bin
Within the bin 'Info' page you can optionally mark a bin as pickable or not pickable. When a bin is non-pickable any inventory in that bin will not show on the pick screen and the big will be ignored when you are going through a pick route.
Heatmaps
You can use SKUSavvy to view which bins and inventory actions are most utilized throughout your warehouse. This can enable better decision making for storing product around the warehouse.

Add change types to show specific heatmaps based on various inventory actions such as order picks, inventory adjustments, restocks, external fulfillments etc.
1) Select change types to view only those bins with products that have had that change type made
2) Select whether you want to view a 2-color or 5-color heatmap
3) Select which bins that you want to filter out. Cap >90% means that 10% of the bins will be left out of consideration for heatmapping

Heatmaps Video
Item Allocation
To place items around the warehouse layout you've setup within SKUSavvy you can utilize a few different methods: scan to bin, directly place to bin, or transfer to bin.
NOTE: You must navigate within a warehouse to allocate inventory to that warehouse
The fastest way to allocate inventory from your Shopify store to bin locations is to use the bulk allocation tool. It will enable continuous scan of items to their respective bins while out in the warehouse. This works best with a Bluetooth barcode scanner.
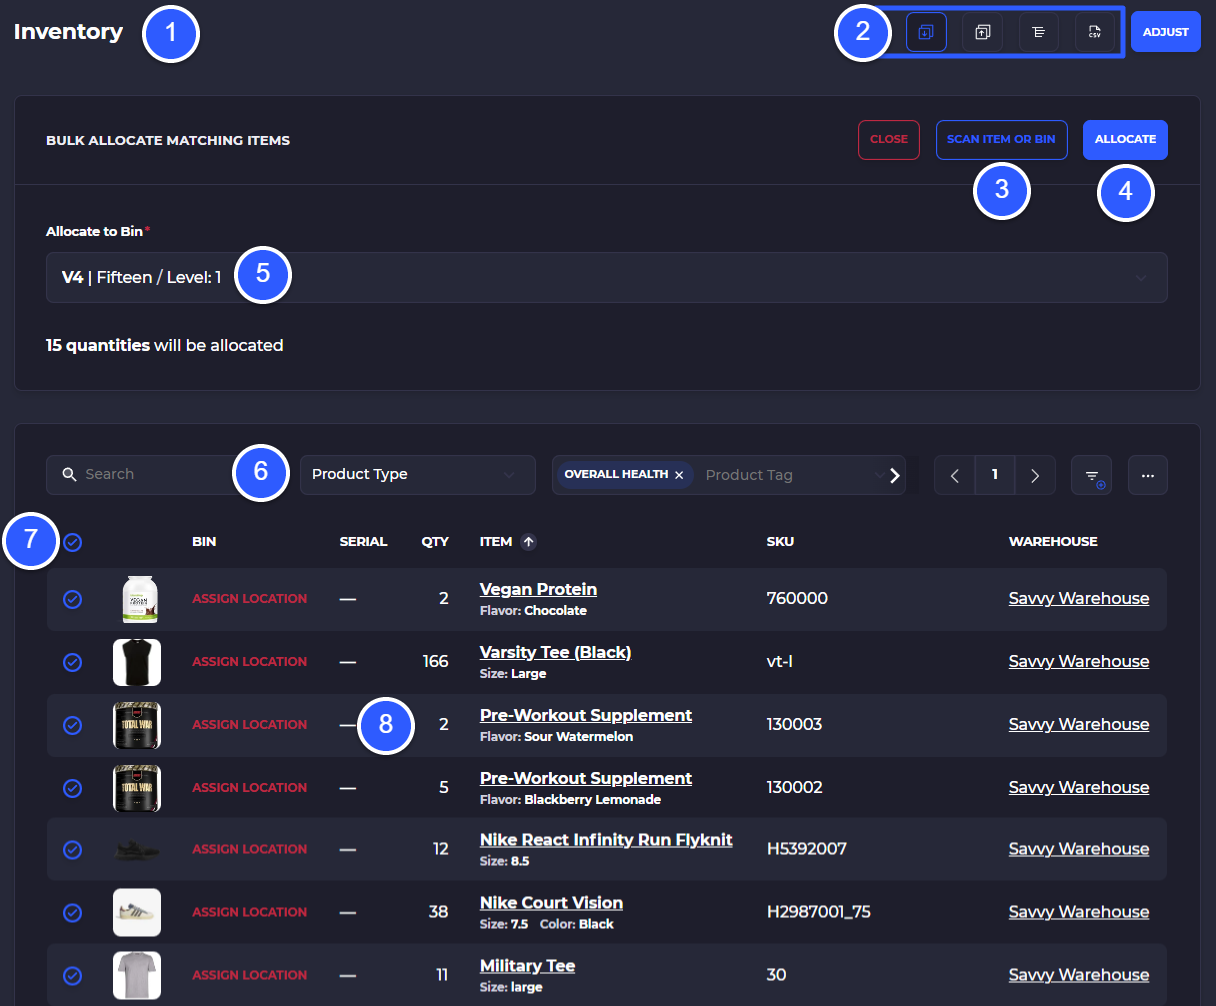
1) Navigate into a warehouse > inventory to bulk allocate stock. Note that you must be looking at the flattened list view for inventory.
2) Tap on flat list view, and then the 'Bulk Allocate' icon button will appear to tap on
3) With a Bluetooth scanner simply scan the bin and the items belonging it that bin, or you can press on 'Scan Item or Bin' to bring up the camera scanner
4) When ready, press 'Allocate'
5) Scan the bin you want to allocate into. Or select from the dropdown
6) Enter filters to select all based on filters
7) Select all items or select individual items. Using your barcode scanner will automatically select the item
8) The inventory quantity shown is your stock counts that have come over from Shopify which will be allocated to the bin upon scanning. You may need to resync your inventory from Shopify if you've made changes to the inventory counts on Shopify while connected to SKUSavvy to bring fresh values in
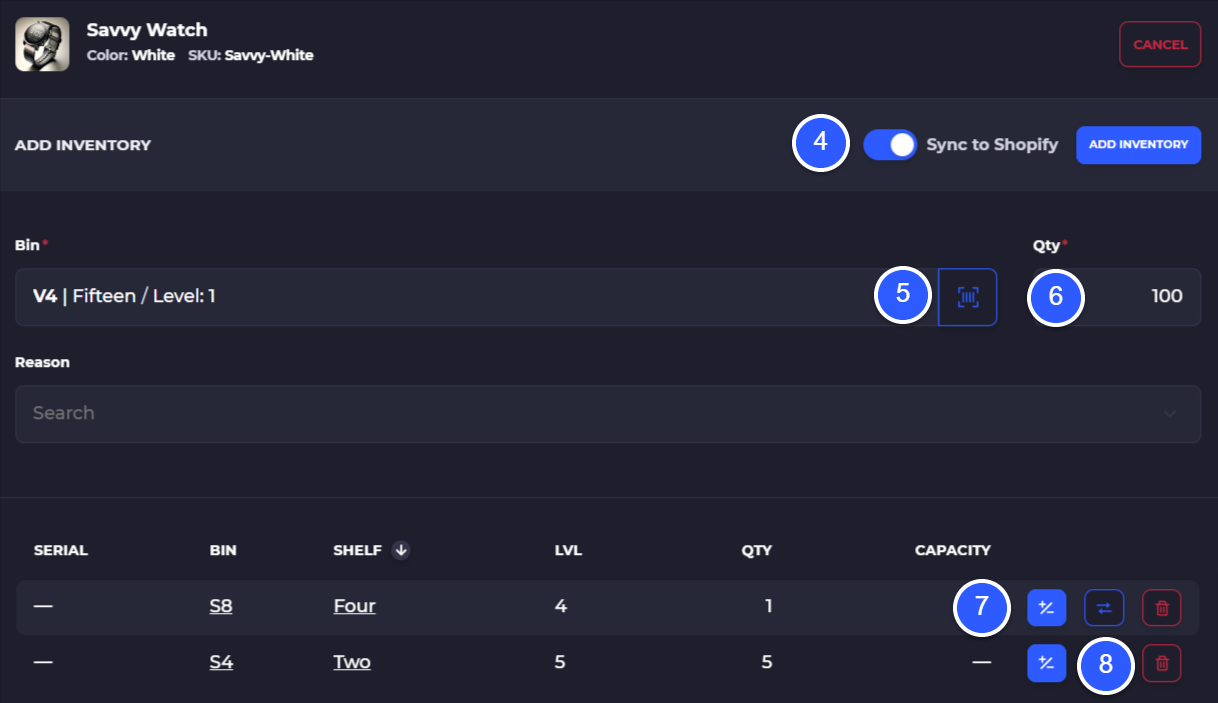
Scan to Bin
With this method it is easiest to use a mobile phone or tablet (ideal is an iPad mini) to first scan the item, select 'Add Inventory' and then scan or search for the bin that item will be placed within. Using this method, you can manually increase the quantity you are checking in.
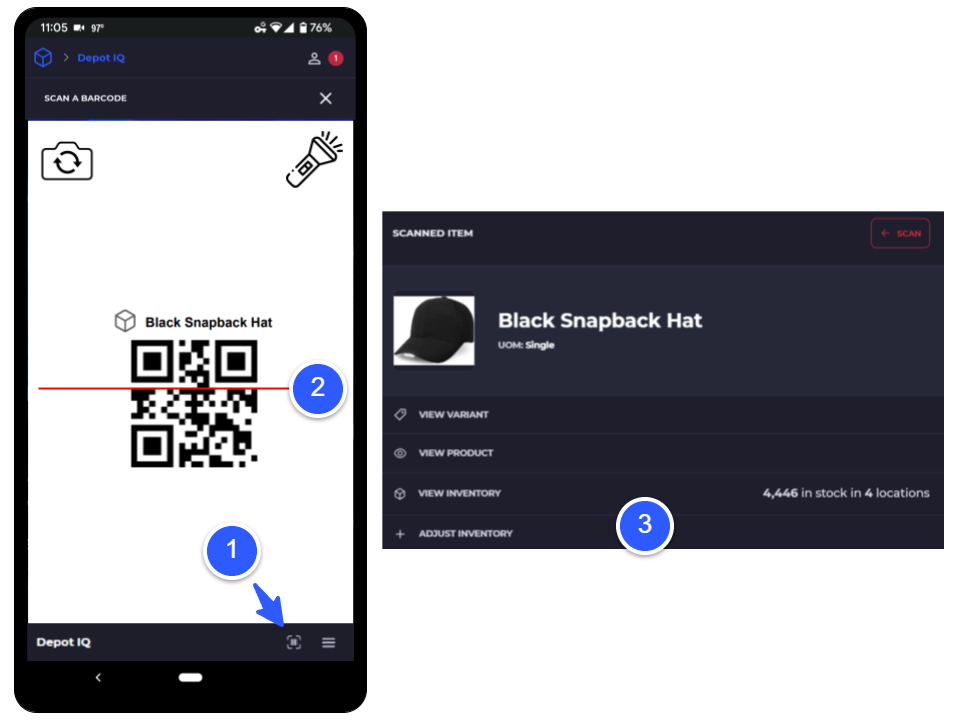
1) On mobile the scan button is on the bottom right of the nav menu, press it to bring up the camera barcode scanner. On desktop, the scan button is on the bottom left. If you are using a hardware scanner, simply scan the item
2) Focus the barcode across the red line that appears on your device screen
3) After a successful scan, select the bottom option to 'Adjust Inventory'
4) You can optionally turn off the sync to Shopify for the inventory changes being made Tap 'Add Inventory' to set a new bin location and quantity to allocate
5) Type or scan a bin barcode to allocate item quantity to that bin. If the item already has stock in the bin, move to step 7 to simply change the inventory within that bin
6) Enter a quantity you are checking into this bin
7) View existing locations and quantity of this item within the warehouse, tap on +/- to make an adjustment to that inventory level
8) Move inventory from one bin to another by tapping on the multi-directional arrow icon
Allocate Directly to Bin
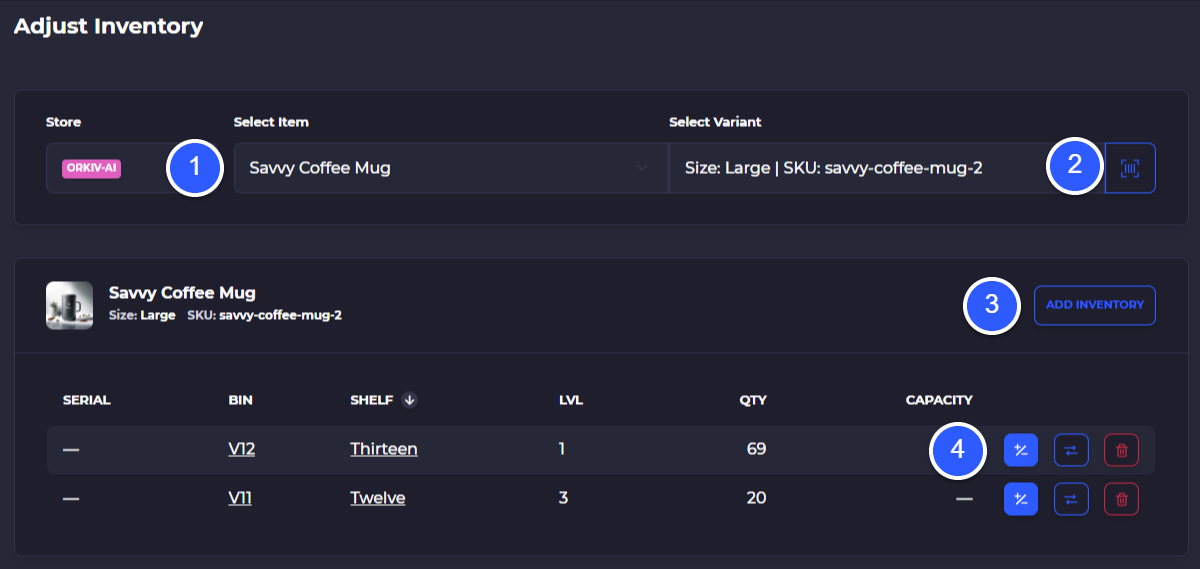
To allocate items to a bin, navigate to a warehouse, then select 'Inventory' where you can adjust the inventory for that warehouse.
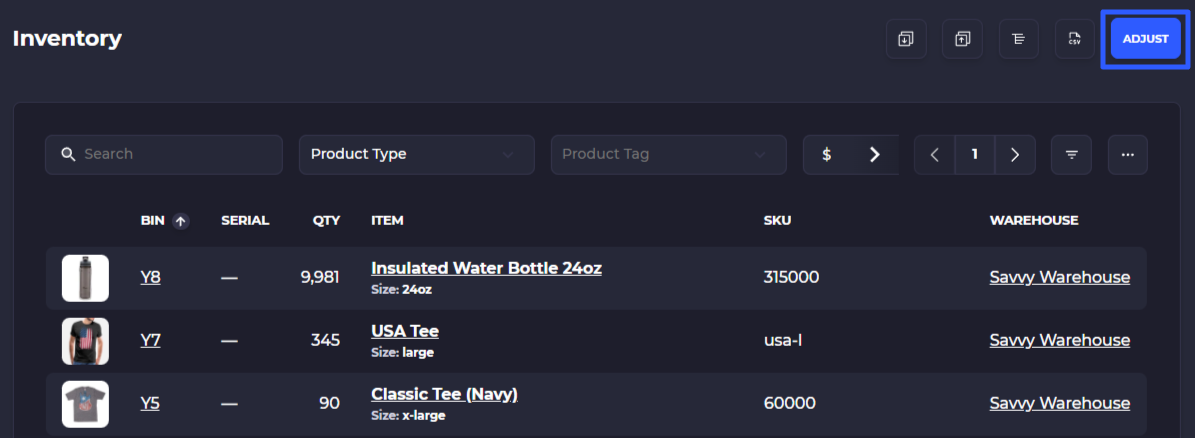
Once here you will find the same interface as if you had scanned an item and selected the 'Adjust Inventory' option.
1) Select which Shopify store you want to add inventory for
2) Select or scan a product and variant to add to a bin
3) Click 'Add Inventory' to place stock in a new bin
4) Make a change directly to an inventory location with inventory by clicking on +/- icon
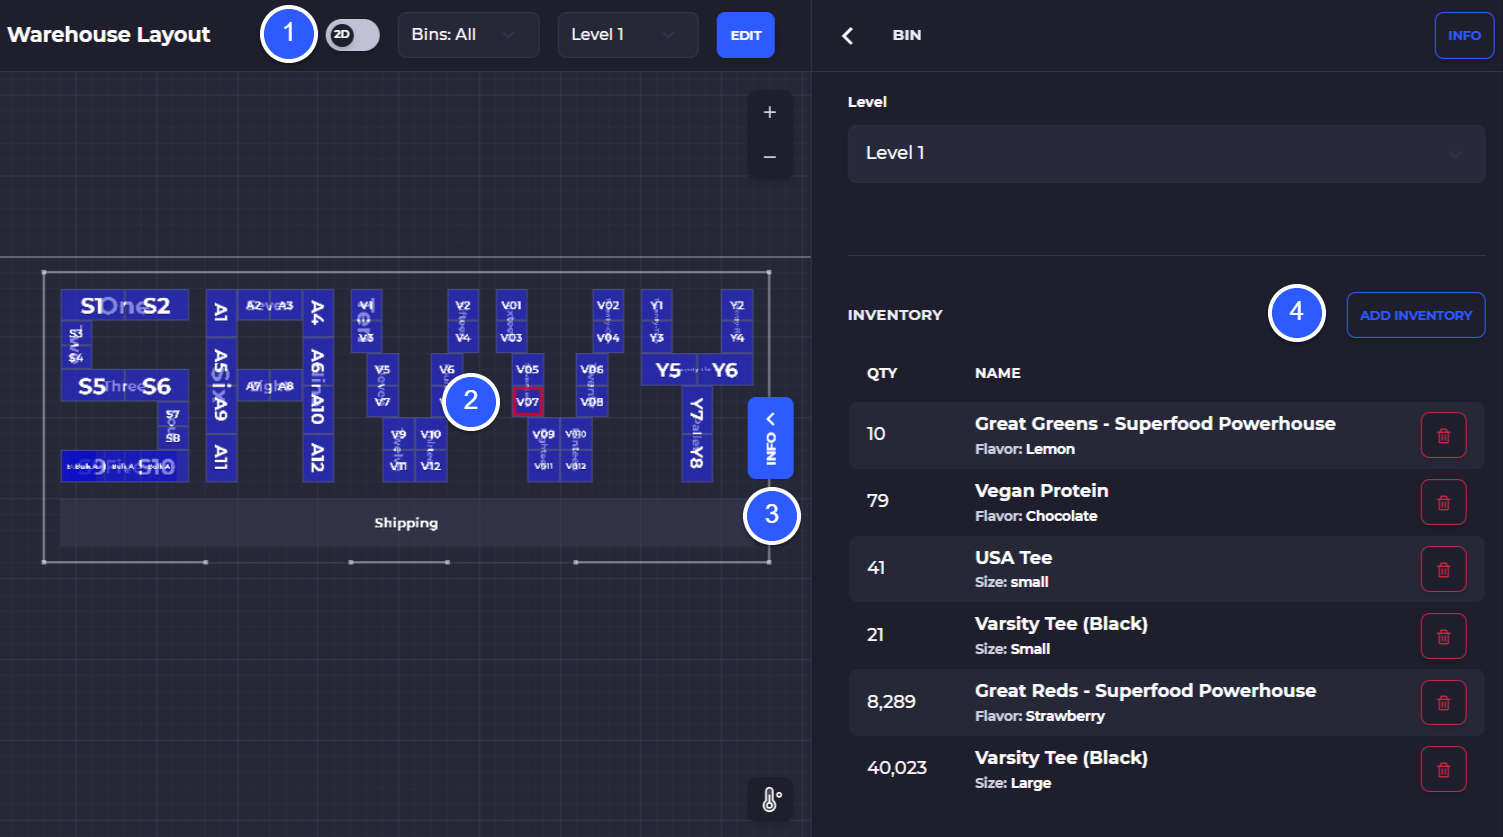
Allocate Inventory from the Warehouse Layout
While on the layout, you can find a bin to select and allocate inventory to just by clicking. Simply pan the warehouse view until you find the bin to select, then select the bin. At first, you will be selecting the shelf, and the second click will be the bin itself. From here, you can click 'Bin Info' which will take you to the bin where you can allocate inventory similar to the methods above.
1) Select the level of the bin you want to allocate inventory to
2) Select the shelf first, then the bin (2-clicks)
3) View the bin information (pull out the info panel)
4) Scroll down and click 'Edit Products' on the 'Products' section of the bin information
Print Bin Labels
Every bin or entire shelf made up of bins can be printed out with a label quickly within the visual layout manager.
Print Individual Bins
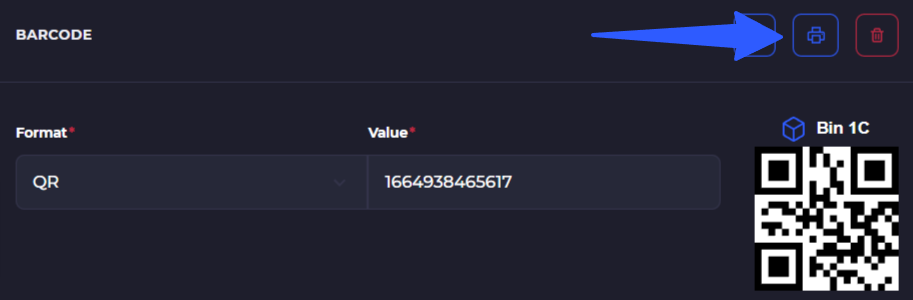
To print a bin, you can go into the bin itself where you will see a generated QR code and a button to print.
Print Multiple Bins
To print multiple bins, go to your list of bins (Layout > Bins) and look for the 'Print Labels' button.
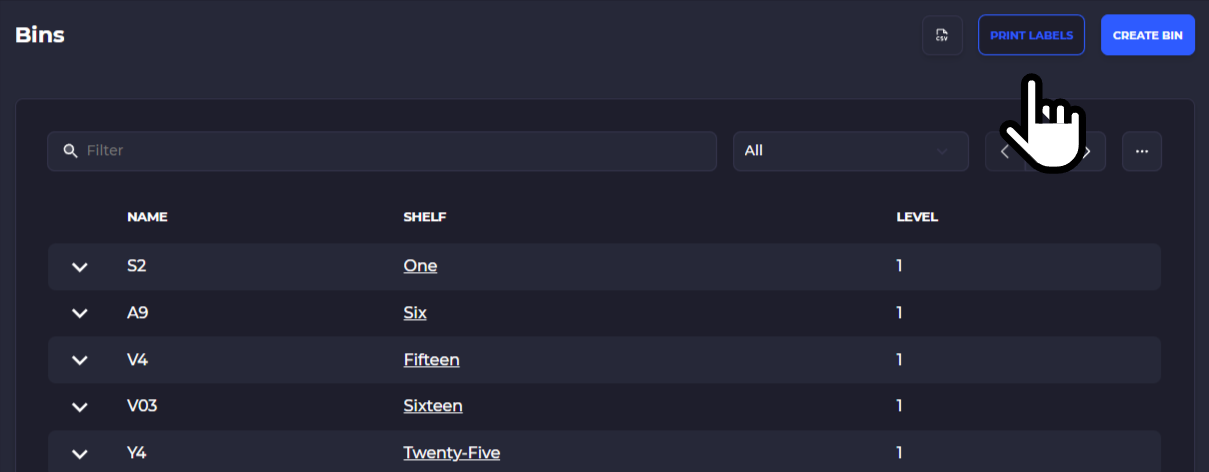
From this screen you can select multiple barcodes, or print all barcodes at once.
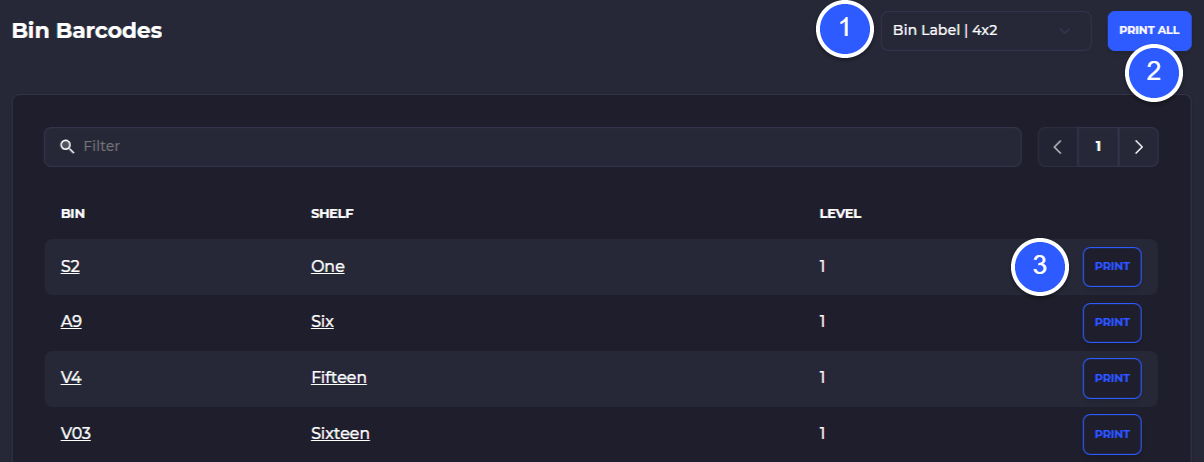
1) Choose a label template to use for bin barcodes
2) Print all available bin barcodes
3) Print the individual barcode label
You can filter bins by clicking on a column header or enter a search for the bin
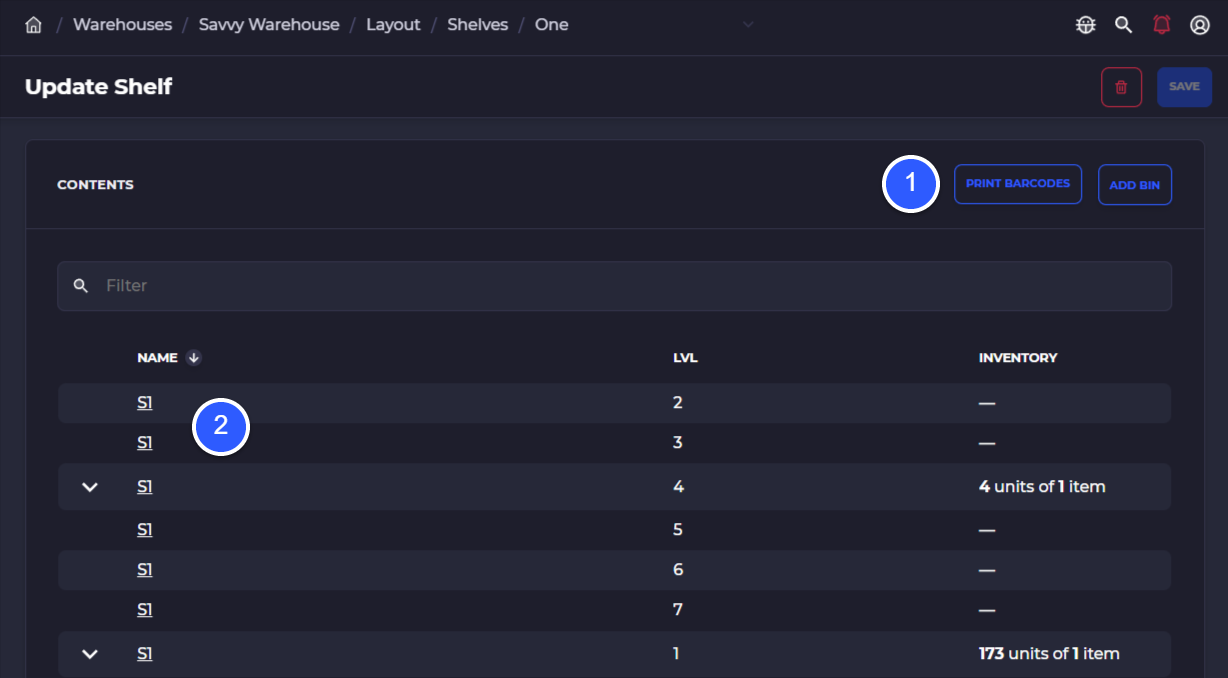
Print Shelf Bins
To print all bins on one shelf, simply navigate to the shelf within the layout view, or click on the shelf within the table view.
1) Print the barcodes for all bins on a shelf
2) Showing the bins associated with this shelf and the inventory
1) Select the label template you want to print your bin barcodes with
2) Select which levels of the shelf you would like to print
3) Print the corresponding shelf bins

Print Product Barcodes
On each product variant will be a barcode shown. If no barcode is showing, check the barcode format. It's suggested that you scan the barcode on the product, however you can import the barcodes as well. Next to the barcode shown is a print button. All product barcodes are printed out as a 4" x 2" label.
Delete Warehouse
You can delete a warehouse and choose to move the inventory to a different warehouse or simply remove it without re-allocating the inventory by going into the warehouse properties.

Optionally select a warehouse location to migrate your inventory and orders to. If you do not migrate the inventory it will be removed completely and there is no way to bring this data back.

Related Guides
Order Fulfillment
Ship your orders out faster with SKUSavvy order fulfillment
Quick Start
Get up and running faster with SKUSavvy, start here