Custom Label Creator
Learn how to create your own custom labels that dynamically change with information from your orders, products, and customers.
Custom Label Types
Within the SKUSavvy custom label builder you can build out several labels for different purposes. Here are the label types and where they can be printed within the system:
Bin Labels
Each bin within your warehouse layout is automatically assigned a barcode. This label will provide you a way to insert images, shelf name, level, bin name, barcode and custom text.

This label can be printed anywhere you can print a single bin, the list of bins, or printing all the bins on a shelf.
Product Labels
The item label allows you to use information from your products and variant details such as SKU, image, meta fields, price, barcode and more.

This label is printable by going into a product variant and selecting print on the barcode then selecting your new custom label.
PO Check-in
These labels can be used similarly to a product label in that you can add all product details, lot information, meta fields, and images.

This label is only available once a product has been counted and checked-in to SKUSavvy from a purchase order or transfers.
Transfer Labels
Include any sort of information needed on the receiving side of a transfer including name, barcode, meta fields, lot information and more.

This label is only available once a product has been counted and checked-in to SKUSavvy from a purchase order or transfers.
Shipping Label
Shipment barcodes are created using the information from an order to create your own custom shipping labels with information such as address, notes, order ID, shipment barcode and meta fields.

The shipping label is available to print using the 'custom carriers' on any shipment batch once you have picked and packed an order instead of producing a carrier label.
Order Pickup Label
This label is available to print for online orders being picked up at your warehouse or store location. It is printed at the time of order fulfillment within SKUSavvy and can be scanned to indicate an order has been picked up by your customer. This will also update to Shopify.
Purchase ORder Template
A fully customizable purchase order template to include PO contents, weight, vendor information, shipping information, delivery date, meta fields and beyond. This can have a default template though you can utilize different templates.
Packing Slip
Edit the packing slip to include details of the order, pricing and discount information as well as shipping information. Available to print after packaging an order.
Action Barcodes
Action barcodes are a special type of label that when scanned enable SKUSavvy to take certain actions such as printing a shipping label or packing slip, selecting a specific box size, moving through the batch, or to split fulfillment.
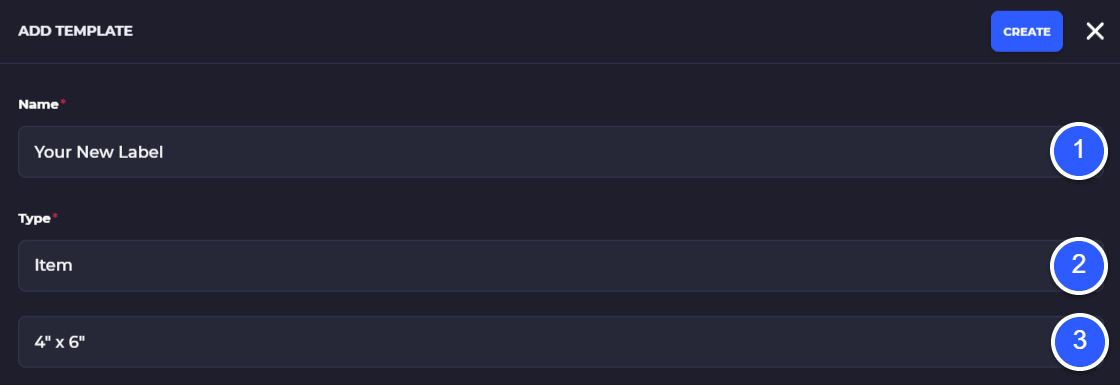
Create a Label
To create your label click on 'Create' and select the label type you plan to make as well as the paper size for the label. Paper sizes are available in 4*2 and 4*6 although you can use the print settings to resize the label for nearly any size paper you plan to print on.
1) Enter the name for your label
2) Select the label type
3) Select the paper size for your label or create your own custom label size
Label Editor
We used our own internal content management system to introduce the easiest barcode label editor. Using the label creator tool will help you come up with customized label formats that use a combination of your text and contextual details from the order, product, and batch. To start using the your new labels open the shipping label creator located in your configuration settings.
1) Go to company dashboard
2) Select 'Templates'
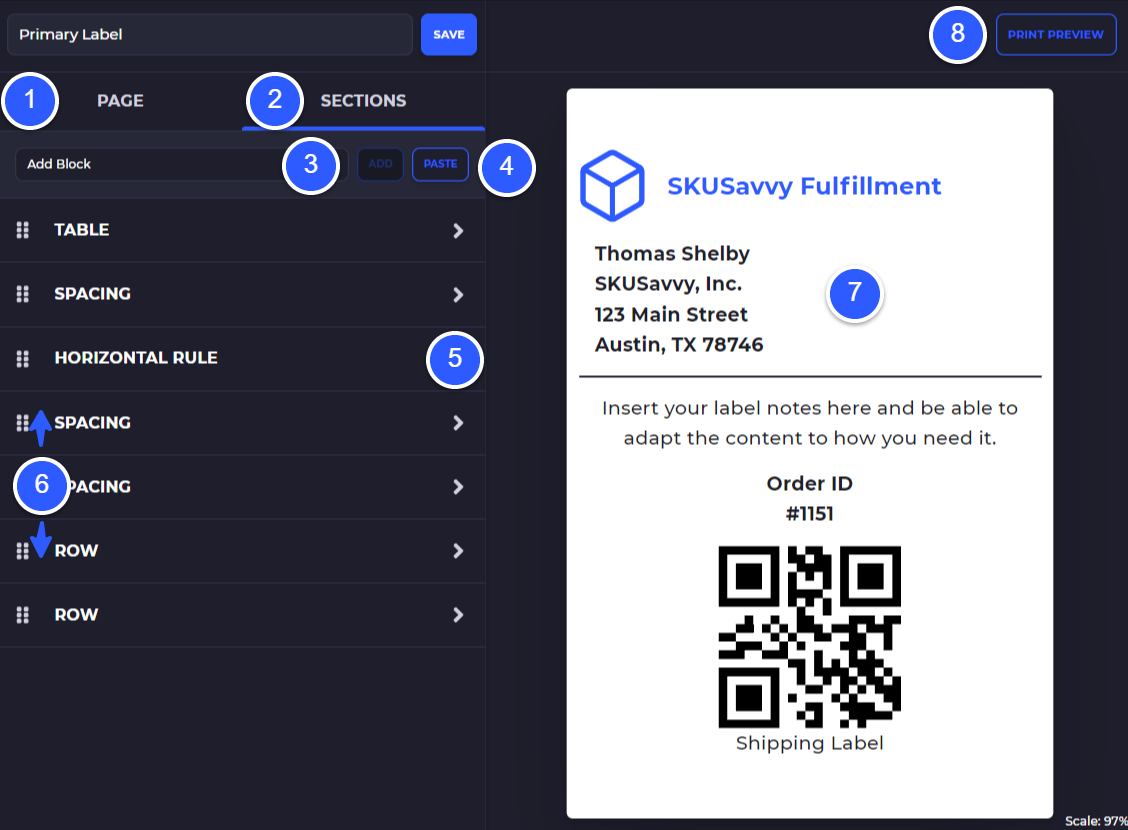
Label Editor Interface
Getting used to the label editor interface is pretty quick and simple using blocks and relevant parameters for each block type so you can assemble the label you need.
1) Select page dimensions or set your own custom dimensions. Add padding to the label edge
2) View sections of your template
3) Add a block to the editor, note the available blocks depending on the type of label selected
4) Once a block is selected you can copy the entire block. Using the 'Spacing' block enables you to create reusable blocks easiest
5) Select the arrow to go into a block, or hover over the label to select a block to edit
6) Click an the grid icon to drag and drop a block position, or nest it within another nestable block. Hold on the arrow at the top of the block list to move the block out of its current position
7) Visual representation of your label
8) Print preview window
Block Detail
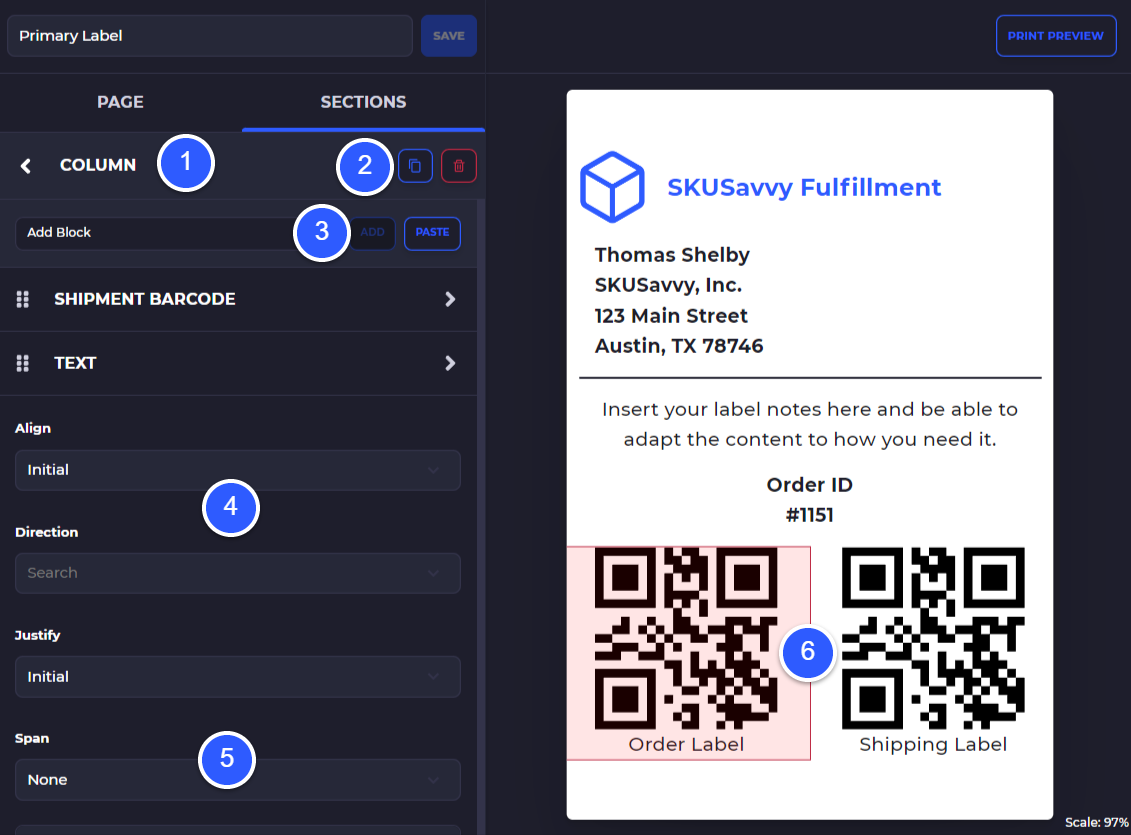
When you click into a block available parameters for the block will show that may include text styling, padding/margin, spacing, and more. Click on a single block to view that blocks available inputs.
1) Current block being edited
2) Copy this block to paste into another
3) Select more blocks to add to the current block
4) View editable elements of the block, in this case for the column we can set the alignment and direction, justify elements left/right/center, breakpoints on different screen sizes
5) Select from available options to set the column span in this case
6) The highlighted block is currently being edited
Available Blocks: Structure
Below are components that can be used and customized to build your own custom bin labels
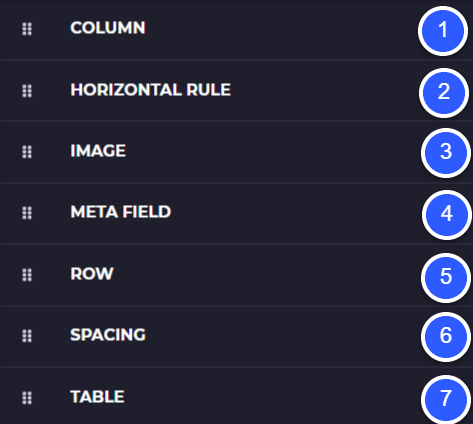
* Indicates the block accepts child blocks
1) *Column: place two or more objects next to each other on a label
2) Horizontal Rule: place a line across the page of varying thickness
3) Image: place and resize an image
4) Meta Field: add relevant dynamic content from metafields in your account
5) *Row: used to add multiple columns on one line
6) *Spacing: add spacing or place several objects inside this element to copy/paste
7) *Table: insert a table then add objects to the table
Available Blocks: Shipments
Below are all the blocks that can be inserted into your shipping label design and whether or not that block accepts child blocks.

1) Batch ID: prints the pick batch ID associated with the shipment label
2) Meta field: add dynamic content from meta fields on products, orders, vendors,
3) Order address: will insert the customer address of an order during shipping
4) Order customer: inserts the customer information from the order
5) Order delivery date: inserts the delivery date of an order if available
6) Order ID: inserts the ID of an order being shipped
7) Order notes: inserts any note associated with an order
8) Shipment barcode: insert a barcode associated with the order shipment (adopts format of your account default barcodes)
9) Shipment Id: Inserts the shipment number for orders that have multiple shipments
Available Blocks: Bin
Below are components that can be used and customized to build your own custom bin labels
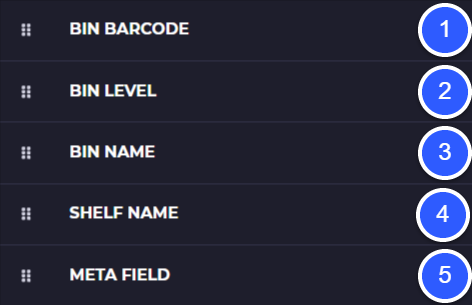
1) Bin Barcode: generates and shows a barcode for the corresponding bin(s) you are printing
2) Bin Level: level of the bin in the warehouse
3) Bin Name: name of the bin being printed
4) Shelf Name: shelf containing the bin being printed
5) Meta field: insert dynamic bin meta fields
Available Blocks: Product
Below are components that can be used and customized to build your own product labels
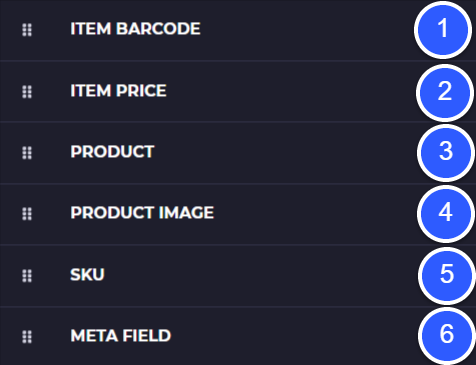
1) Item Barcode: generates and shows a barcode for the corresponding product(s) you are printing
2) Item Price: add the retail price to your barcode label
3) Product Name: name of the product being printed
4) Product Image: adds the image of your product to the label
5) SKU: inserts the SKU of the product on the label
6) Meta field: insert dynamic product meta fields
Available Blocks: PO Check-In
Below are components that can be used and customized to build your own product labels
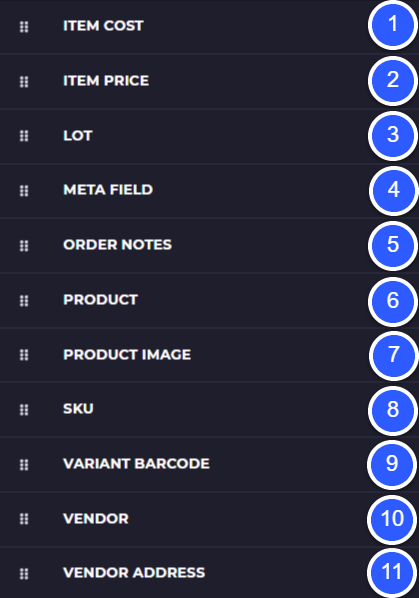
1) Item Cost: the cost of the product at the time the PO was placed
2) Item Price: the retail price of the product
3) Lot Number: displays the lot number and expiration date assigned to the product during check-in
4) Meta Field: insert dynamic content related to the PO, vendor, or product
5) Order Notes: insert notes on the PO
6) Product: insert product name
7) Product Image: show your product photo on the check-in label
8) SKU: insert just the SKU for a product
9) Variant Barcode: inserts the barcode (you may need different check-in labels for different barcode types)
10) Vendor: insert the vendor name
11) Vendor Address: insert the vendors shipping address
Available Blocks: Transfer Check-In
Below are components that can be used and customized to build your own product labels
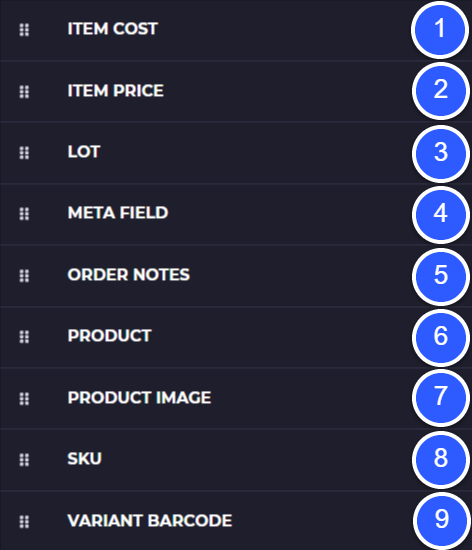
1) Item Cost: the cost of the product at the time the transfer was placed
2) Item Price: the retail price of the product
3) Lot Number: displays the lot number and expiration date assigned to the product during transfer check-in
4) Meta Field: insert dynamic content related to the PO, vendor, or product
5) Order Notes: insert notes from the transfer
6) Product: insert product name
7) Product Image: show your product photo on the transfer check-in label
8) SKU: insert just the SKU for a product
9) Variant Barcode: inserts the barcode (you may need different check-in labels for different barcode types)
Available Blocks: Purchase Order Template
Below are components that can be used and customized to build your own purchase order template. There is already a default PO template that will be used in place of your own custom template if you have not created a new one.
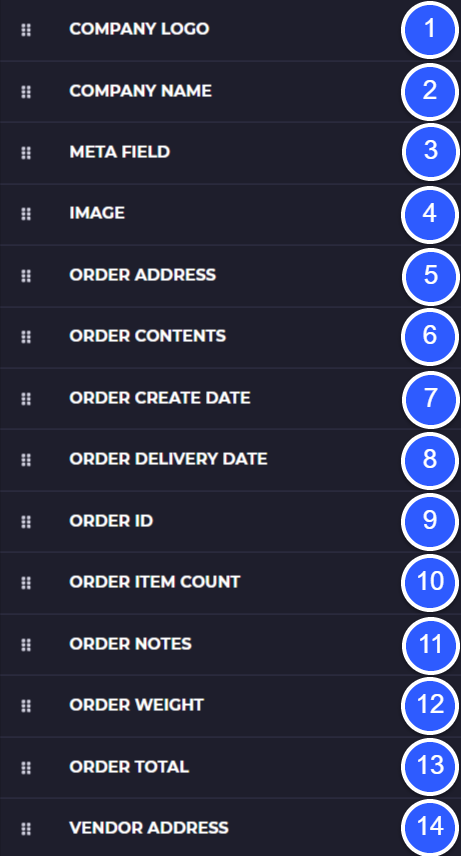
1) Company Logo: insert your company logo into the PO
2) Company Name: insert your company name on the PO template
3) Meta Field: add meta fields across products customers, order, bins and more
4) Image: add an image to the PO
5) Order Address: you can add the delivery address to your warehouse
6) Order Contents: insert a table of items on the order, customize the table elements
7) Order Create Date: date of order creation
8) Order Delivery Date: insert the preferred delivery date on the order
9) Order ID: insert the purchase order ID from the system
10) Order Item Count: counts all quantities in the order to provide a total
11) Order Notes: insert notes from your team on the PO
12) Order Weight: totals all item weights within the order
13) Order Total: insert the total cost of all products on the order
14) Vendor Address: Add the vendors addres to the PO template
Available Blocks: Action Barcodes
Use these different types of action barcode to make actions within SKUSavvy by simply scanning the barcode.
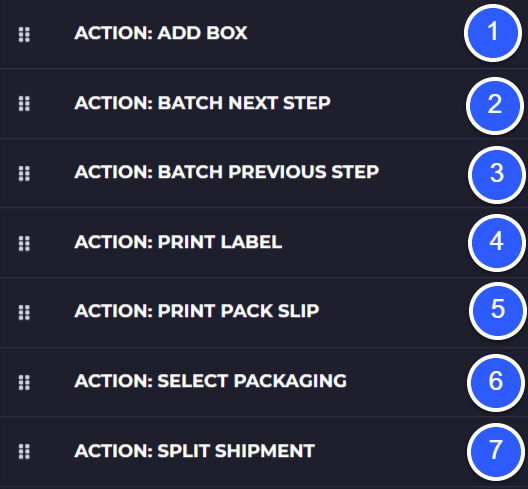
1) Add Box: during fulfillment this will add a new box so you can ship in multiple boxes for one shipment
2) Advance through the batch steps during fulfillment
3) Go back to previous step during fulfillment
4) Print the shipping label once purchased
5) Print your packing slip
6) Select a specific box size during fulfillment
7) Split the shipment
Custom Shipping Label Printing
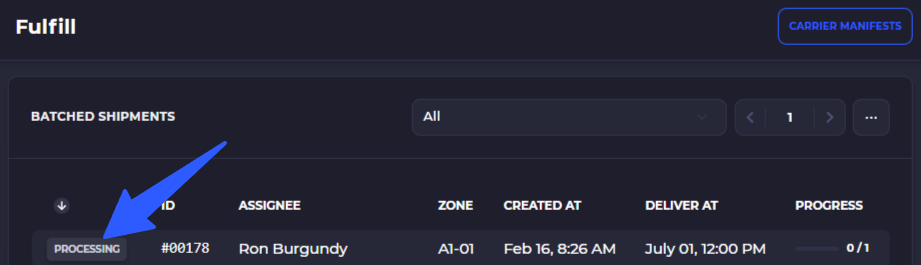
To use your custom label, you need to enable custom shipping labels within an order batch. From within any order pick batch click the 3-dot menu to pull up batch settings.
Select an Order Batch to use Custom Labels
Select 3-Dot Menu to Turn on Custom Labels

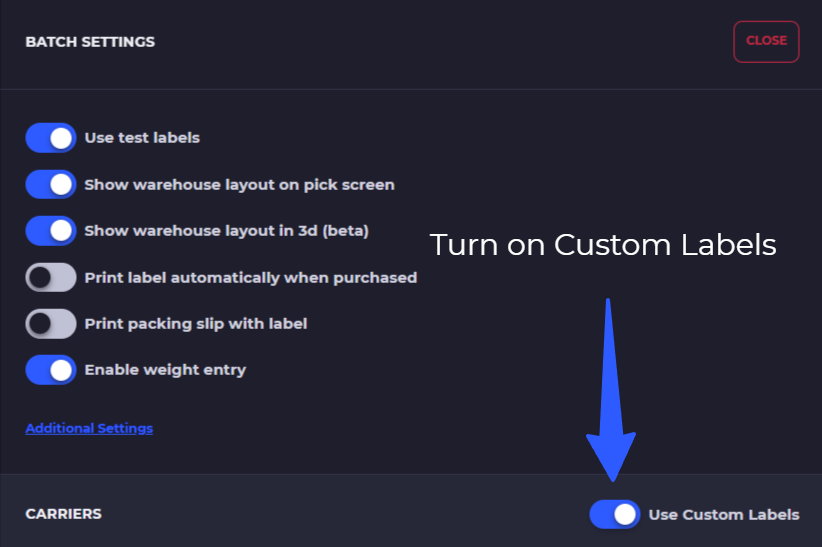
Turn On Custom Shipping Labels
Print Your Label
When you have turned on custom label printing for the order batch you'll see that you can print all labels at once by clicking in the batch toolbar. Note you can only print custom labels, this option is not yet available for connected carrier accounts.
If you have a barcode associated with your custom label you may need to generate the barcode during fulfillment. You can print all custom shipping labels within an order batch by selecting 'Print All Labels'

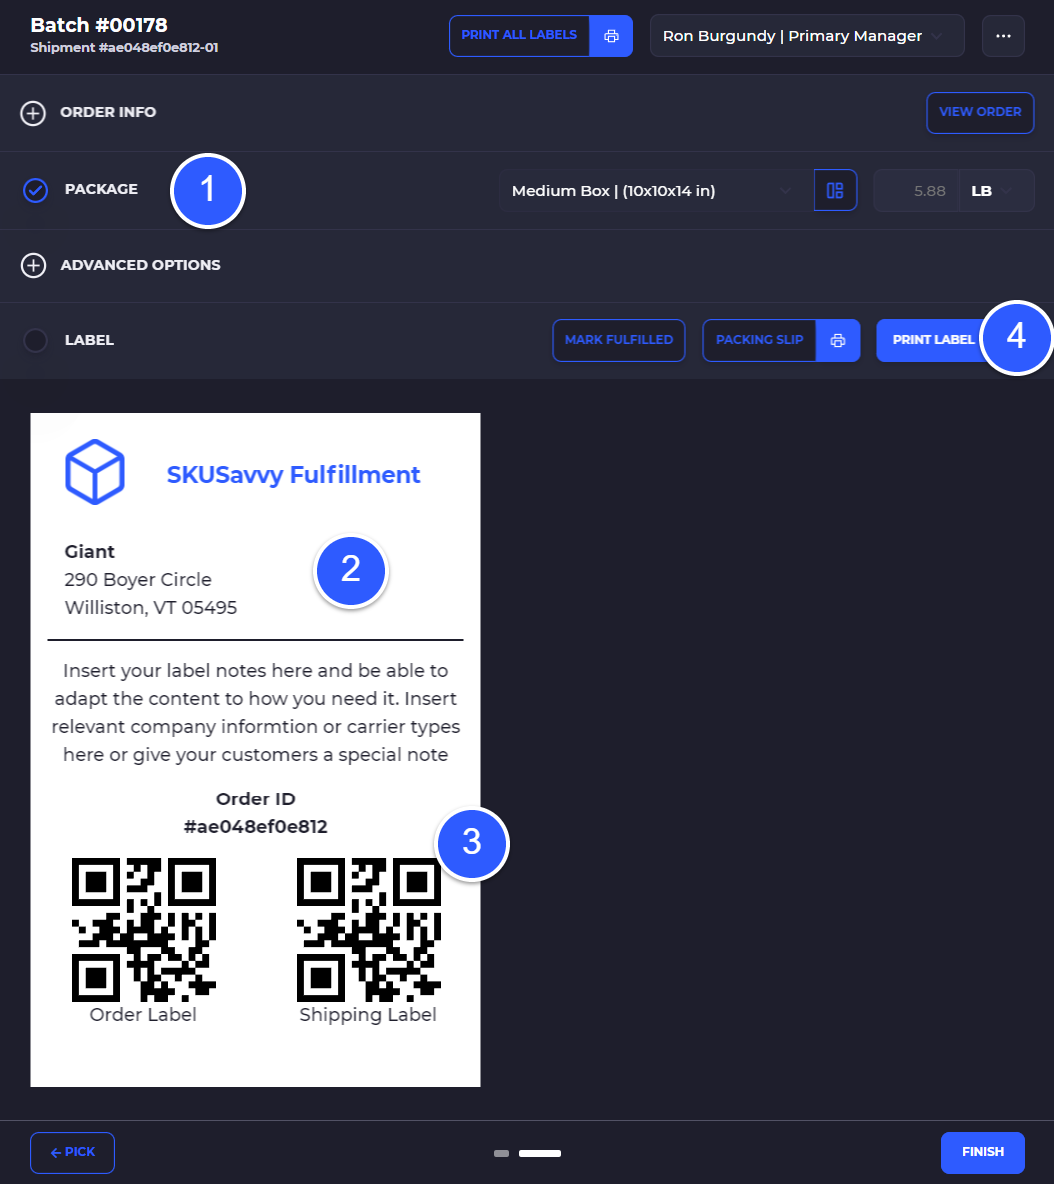
Below is a screen post picking and packing the order contents showing a custom label with this order information dynamically showing
1) Package order contents (treat any split shipments just like any other order)
2) View your custom shipping label
3) Label barcodes for the custom shipping label
4) Print the custom shipping label associated with the order
Check-In & Transfer Label Printing
To print a custom label during check-in of a PO or transfer order you need to have the printing turned on for the check-in/transfer order, and ensure you have counted/allocated items, then printing is available and by default prints the number of items checked in. Since the check-in label can contain lot information this label is reserved until after a product has been fully checked in.
You must have already designed your label to use it during check-in
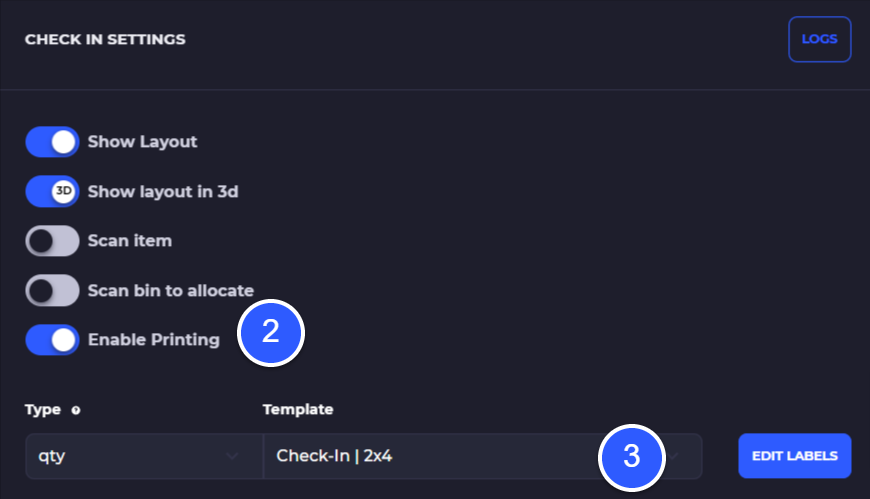
1) Open the 3-dot menu from within PO check-in
2) Turn on 'Enable Printing' within the settings
3) Select which check-in label you'd like to use

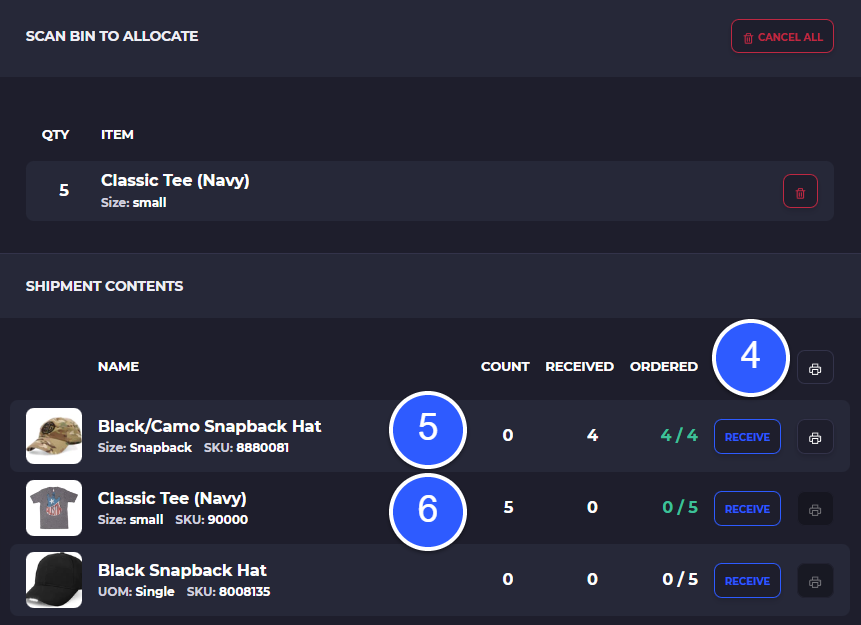
With the print settings turned on, you can now go through the normal check-in process within SKUSavvy and as items are completed, you will be able to print the barcodes out.
4) Print all available items that have already been checked-in
5) This item is already counted and received so it is showing the print icon which can be used to print this items labels
6) This item has only been counted, but not received, so the print icon does not show yet until the units are allocated to bins
Print Custom Bin Labels
To print your own custom bin labels you can design the label then head into any place you normally would print bin labels from including a single bin view, list bin view, and printing all bins for a single shelf.
Select your label format while on the print screen of your bins
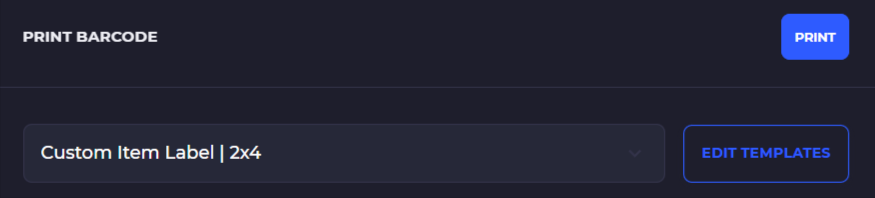
Print Custom Product Barcode Labels
Once you've designed a product barcode label you can print this out by going to the product > variant and tapping on the print icon next to one of the barcode associated with your product. SKUSavvy will prompt you to select the label format you want to use and then you can print whatever quantity you need.
You must already have the label created to use it. Missing fields from your product will not show on the print if they have been included on the label design.
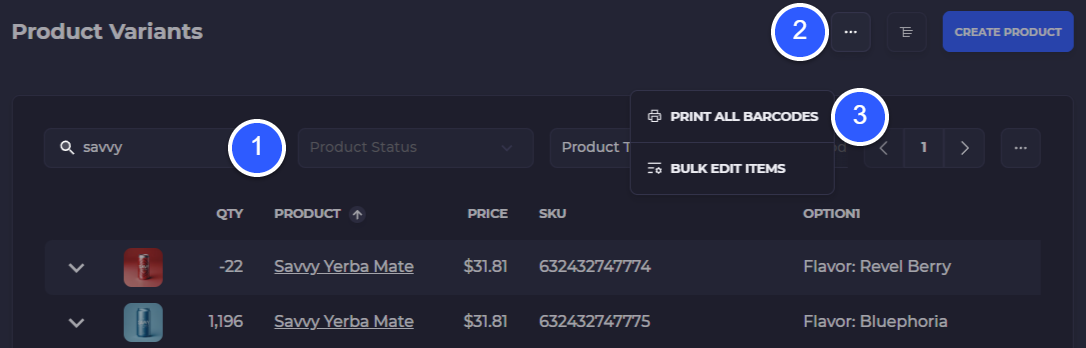
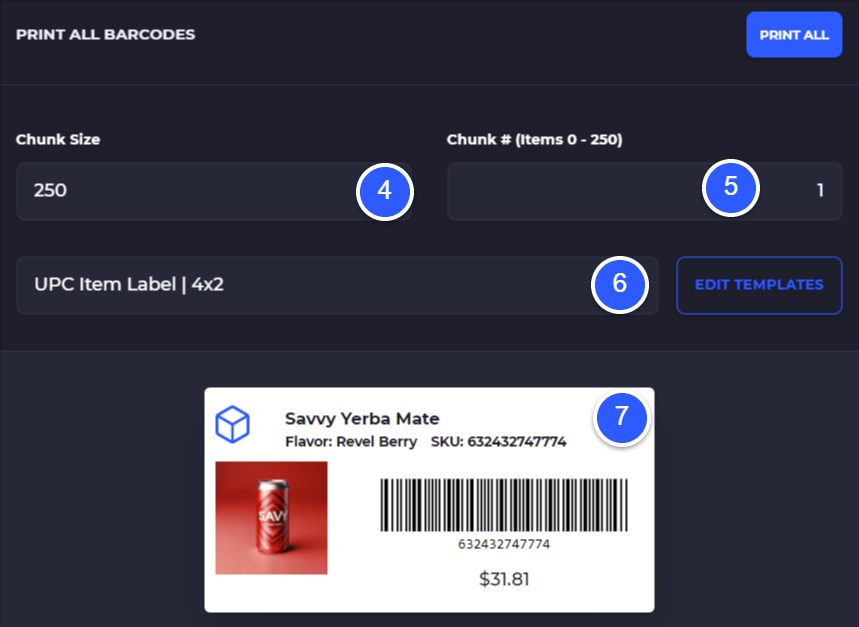
Bulk Print Products
You can print product barcodes in bulk by going to your products table, entering filters to narrow down which labels should be printed, and printing them off in batches of maximum 250 at a time.
1) Enter filters to narrow down which products should be printed
2) Select the 3-dot menu
3) Select 'Print All Barcodes'
4) Chunk size - 50, 100, 250, 500, 1000 - this is how many labels should print at one time
5) Which chunk to print so at a chunk size of 250, entering 2 here would print labels 251-500
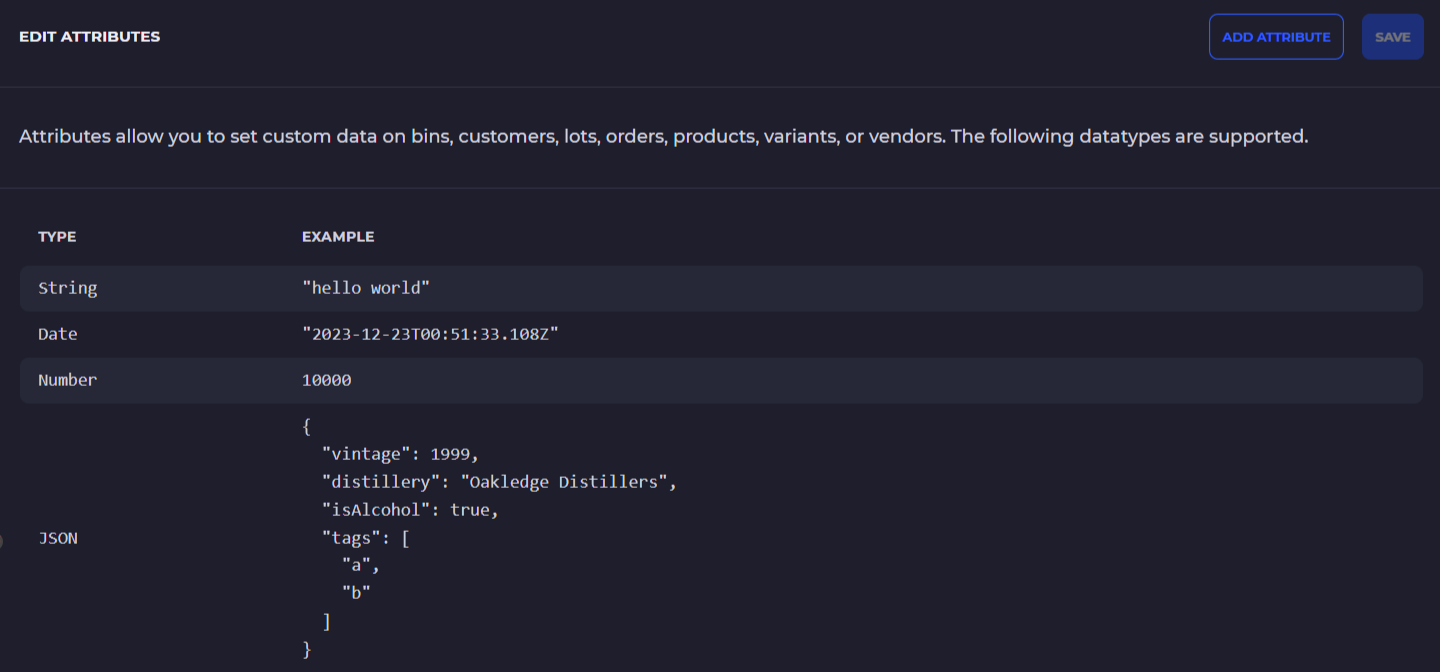
Printing Custom Meta Fields
You can use meta fields from SKUSavvy on any of the appropriate labels. For instance meta fields can be applied to products, product variants, vendors, orders, lots, customers. These meta fields can contain a name, data type, and value which can then be utilized to pull this dynamic information for any of the label types you have created.
Below is a list of data elements that accept meta fields:
Product
Product variant
Vendor
Customer
Order
Purchase order
Transfer order
Bin
Add Meta Fields First
To use meta fields within a custom label you need to have already added the data to it's relevant source. Look for the meta fields anywhere you see this dialog:
Add Meta Field to Label
Within the label builder select from the dropdown the meta field attribute and add it to your label. Once added you should click into this and choose which type of meta field (product, variant, customer, etc.) and the data to show.

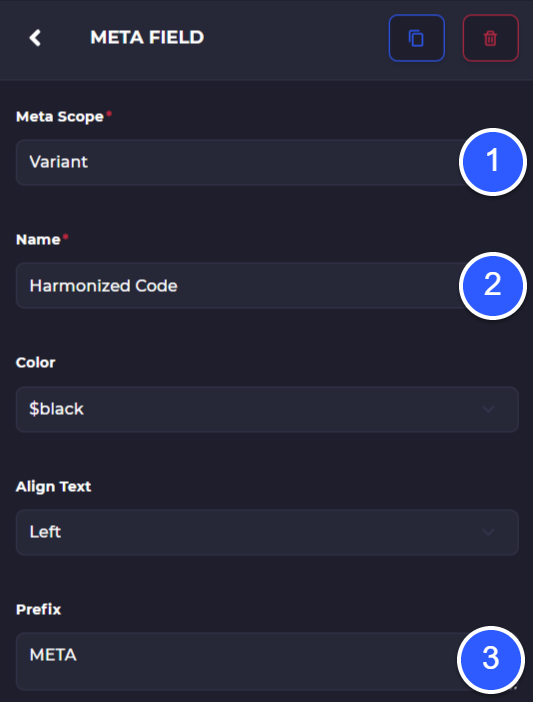
Select the meta field attributes to add them to the label builder.
1) Select meta field type
2) Select the data field you want available for the selected meta field type (must have already added this data on the meta fields directly for it to show)
3) Add a prefix for your meta field
Printing
Learn about the various print types within SKUSavvy
Fulfillment
Learn how to batch and fulfill orders on SKUSavvy
Shopify Inventory Management
How to get the most out of Shopify inventory management
Action Barcodes
This special type of barcode will enable you maximum efficiency in your fulfillment process by automatically advancing or performing prints simply by scanning. You can use these barcodes for the following actions:
Advance through the batch
Go to previous step in a batch
Print a shipping label
Print a purchased shipping label
Select a box size
Add a box to the shipment (multi-box)
Split a shipment
Barcode actions require a connected hardware scanner
Print Action Barcodes
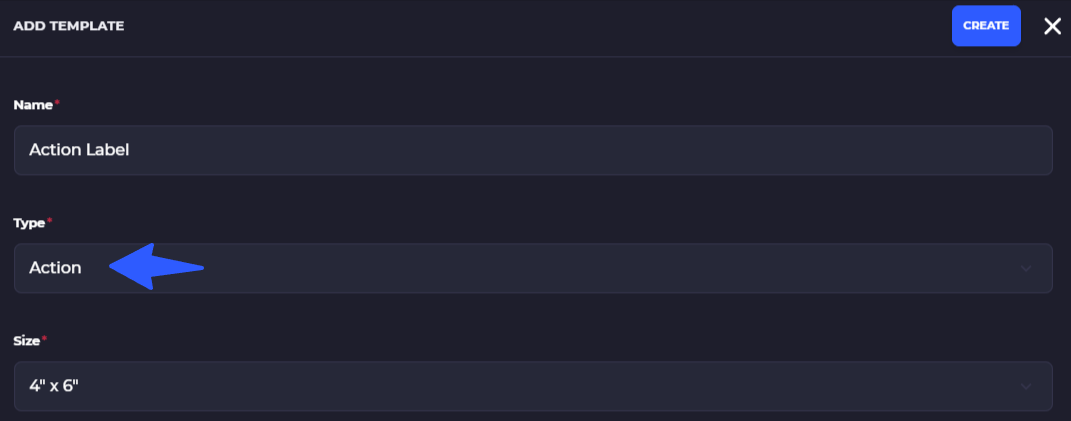
To print an action barcode you can simply go into the tempalte editor and either create a new barcode then using the 'Action' barcodes, or copying one of the templates already included.
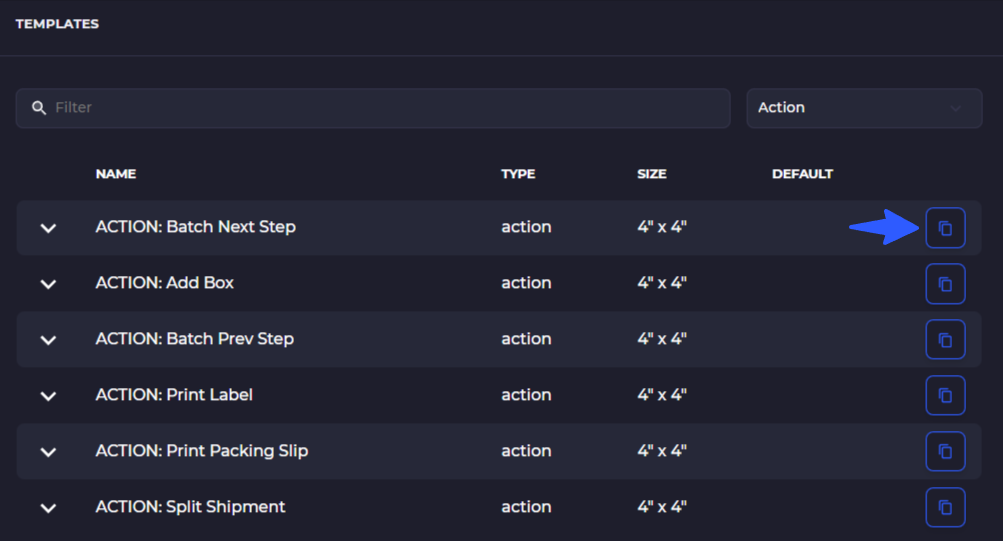
Copy Templates
Edit and Print
