Add Inventory
Add inventory to a warehouse in your SKUSavvy account. Four ways to add inventory to a warehouse bin location.
How to Change or Add Inventory
One of the first steps to using SKUSavvy to your advantage is to add inventory to bin locations. Here we'll go through a few ways to add inventory. The methods to add inventory are as follows: add inventory through the inventory adjustment flow, adjust inventory on the product, or the simplest method, scan inventory to a bin.
Bulk Allocate Stock
From within the inventory view in a warehouse you can bulk allocate inventory that has come over from Shopify. Simply select the bulk allocation tool, filters products you want to allocate, and select a bin for the stock.
Note this is only available for Shopify inventory that has not been placed in a bin yet
If you don't see the bulk allocation tool icon, click on the 'Flat List View' icon to switch the view enabling bulk allocation.

1) To use a camera scanner with the bulk allocation, click 'Scan Item or Bin' and to use hardware scanners you can simply start scanning items to auto select those items for allocation, or scan the bin to enter the bin you want to allocate into
2) When you are satisfied with the product/bin selection, click 'Allocate' - note that if you accidentally allocate, you should plan to manually move stock from one bin to another to correct this
3) Bin you are allocating to
4) Indicates how many quantity is being allocated, you can allocate all items to a bin by not making any selection
5) Enter your filters to narrow down and select specific items for allocation
6) Select all items matching your filters
7) Check/uncheck an item for allocation

Inventory Adjustment
One way to make changes to inventory is done within an inventory adjustment which enables you to select a product and bin to be adjusted from. To make a change you first must be within a warehouse, then select inventory and click 'Add Inventory'.
1) Go into the warehouse you want to make the inventory adjustment for
2) Select inventory
3) Inventory Tools Buttons: Bulk allocate Shopify inventory, toggle between flat and grouped product variant views, export inventory as a CSV
4) Click 'Adjust'

Next, you'll see a screen to select a product from your central catalog across all warehouses. Once a product is selected, if that item is already within the warehouses, you will see the current inventory locations and quantities. If the product does not currently exist in the warehouse, you'll be prompted to select a bin and enter a quantity for the inventory adjustment. Below is a product that already exists in the warehouse, and we'll be adding new inventory to a different bin location.
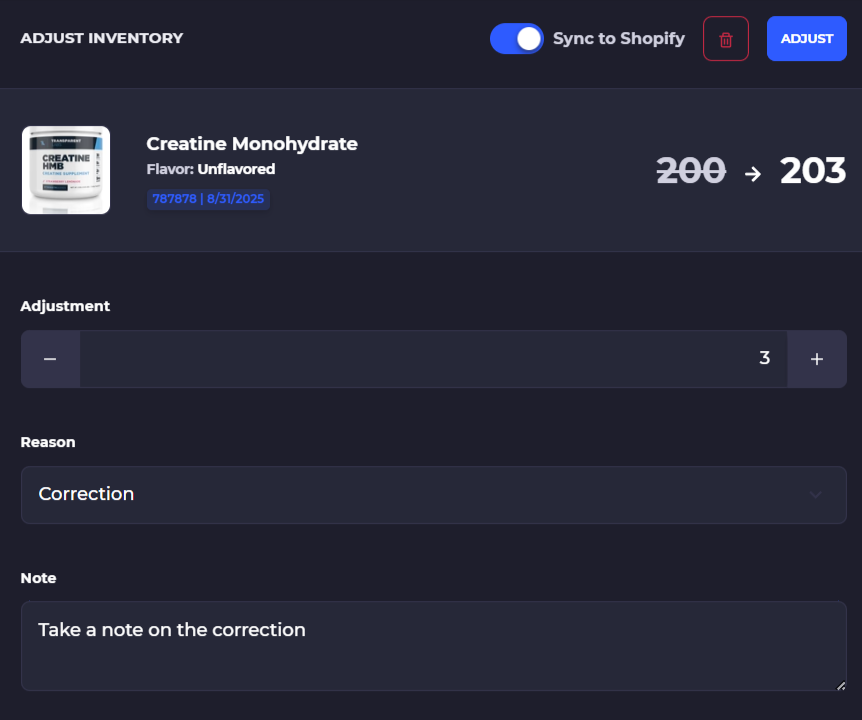
1) Optionally turn off the inventory changes from syncing up to Shopify
2) Select or scan a product to make adjustments for
3) Select the bin you want to place this product into, for existing bin locations, simply adjust the quantity already in the bin
4) Enter the quantity you want to add and click 'Add to Bin'
5) View the current bins this product is held in
6) View/adjust the existing quantity in a bin
7) Add select or scan multiple products to make bulk adjustments
Click SAVE to submit your changes

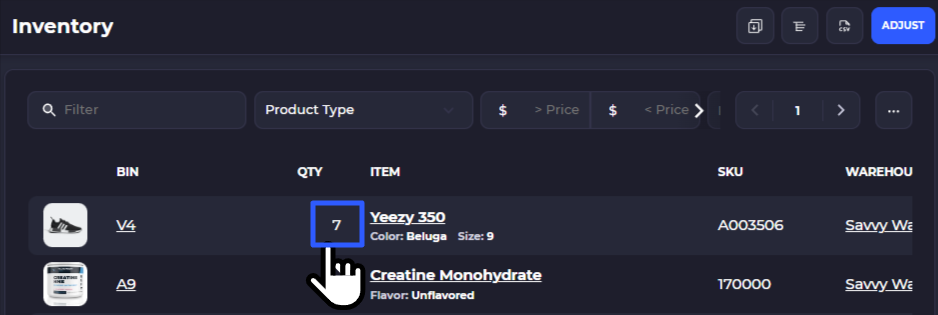
Tap the Inventory Quantity in Any Table to Make Adjustments
Inventory must already be within a bin location to click > adjust
Manually Adjust Inventory
Another method for adding inventory is to go directly within a bin location on your warehouse layout and add quantity there. This is done by first entering the warehouse you'd like to add quantity in. Then, you'll go within the list of bin locations, or go directly within the warehouse layout and select the bin there, then view the bin and add quantity.
Method One - Warehouse Layout
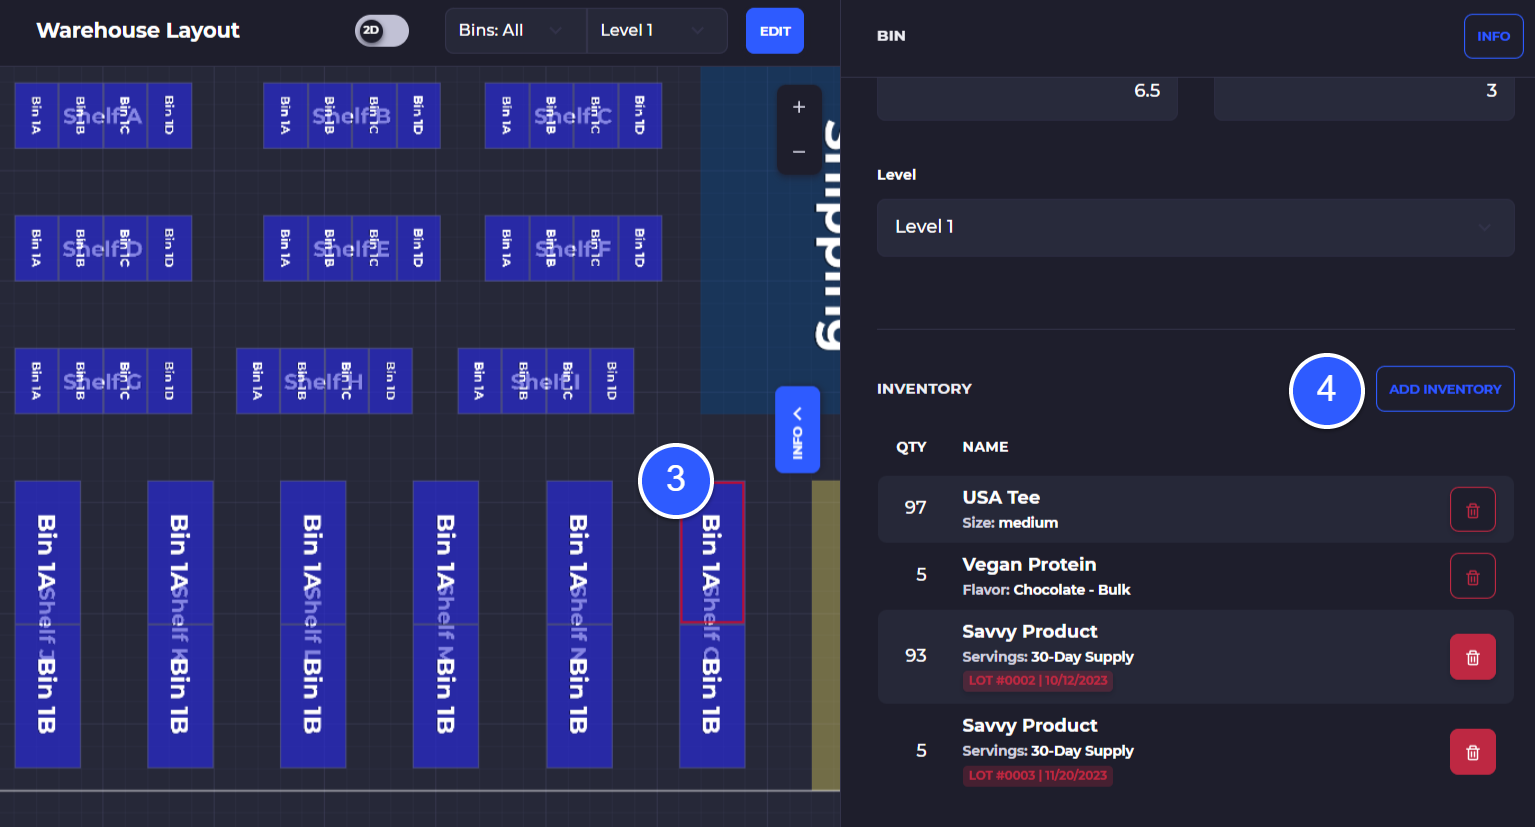
1) Enter a warehouse
2) Go into the warehouse layout
3) Select the bin location you want to add inventory to
4) Click 'Add Inventory'
At the bottom select 'Add Inventory' to go into the inventory adjustment screen.
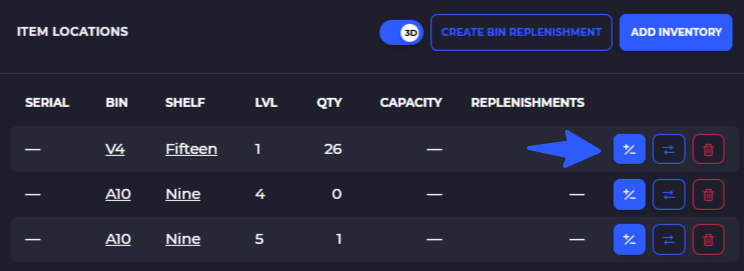
Method Two - Directly on the Inventory
You can also make inventory adjustments by simply going into the inventory you want to adjust and clicking on the adjustment button, which looks like the one below:

Scan to Add Inventory
The best way to add inventory in the warehouse. Once you've got a warehouse layout setup with bin locations and labels, you'll be able to directly scan products into a bin either from a purchase order or by scanning a product then adjusting a quantity and allocating to the bin location.
If you've got a desktop or laptop with a camera, you can simply press the scan button, and hold the product in front of the camera. Once a product variant is detected, you will have a screen with various options, most importantly here is to 'Adjust Inventory' which will let you add a quantity and scan a bin to assign that quantity to the bin.
1) Select the scan button - located in the bottom left on laptops and desktops, and located in the bottom right as just the icon on mobile then align the red bar over your barcode to scan any item
2) Click 'Adjust Inventory' to make an adjustment to that item within the current warehouse


4) Select a bin location you want to add the inventory to
5) Add a quantity
6) View existing locations already containing the inventory within this warehouse
SAVE

Related Docs
Build a Warehouse Layout
Learn how to create bins on a 3D warehouse layout tool within SKUSavvy
Create Custom Labels
Learn how to build your own custom label formats for printing items, bins, POs, and more