Transfer Inventory
Use SKUSavvy to transfer inventory between warehouse locations or 3PL providers.
Transfer Inventory
To move inventory from one warehouse to another simply create a transfer request from the originating warehouse to the receiving address. This will initiate an inbound internal order to be created and set up on the receiving end warehouse. This will also create an outbound order flow for the origin inventory to be picked and shipped to the receiving side.
You must turn on the transfer functionality from your account configuration
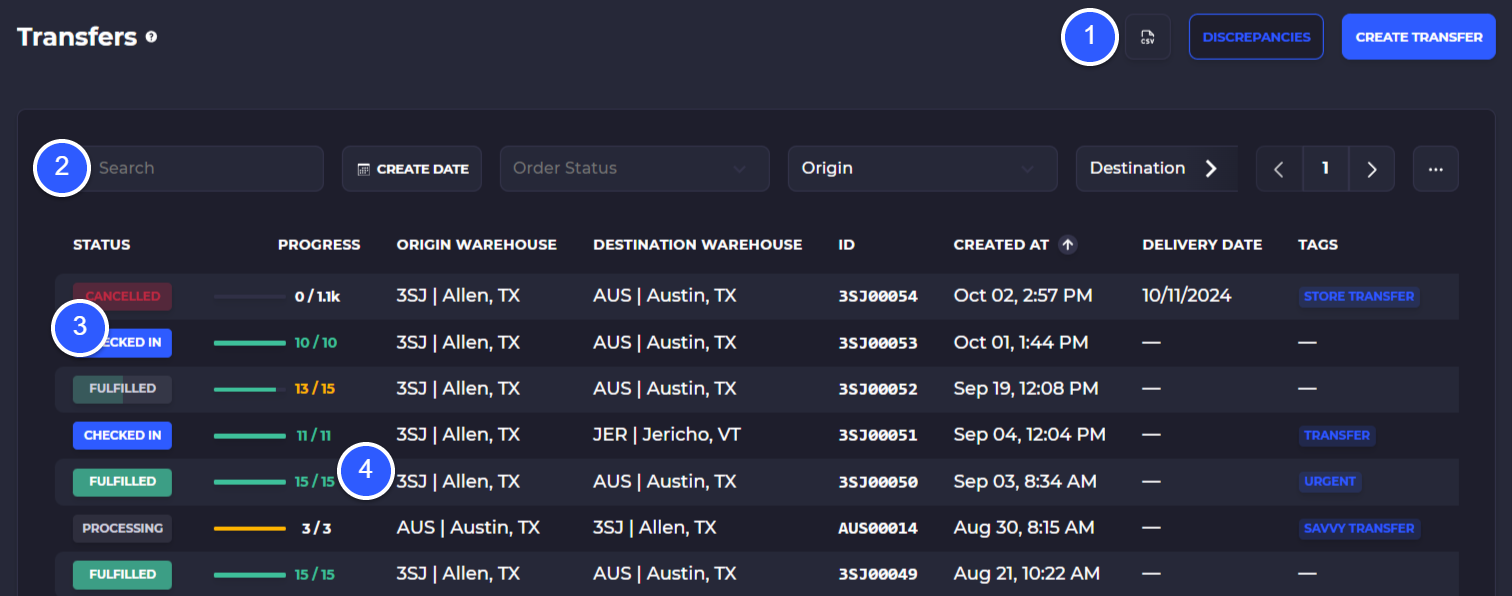
1) Export all transfer orders with the CSV button
2) Filter transfer orders by creation date, order status, origin warehouse, destination warehouse and paginate through transfer orders
3) Transfer order status:
Processing: The transfer has been created but no further action has been taken
Partially Fulfilled: Some items in the order have been picked and packaged with a shipment created
Fulfilled: All items on the outbound side of the transfer have been picked, packaged, and fulfilled with a carrier label or manual shipment
Partially Checked-In: Some items of the transfer have been checked-in to the inbound side of the transfer and allocated to a bin
Checked-In: All items on the transfer have been fulfilled on the outbound side and checked-in on the inbound side
Cancelled: The transfer order is no longer open for any actions
Video Overview
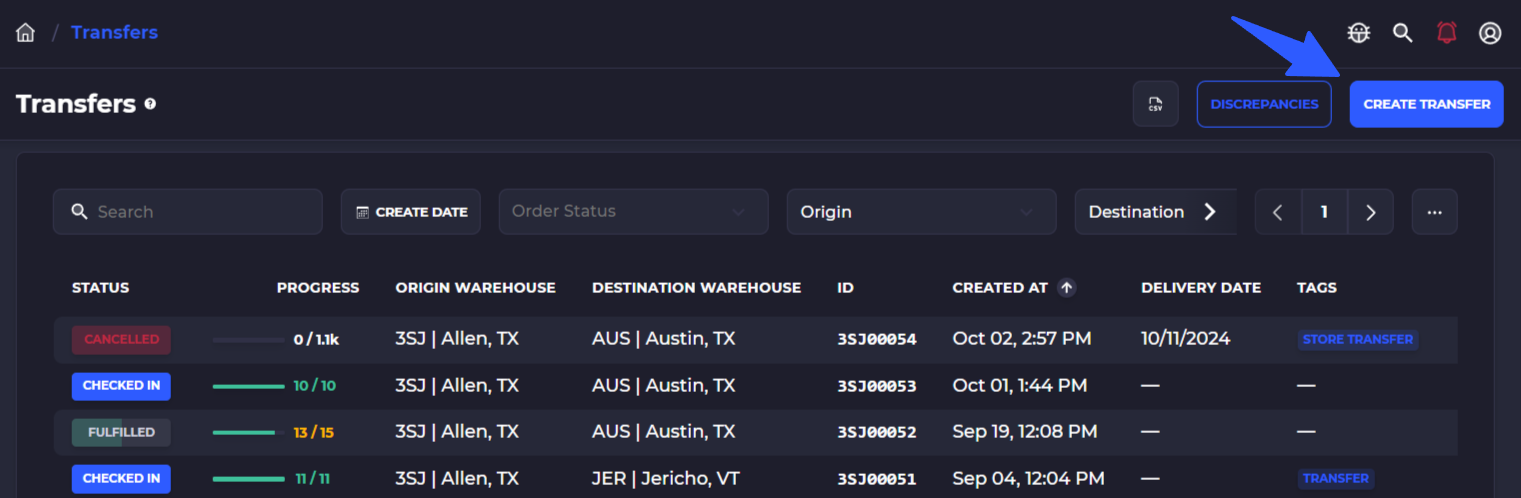
Create Outbound Transfer
Each cross-dock request creates one outbound transfer for the originating warehouse and one inbound transfer for the receiving warehouse. The process starts on the outbound side where you can pick the items and get them ready for transfer.
To do so, go into your transfer orders or go to the originating warehouse, select transfers > outbound, and select the transfer you want to initiate.
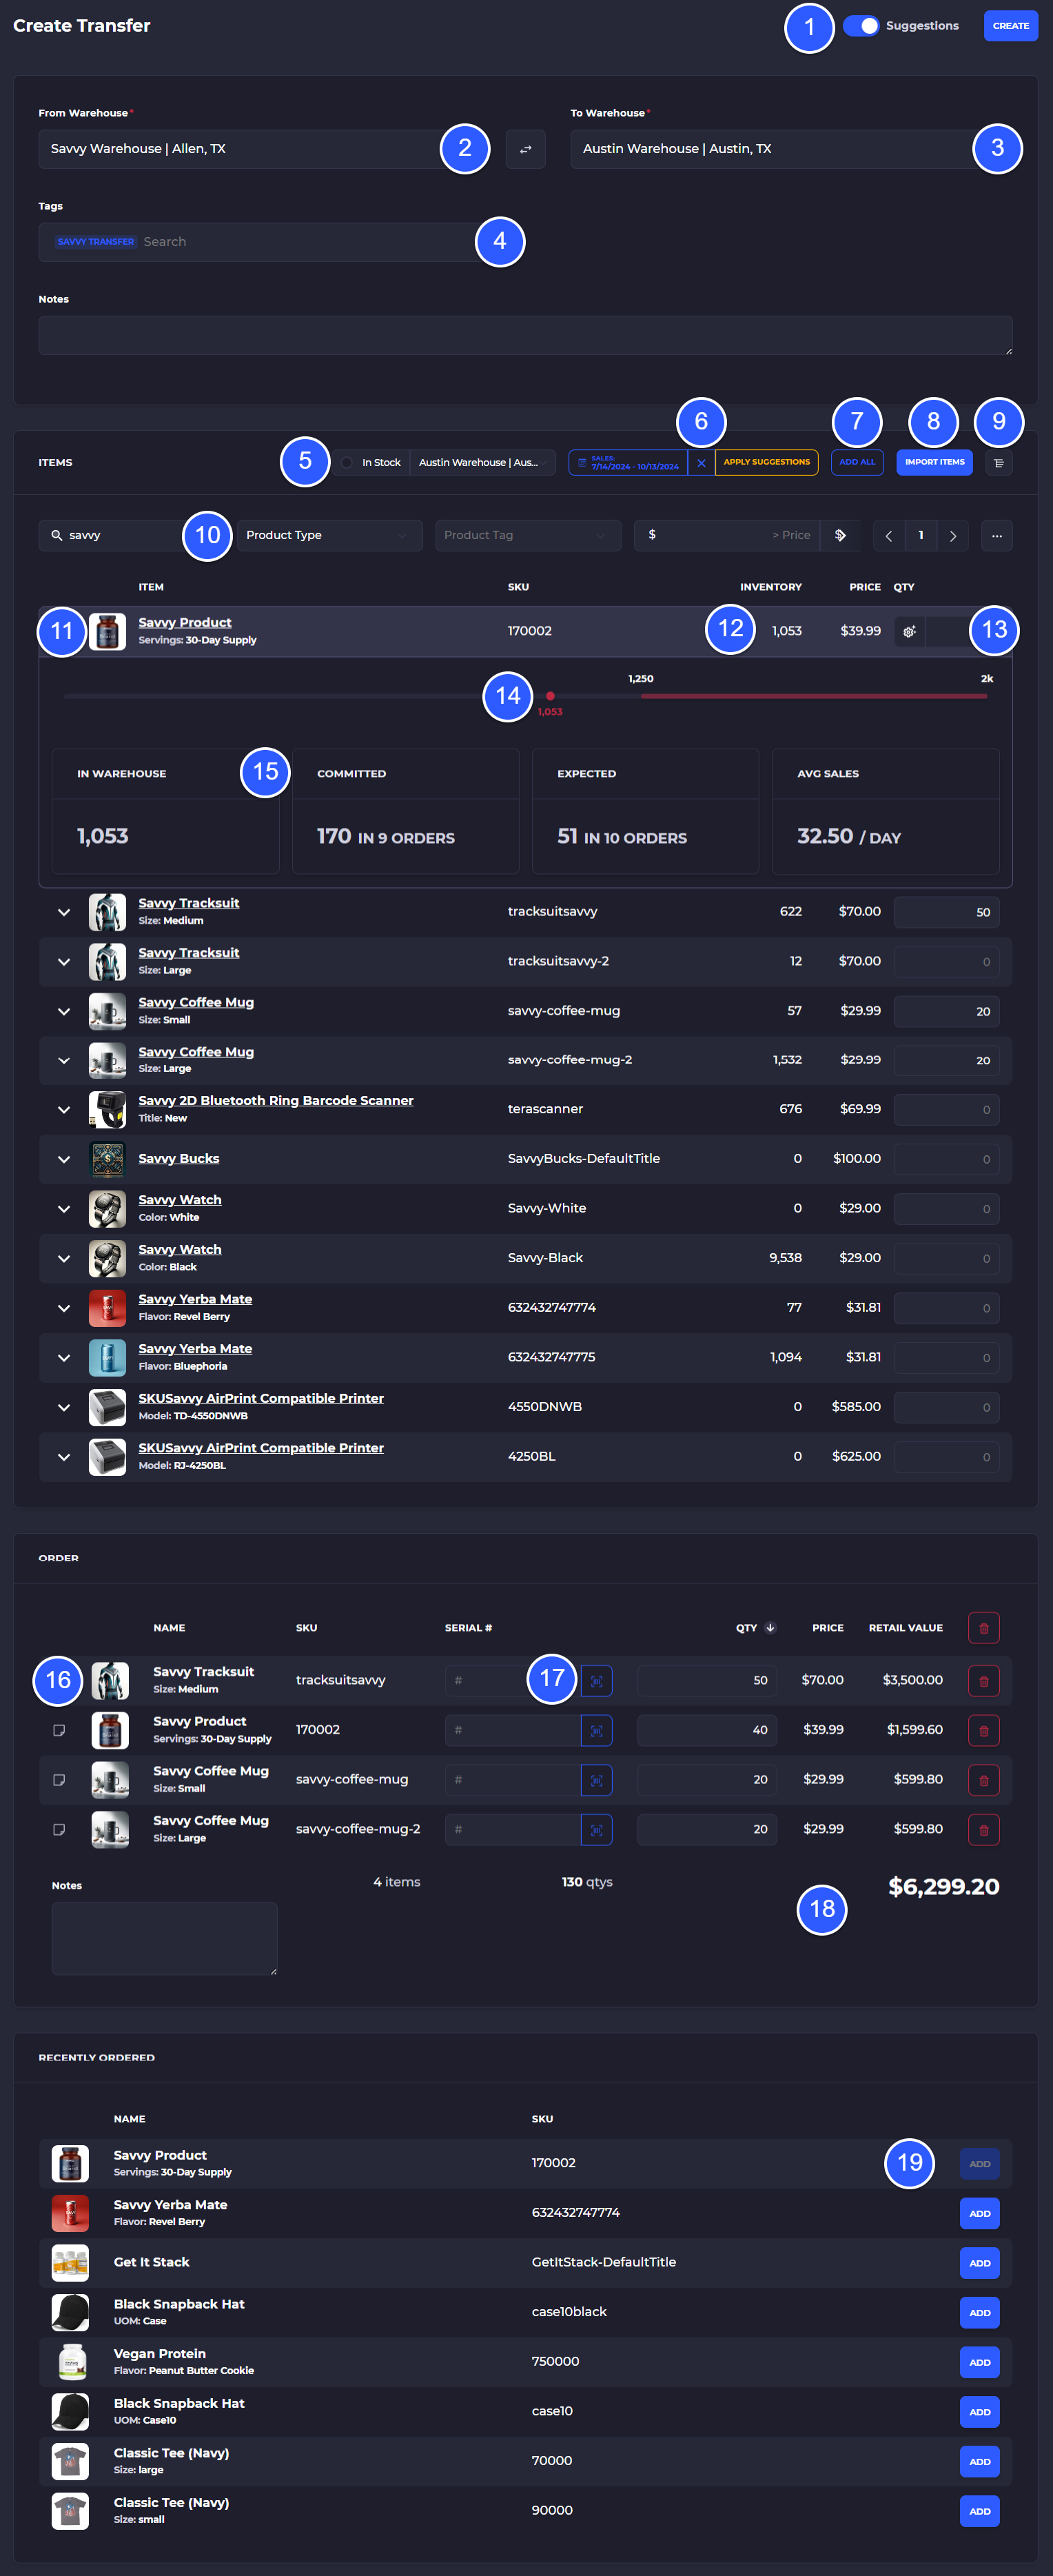
Create the Transfer
1) Turn on replenishment suggestions during transfer creation. Factors in on hand, committed, expected, avg. sales, par values, lead time into consideration
2) Select the from warehouse
3) Enter the receiving warehouse
4) Enter any transfer tags and notes
5) Select which warehouses inventory to look at and optionally check off to only look at in stock items
6) Select a date range to consider for sales velocity and apply suggested transfer quantity
7) Add all products to the transfer and enter a desired quantity
8) Create an import of products to add to the transfer
9) Toggle between flat and list views. Flat will show each variant on a row, list view shows each product with variants folded up into the product view
10) Enter any filters to narrow down the product list
11) View product and tap the caret to dropdown details
12) Current inventory at the selected warehouse
13) Suggested quantity, tap on the gear icon to show what values are considered
14) Par values as well as the current inventory quantity
15) Showing on-hand, committed, expected, and avg. sales for a specific variant
16) View products added to the transfer and add line item notes
17) Enter serial numbers for line items (or tap on the scan icon to scan in a serial number)
18) Total quantity and value of the transfer
19) Previously transferred items are shown at the bottom
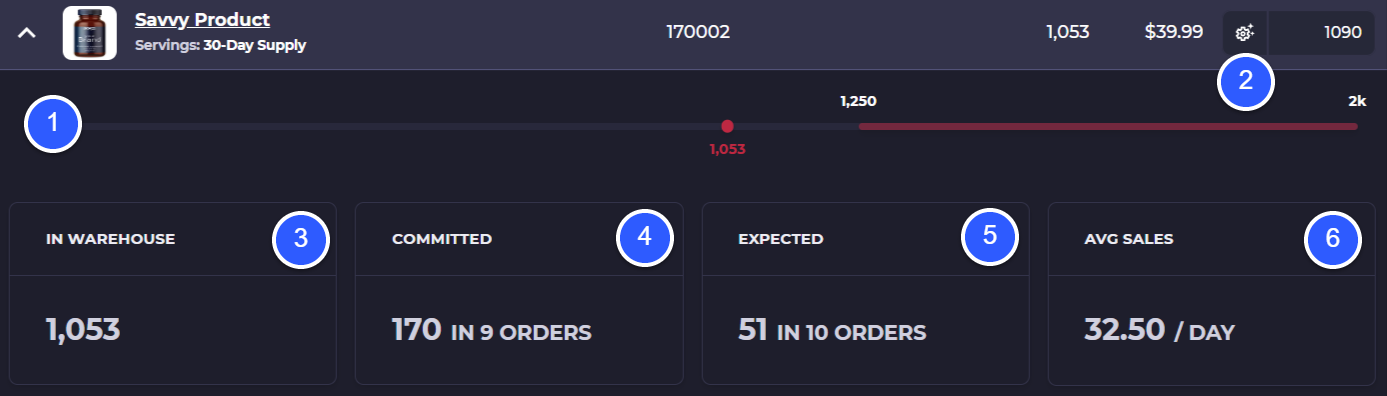
Order Form Detail
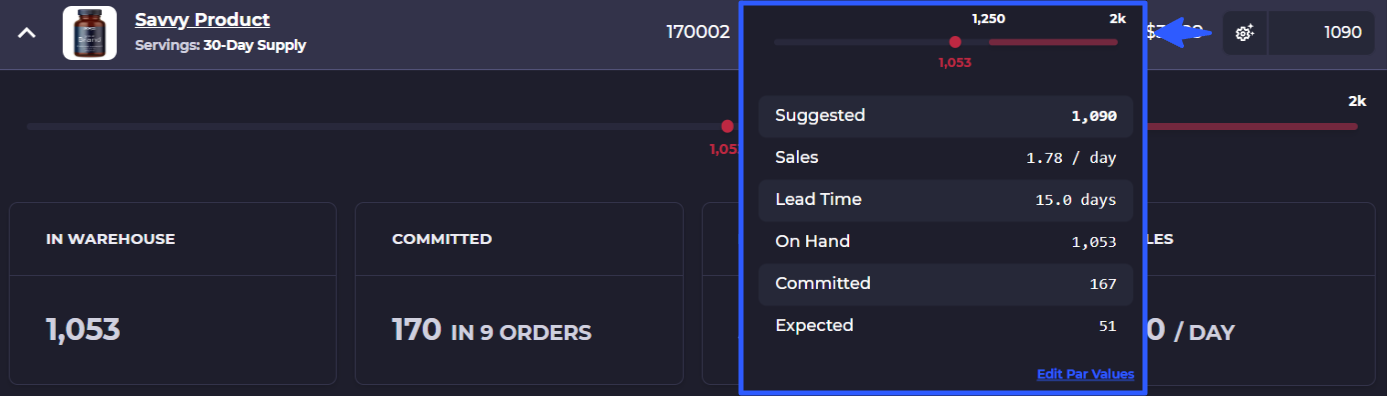
Below are some details to be aware of when creating a transfer order.

The first is when you click on an item within the transfer order form, you will see details related to the replenishment and current stock levels of the item.
1) View min/max and current inventory level of the item for the selected transfer to warehouse (will only show if par values are set on the inventory item)
2) Suggested quantity to transfer - tap on the gear icon to show how this is calculated
3) Total on-hand inventory value within the warehouse
4) Total committed stock of the item (click on the orders to view them all)
5) Total expected quantity for the current outbound warehouse (tap on the quantity to show them)
6) Average sales per day of the item (click on the avg. sales value to show a chart)
Automate Transfers
You can utilize the intelligence built-in to SKUSavvy to automatically forecast and suggest a quantity to transfer depending on which warehouse will be receiving the stock. You can also influence how much stock should be suggested by adding par values or changing the sales date range to look at.

Start by creating a new transfer and turning on suggestions.
Turn on Automated transfers

1) Make sure you are looking at the correct warehouses inventory, this should be the receiving side for that is the side SKUSavvy is suggesting quantity for
2) Select a date range for the sales data to consider, you can also set seasonal date ranges on the inventory item under automated replenishment
2.a) Click on 'Apply Suggestions' to add the quantity to the transfer

View the quantity being suggested by SKUSavvy and all considerations for making the suggestion. You do not need to have par values set to get suggestions, however you can utilize par values to influence the suggestion.
Set Par Values
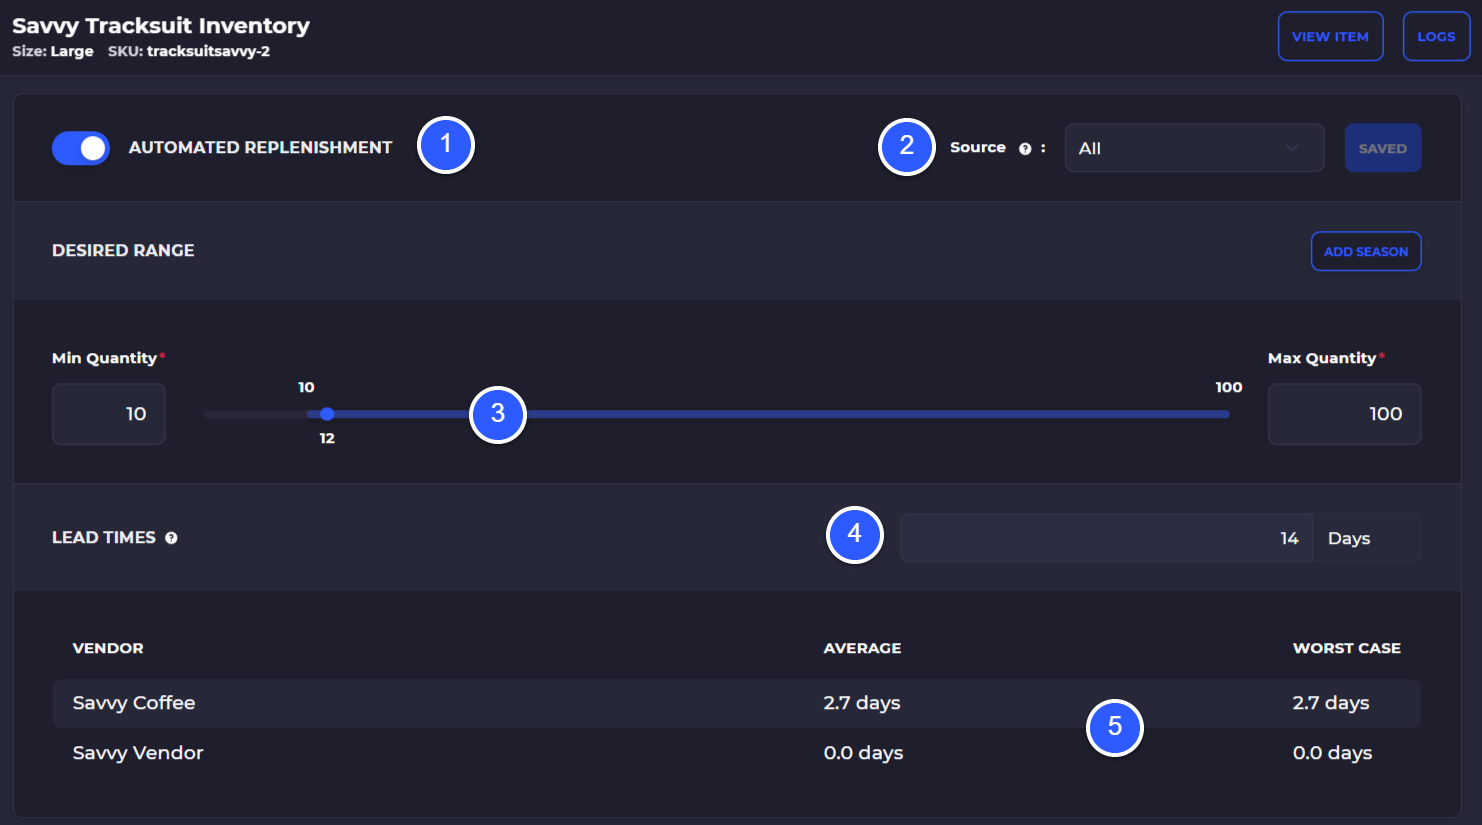
You can influence what SKUSavvy suggests by adding par values to an inventory item. These are set by going into a warehouse > inventory and selecting the inventory item. Scroll down to automated replenishment and turn this on. SKUSavvy will make suggestions to get the inventory level at the receiving side back up to the max par value considering on-hand stock, committed stock, expected from purchases and transfer, as well as sales velocity and the lead time it takes to to ship this stock.
1) Turn on automated replenishment for a given inventory item
2) Choose whether or not this inventory item should be ignored during transfer or PO creation
3) Set the par values
4) Set a default lead time for the inventory at this warehouse
5) View calculated lead time from vendors which will get more accurate as you make purchases in SKUSavvy
Fulfill Outbound Transfer
When you click on an outbound transfer you will see the details of the transfer, as well as a button at the bottom of the transfer details to 'Fulfill' which will take you through a pick flow. Click on 'Fulfill' to get started.
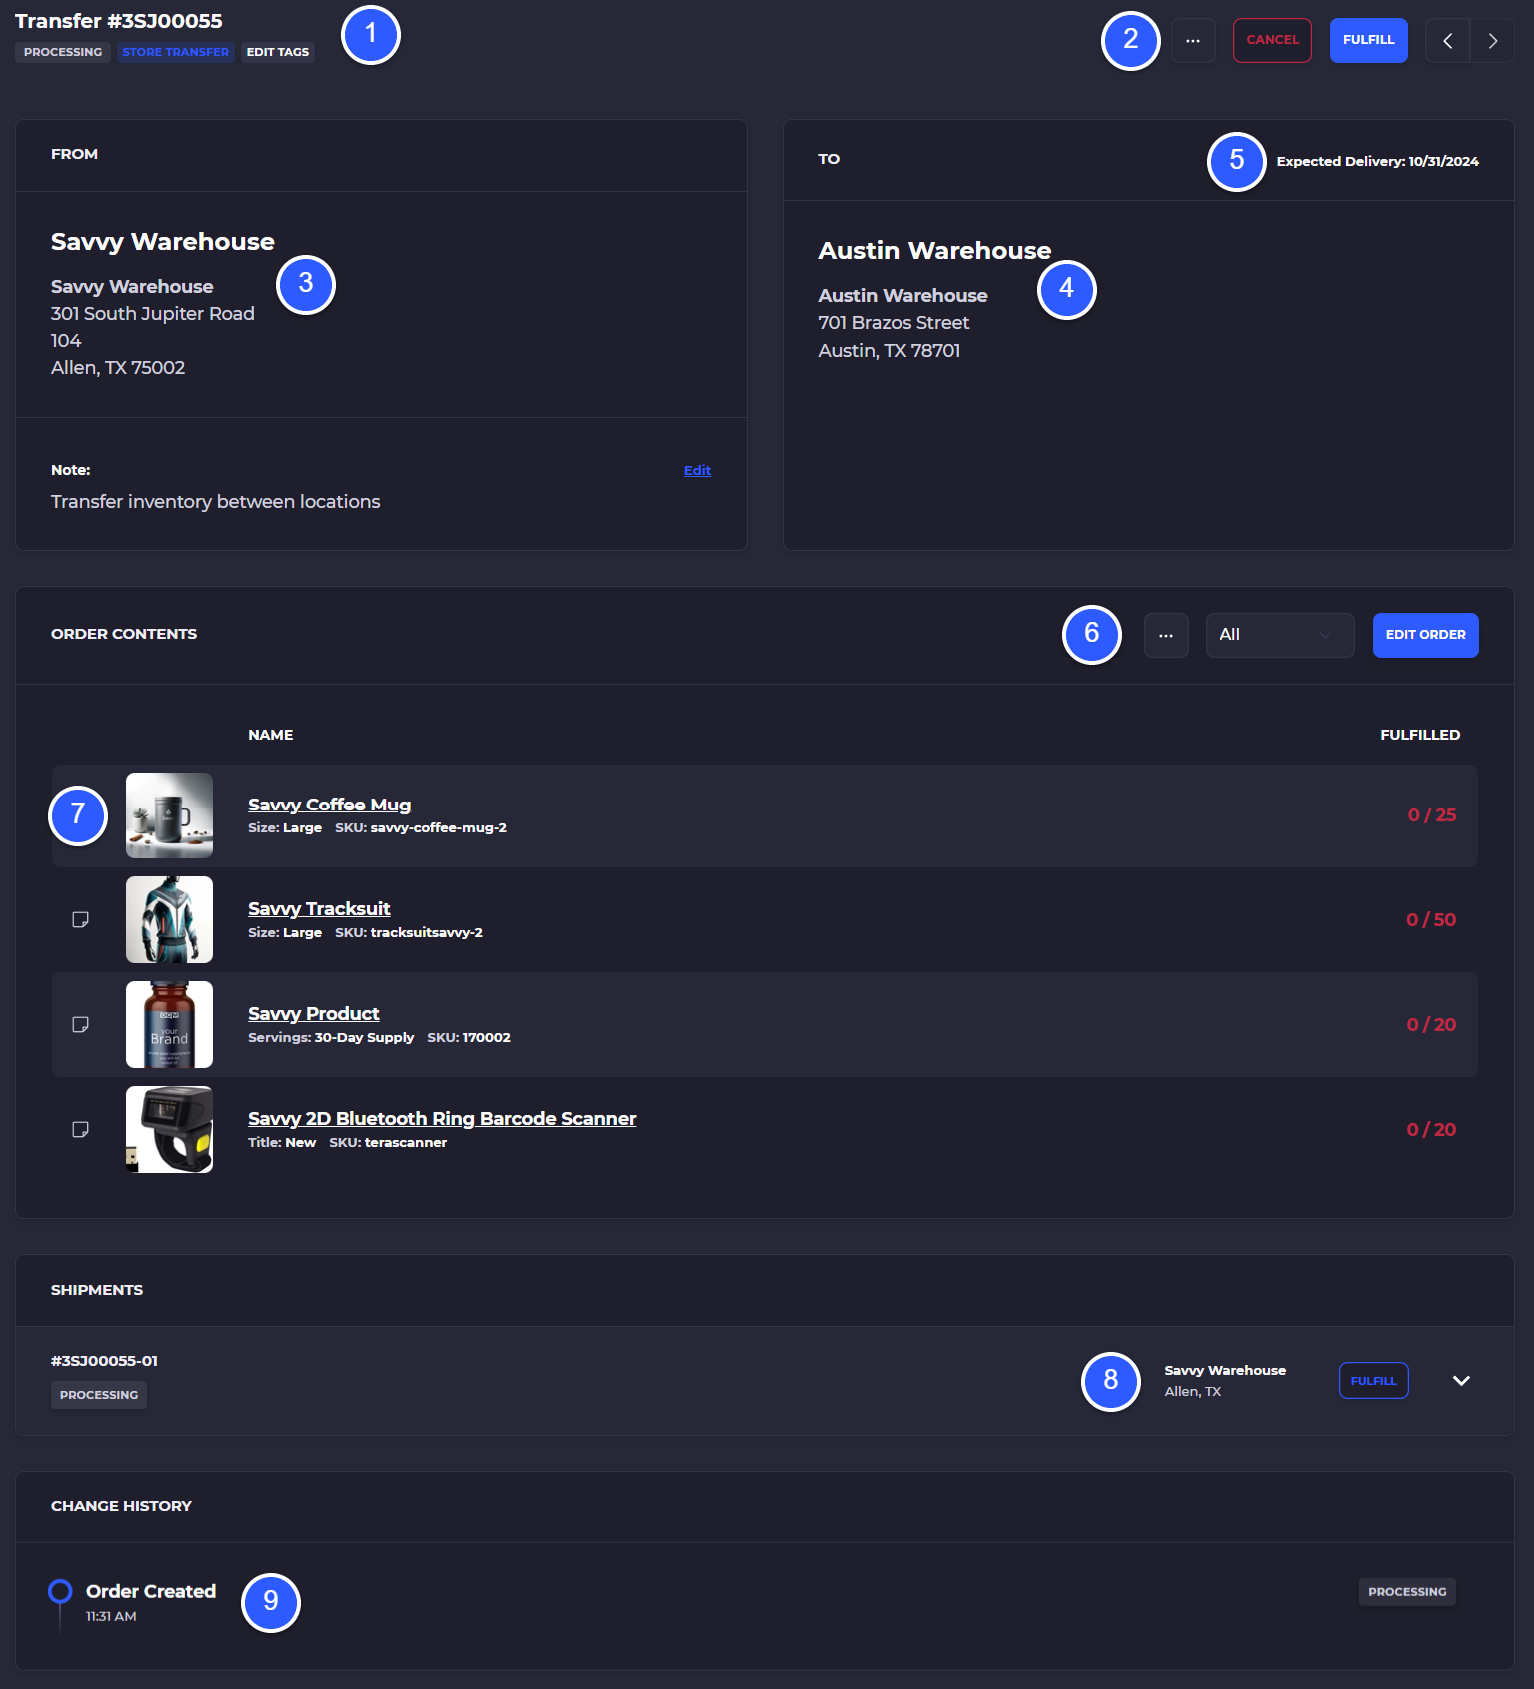
1) Transfer order number and status as well as tags
2) 3-dot menu and transfer cancellation. Here you also see the 'Fulfill' button to get this transfer ready. Next to this is the ability to paginate through transfer orders
3) From warehouse is the originating outbound side of the transfer. Stock will come from this warehouse going to the inbound side. Click on the warehouse name to navigate to the outbound side
4) To warehouse is the inbound side of a transfer. Click on the warehouse name to navigate to the inbound side of a transfer
5) Expected delivery date. Tap to change
6) 3-dot menu to adjust table columns. Filter by remaining quantities. Edit the transfer order to add items and update quantities. Note there is a setting on the configuration to be able to edit a transfer order all the way through check-in
7) Items and the quantity expected on the transfer, tap the notes icon to add a line item note
8) Warehouse the transfer is being fulfilled from as well as the 'Fulfill' button to start preparing the transfer
9) Order action history showing when the transfer was created, fulfilled, checked-in, notes added, tags added
Pick Outbound Transfer Items
Once you click 'Fulfill' SKUSavvy will take you into the warehouse layout to pick and pack items getting them ready for transfer.
Scan settings for transfers are adopted from pick/pack scan settings in your configuration. When using a hardware scanner with scan settings turned on simply scan, there is no need to click any button to scan.
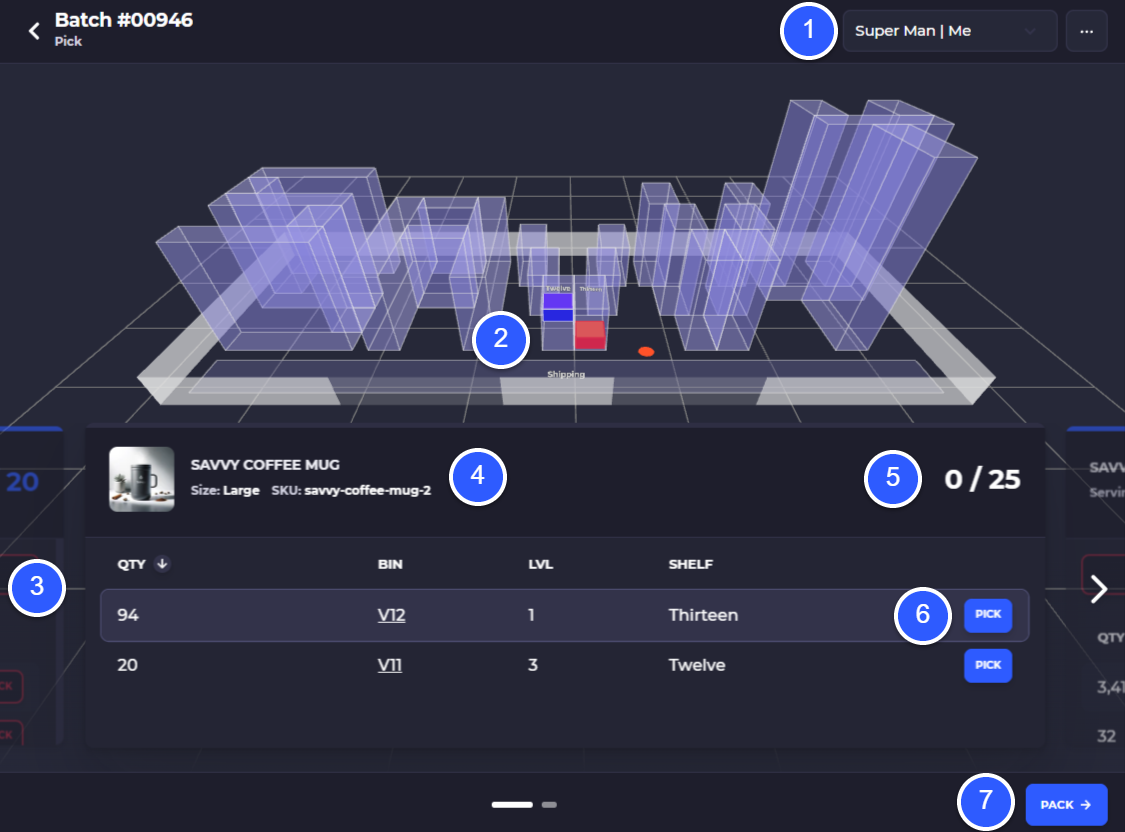
1) View/assign a staff to the transfer and open the 3-dot transfer settings menu that includes options for map settings, pick routing, carrier options, batch barcode etc.
2) Visual layout of all bin locations containing at least one item on the transfer order pick sheet. Click in the top of the pick list to view all locations or to filter by picked/not-picked
3) On mobile devices tap the arrow to go through items in the pick list or view all items on the map
4) Product to pick
5) Quantity for the currently selected item on the transfer with options to pick/unpick
6) Tap on pick to pick, or simply scan the item if using a hardware scanner
7) Once the transfer order is picked, select 'Pack'
Transfer Batch Settings
These settings are accessed through the 3-dot menu in the top right of any order pick batch
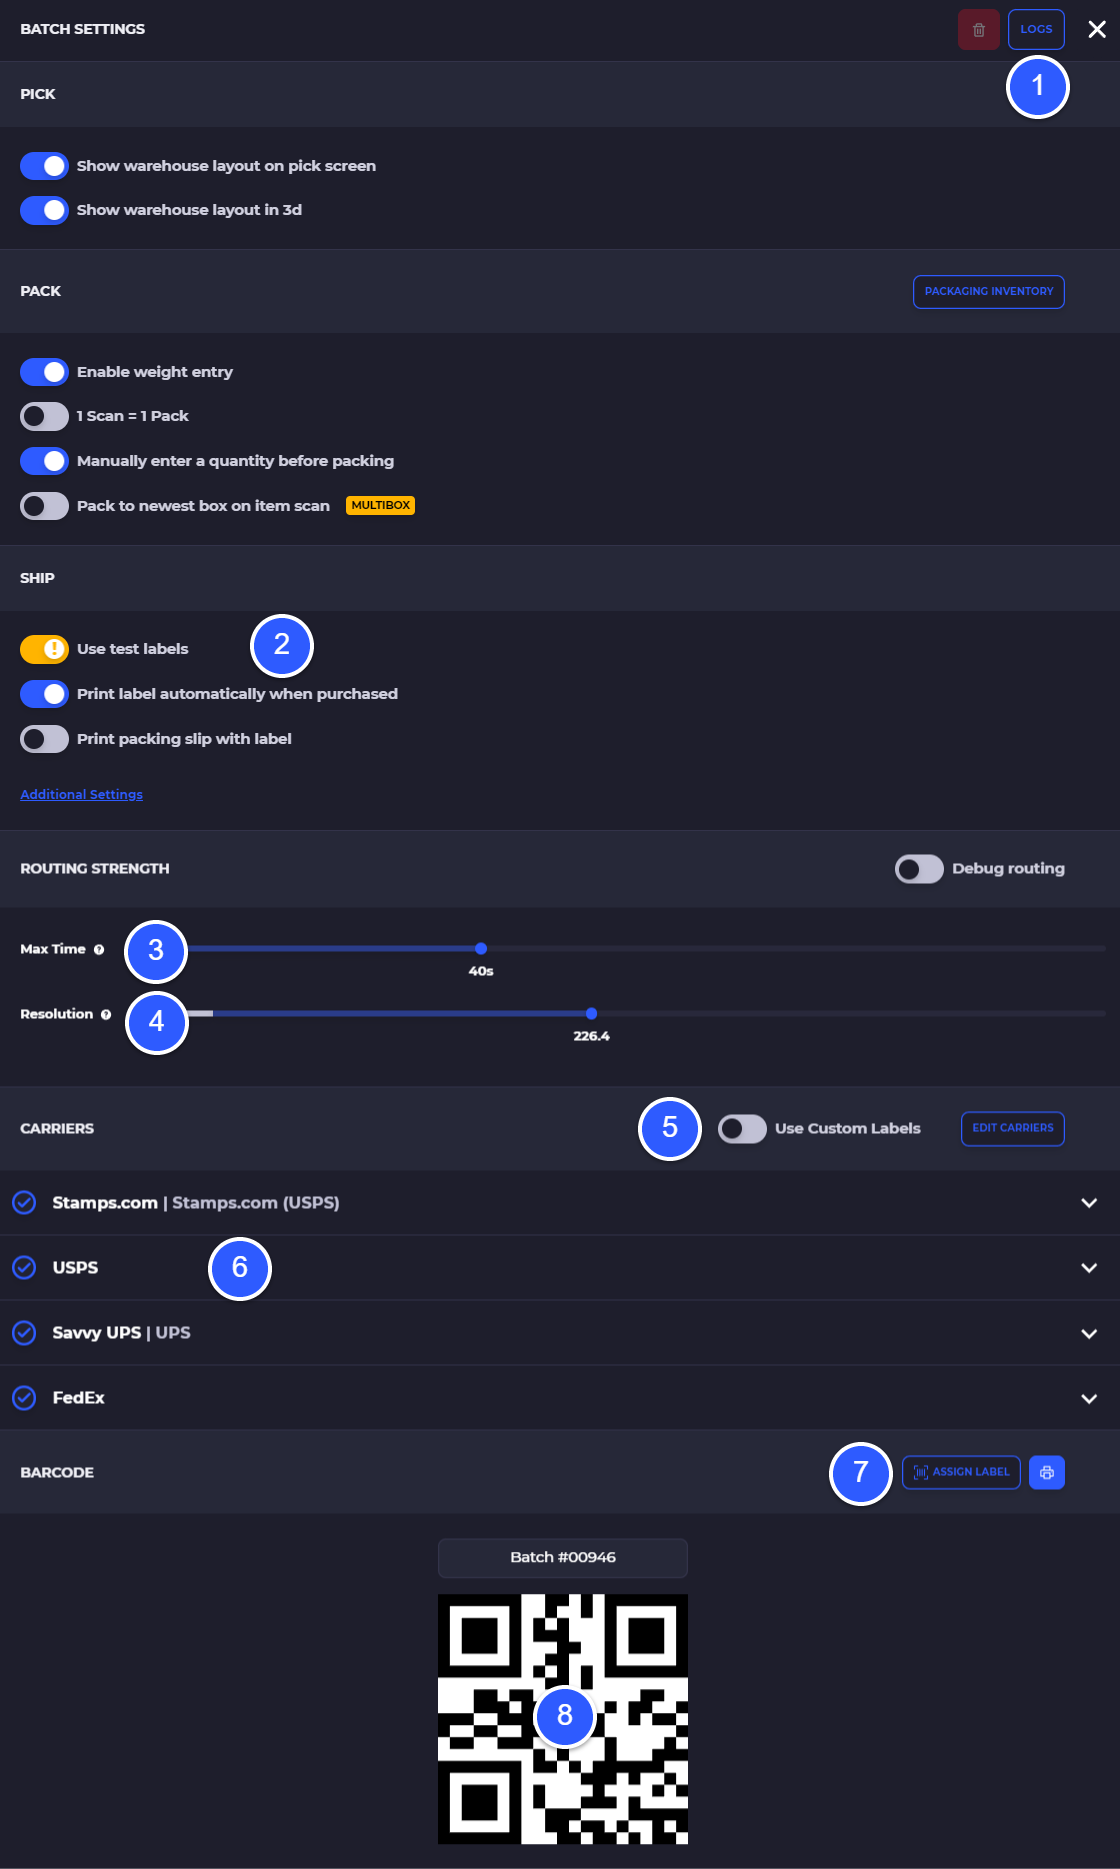
1) View the logs for the transfer to show all activity
2) Settings for test shipping labels, warehouse layout options, automatic shipping label printing, weight entry, manual counting dialog
3) Max time allowed for the pick routing algorithm to finish route planning, it may not be fully optimized if the route runs out of time. High times for long line item orders may take a while to plan
4) Resolution is how fine tuned the routing algorithm with consider for spaces and aisles between shelves, smaller is almost always better
5) Setting to turn on/off your own custom shipping labels which can be built in the custom label creator
6) Turn on/off carrier services options
7) Transfer order batch barcode which can be assigned, generated and printed out so a staff member can scan it to come right back into the transfer order where it was left off
8) Batch barcode
Pack & Fulfill Transfer Contents
Once you click 'Pack' SKUSavvy will show the necessary information to be able to pack the order, count items in each box, and select shipping.
1) Transfer info, click to expand
2) View the transfer to make edits and switch to inbound/outbound side of the transfer workflow
3) Select or add packaging (required if sending via carrier)
3.a) Add custom box size during fulfillment as well as view the 3D palletized order using the palletization software in SKUSavvy
3.b) View or enter a custom weight of the items on the transfer
4) Items to pack, click to pack when using no scans or camera scanner or simply scan to pack items with hardware scanner
5) Unpack items back to the batch (remains picked) or back to the bin directly to unpack and unpick
6) Mark the order manually fulfilled (and you can skip carrier tracking number entry) for transfers made with a fleet vehicle
7) View and purchase a carrier shipment option to print a shipping label
8) Finish the outbound side of a transfer order (or you can click on 'View Transfer' to go into the inbound side

Inbound Transfer Check-In
When viewing the transfer details you can click on the inbound 'To' side of the transfer to begin a check-in process. You can also find the inbound transfer by going to the inbound transfer warehouse and finding the transfer there. From transfer table, click into the transfer you want to bring inbound, this transfer must have already been fulfilled on the outbound side to bring the transfer into the inbound warehouse.
Inbound transfer must have a 'Fulfilled' status to complete the transfer check-in
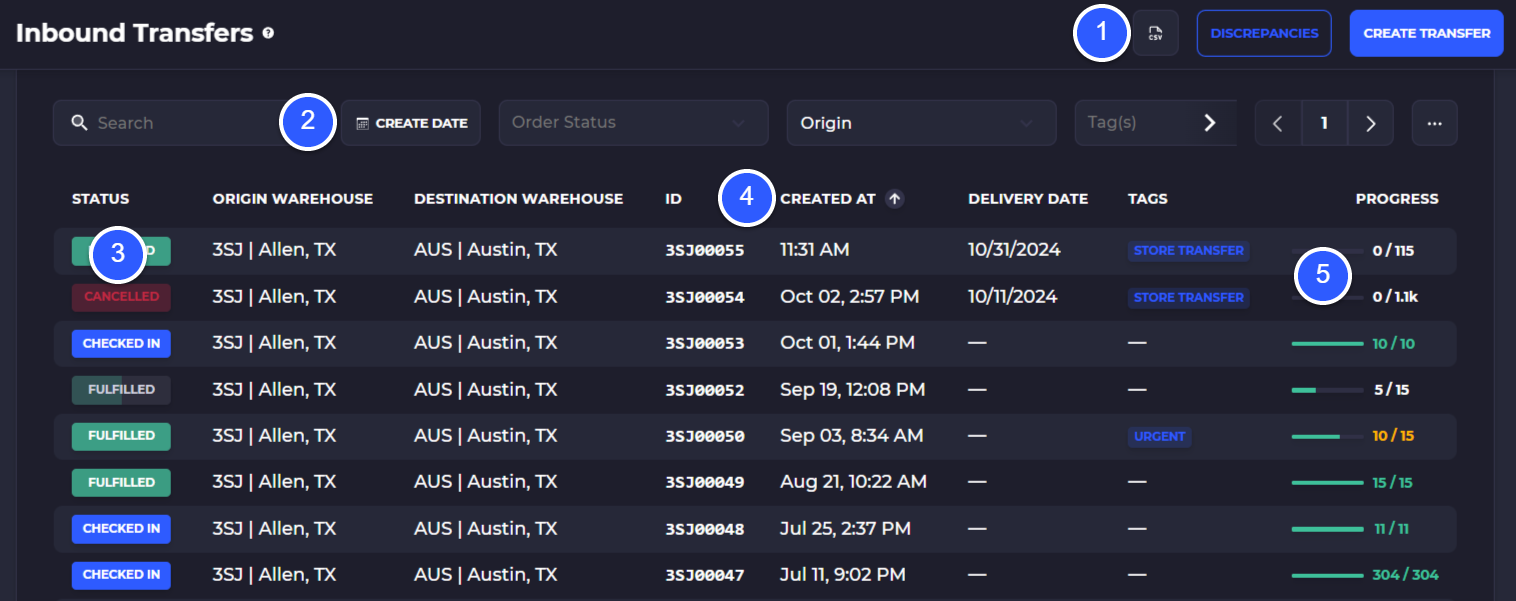
1) Export transfers and filter down by data. You can also view transfer discrepancies or create a new transfer
2) Filters for inbound transfer: text search, creation date, order status, origin warehouse, tags. Tap on the 3-dot menu to rearrange columns
3) Status of the transfer. Must have a status of fulfilled to check-in the inbound side of a transfer
4) Sort the columns by clicking on a column header
5) Progress of the inbound side of the transfer, hover for more detail
Once you click on an inbound transfer you'll see a similar workflow to the receiving of purchase orders. NOTE: when receiving perishable goods, you'll be required to enter a lot number and expiration date on the goods when they are received.
Transfer Check-In Details
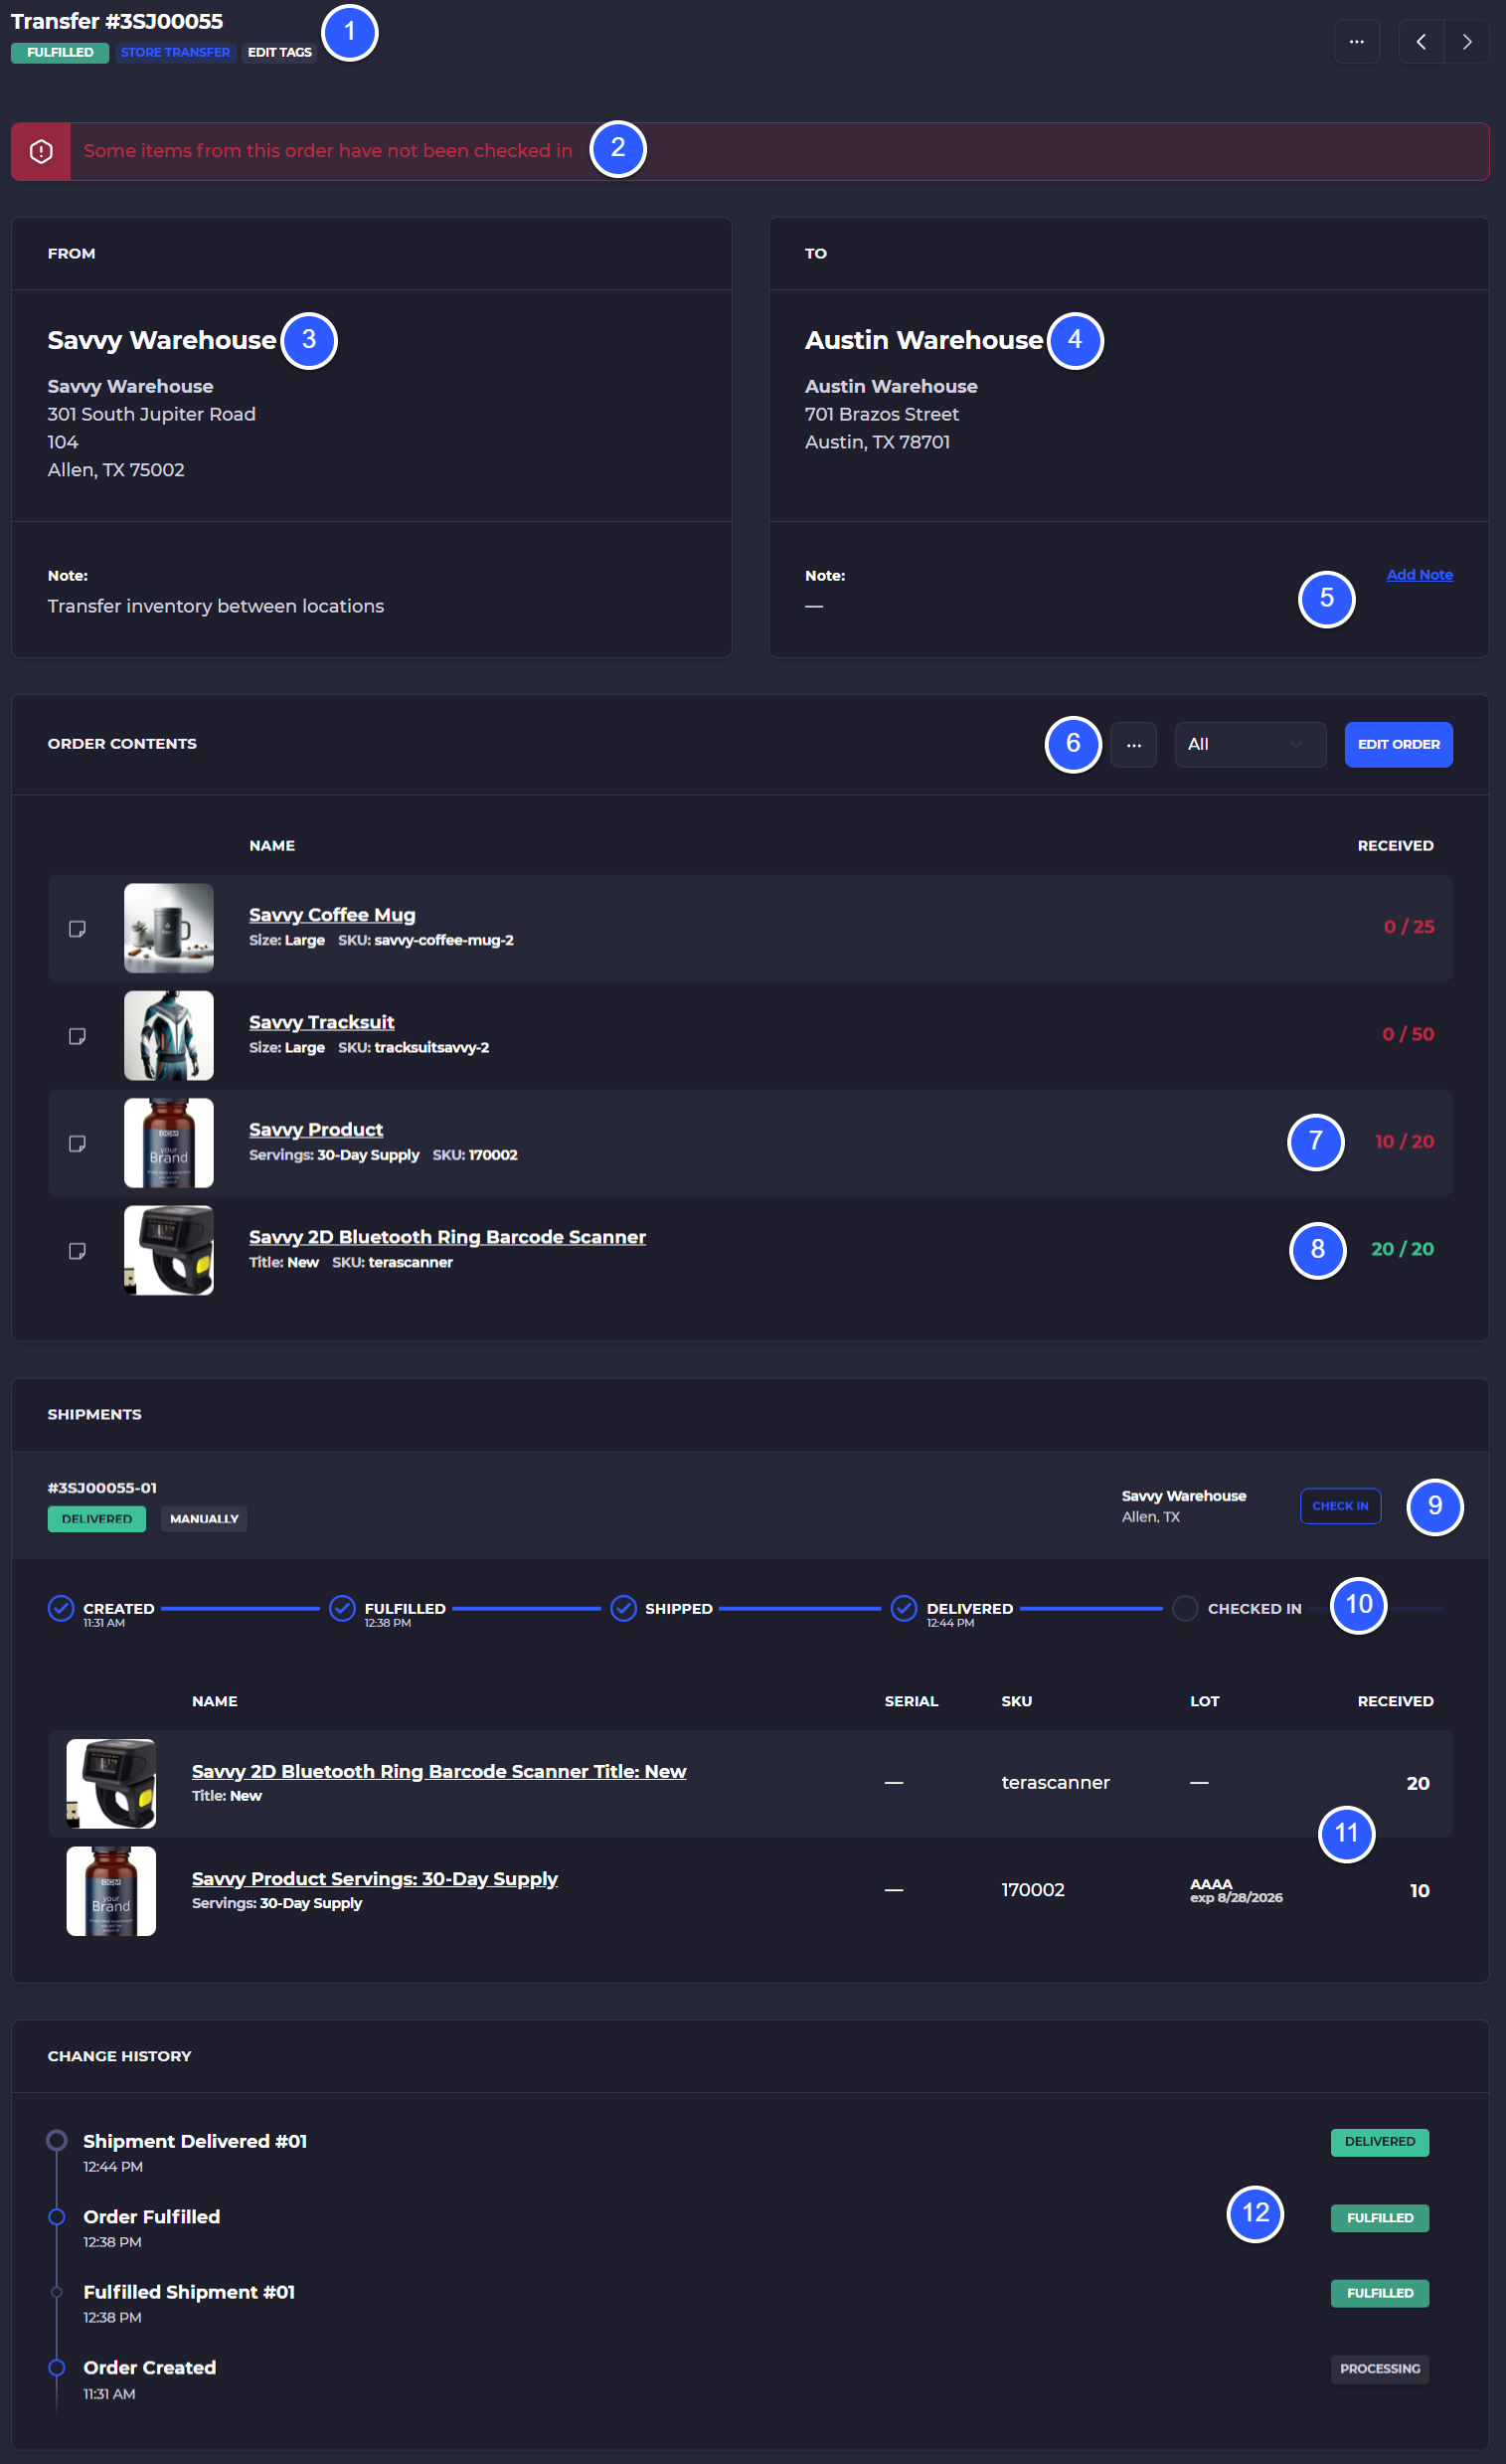
1) Transfer order ID and status as well as tags and the ability to edit tags
2) Alert indicating not all items from the transfer have been checked-in
3) Outbound warehouse of the transfer (click to go into outbound side)
4) Inbound warehouse for the transfer (click to go into inbound side)
5) Add a note on the inbound side of the transfer order
6) Edit the transfer order to add new items or change item quantities (see your config settings for transfer editing after fulfillment). You can also see the 3-dot menu above the table to adjust table columns)
7) Item that has not been fully checked-in
8) Item that has already been checked-in
9) Check-in the contents of a transfer, tap on the caret icon to open the shipment details
10) Open the shipment transfer to view contents that have been checked-in already
11) View a timeline of the transfer activities
12) View full history of the transfer order
Put-Away Inbound Transfer
Click 'Check-In' on the transfer shipment to bring this inventory into the inbound warehouse bin locations.
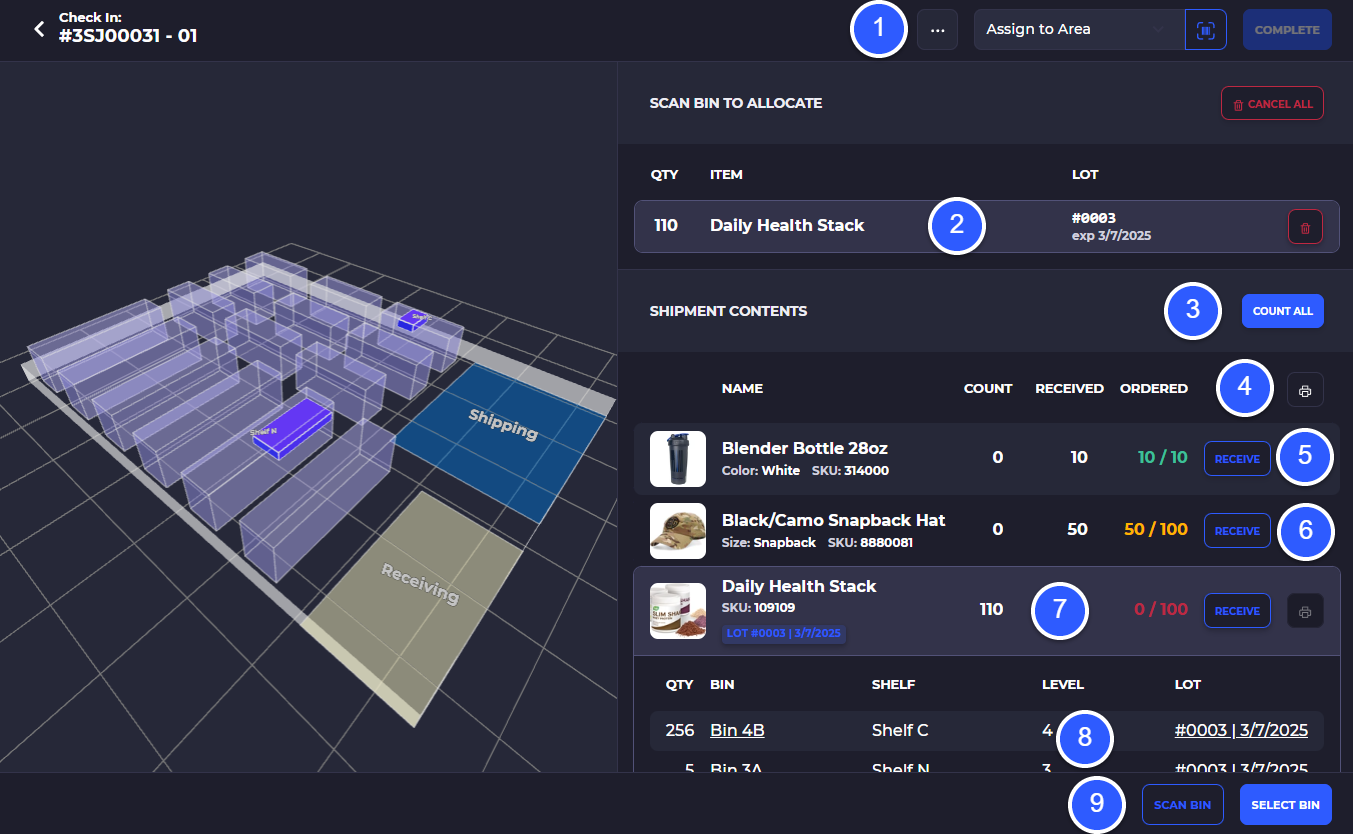
1) Transfer settings: scan options, print template settings, layout settings
2) Current item(s) being counted and put-away. Click the trash icon to remove the item from being put-away
3) Count all items on the transfer for bulk put-away. This setting must be turned on in the configuration settings of your account
4) Print all or print a single item after counting and allocation
5) Item counted and put-away. Click receive to add quantity to this item
6) Item partially counted and received
7) Item that has been overcounted. You can click on the counted quantity to remove some of the overcounted quantity
8) Bin locations the currently selected item is already stored
9) Manual scan option and manual bin selection to put away to the bin currently selected item being counted. You can use barcode scanning through the 3-dot menu and with hardware scanners all you need to do is scan the item, scan the bin, no button presses needed
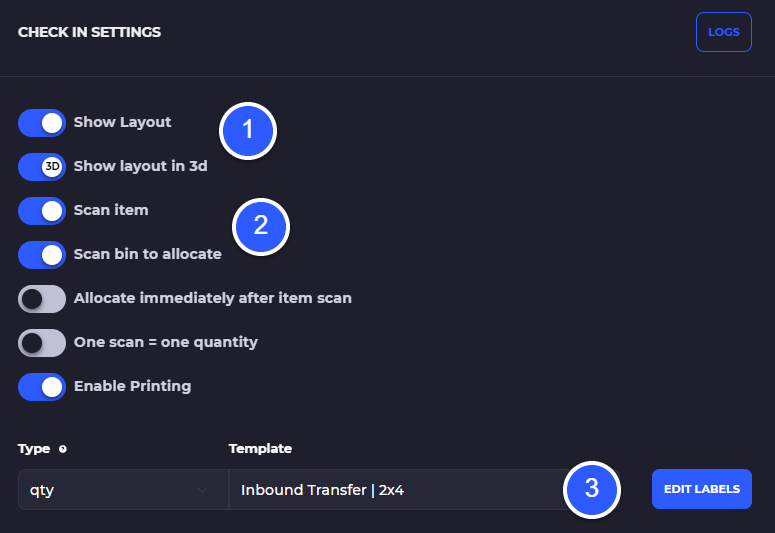
Put-Away 3-dot Settings
1) Warehouse layout settings
2) Scan settings for the transfer
3) Enable printing and select print template
Complete Transfer
Once satisfied with the transfer check-in and put-away you can click on 'Complete' which will go through and mark the shipment fully received. If you have not received everything (there are still items with remaining quantity to be counted/put-away) SKUSavvy will open a second transfer shipment to receive.