PO Receiving & Check-In: Count, Put Away and Label Stock
Check in purchase orders by scan: count items, receive lots and serial numbers, put stock in bins, print receiving labels and handle partial shipments.
Start a PO Check-In
Checking in is how stock from a PO gets into your bins. You count what arrived, put it in bins, and complete the shipment. SKUSavvy then updates on-hand stock, item costs and Shopify.
This guide is for the team that receives deliveries. To create, send or close out a PO, see the purchase orders guide.
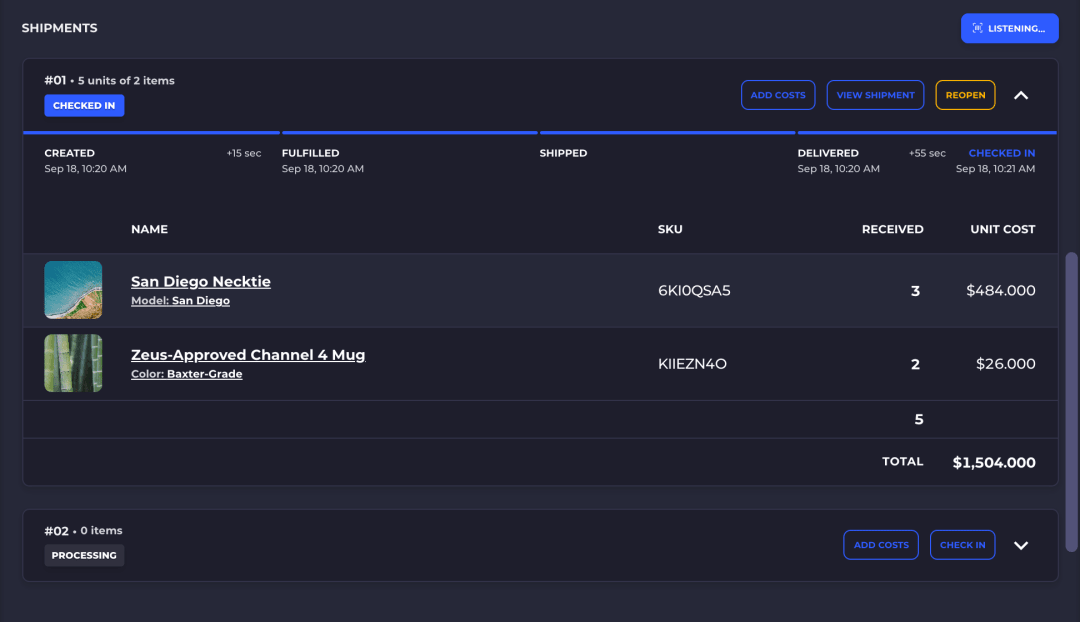
Scan Shipment opens the right check-in when you scan the barcode on a delivery, such as an ASN or packing list. It reads Listening while a hardware scanner is ready. For a barcode SKUSavvy doesn't know yet, click Add to Shipment so the next scan opens that shipment.
Each delivery is a shipment with its own number and status. A checked-in shipment shows View Shipment and Reopen instead of Check In.
Check In opens the check-in screen for a shipment that's still open.
The shipment's timeline, from created to checked in, and what it received.
If the shipment isn't marked delivered yet, SKUSavvy asks first. Click Mark as Delivered, because delivery dates feed your vendor lead times.

The Check-In Screen
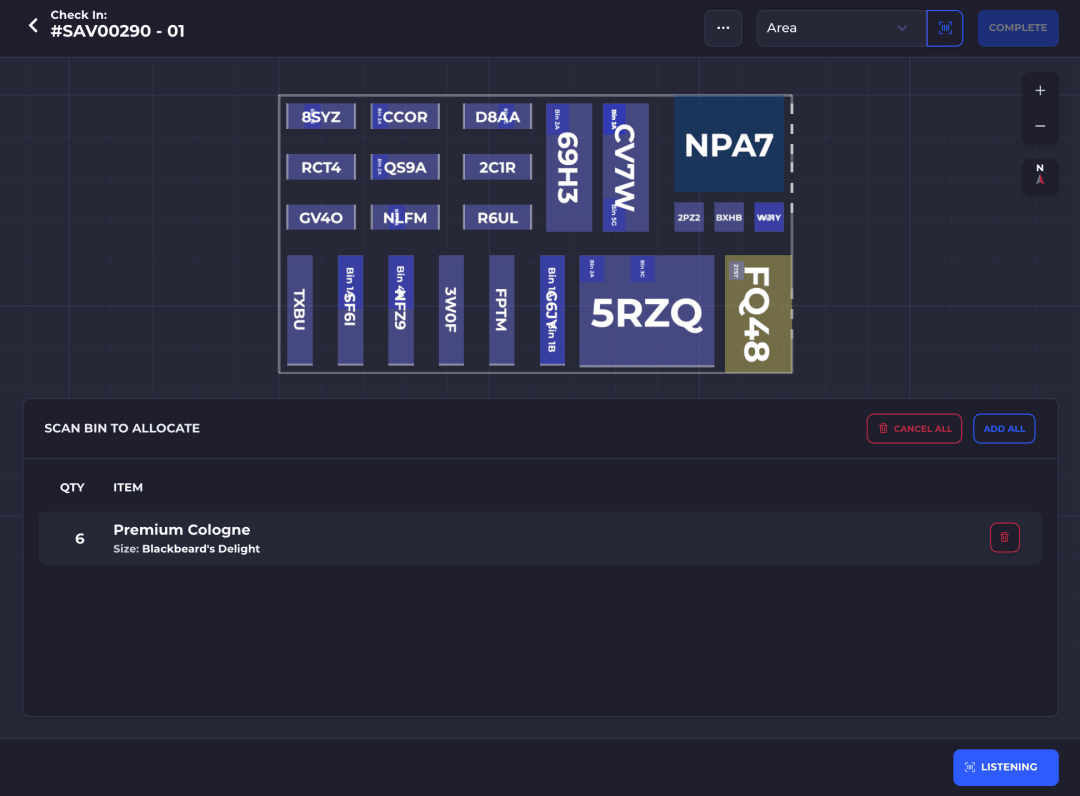
Check-in settings (3-dot button): how scanning and allocation work.
Assign to Area: records which area of the warehouse the delivery is waiting in. It doesn't receive stock or mark the shipment delivered, so anyone signed in can set it.
Complete finishes the shipment once everything counted is in a bin.
The allocation list: counted items waiting for a bin. On a tablet, swipe it to reach Shipment Contents; a wider screen shows the contents beside the map.
The warehouse map highlights the bins that already hold the PO's items, so you can see where each item usually goes.
Count, Received and Expected
| Column | What it means |
|---|---|
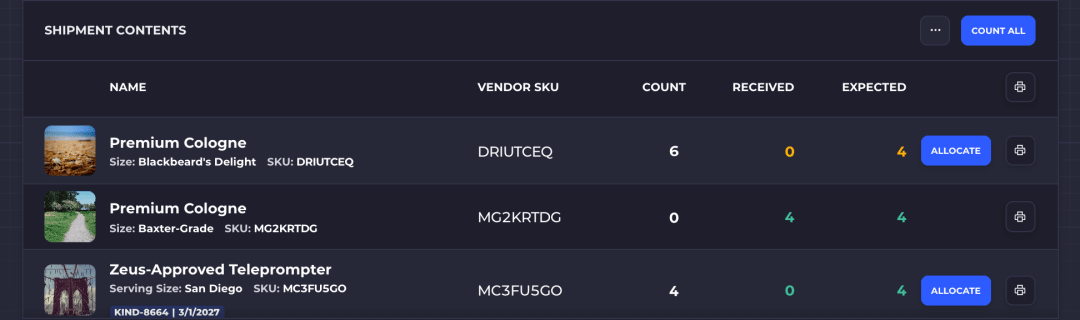
Count | Units counted on this shipment that aren't in a bin yet. They aren't on hand, don't sync to Shopify, and you can still remove them. |
Received | Units put into bins from this shipment. They're on hand, carry the PO's cost, and sync to Shopify. |
Expected | Units still due on this shipment: the ordered quantity, minus what's counted or received on the PO's other shipments. |
The received number is green when it matches what's expected, orange when it's over, and red when it's short. Click a row to see the bins that already hold that item. Turn on the Vendor SKU column in the column picker to match lines to the vendor's packing list.
Count Items by Scan or by Hand
Scan an item's barcode to count it. A hardware scanner works at any time, and on a phone or tablet you tap Scan Item to open the camera. SKUSavvy matches the barcode to a serial on the PO, an item on the PO, or any item in your catalog.
With One scan = one quantity on, the default, each scan counts the item at once.
A barcode with a quantity, such as a case barcode for 24 units, counts all 24 units with each scan. You set a barcode's quantity on the item's barcodes.
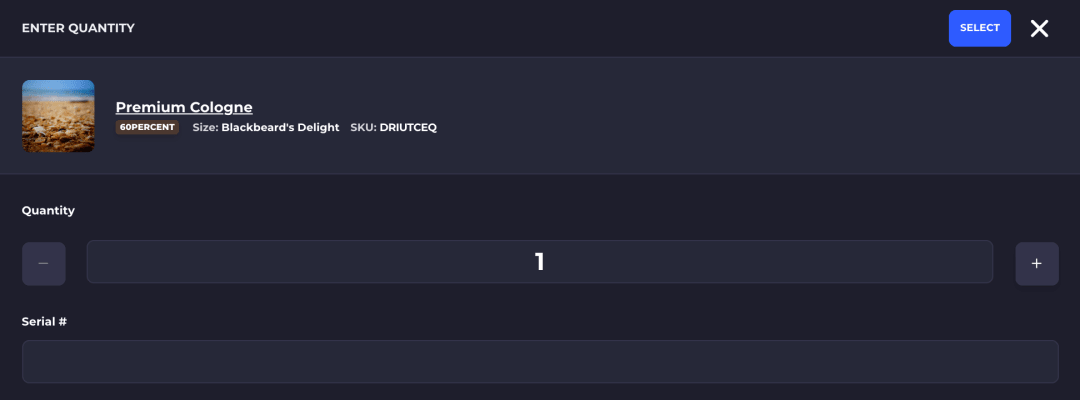
With One scan = one quantity off, each scan opens Enter Quantity with the remaining quantity filled in, so one scan can count a whole line.
With Scan item off, each row has a Receive button that opens Enter Quantity.
Count Everything at Once
Turn on Enable one-step receiving (Receive All) in Company Settings to add Count All to the check-in screen. It counts every unit still expected on the shipment, so you only have to allocate and complete.
On a PO, Count All skips items that need a lot or a serial number, because each of those units needs its own entry. Count them one at a time.
Over-Receiving and Unexpected Items
If you count more than was ordered, SKUSavvy shows Confirm Overage with the ordered quantity and how many you're over. Click Count to accept the extra units, or Go Back.
An item that isn't on the PO shows Unexpected Item. Click Add to Order to add it to the PO with a unit cost, because units received without a line have no cost. Check Stop warning about this item for this shipment to skip the prompt while you finish this shipment.
Receive Lots and Serial Numbers
With lot and expiration tracking on, every lot-tracked item opens Enter Quantity with a required Lot #. Pick an existing lot, or click Create Lot and enter its name and expiration date.
Lots Already on the PO
When the PO carries a lot for an item, from an import or a draft, SKUSavvy fills it in for you. Check that it matches the delivery and click Select.
Check Remember this choice to fill in the same lot for that item for the rest of this shipment. A remembered lot takes the place of the PO's lot for that item.
While Limit one lot per item per bin is on in Company Settings, the default, a bin holds one lot of each item. Put a new lot in a different bin, or SKUSavvy refuses the allocation.
Serial Numbers Already on the PO
Scan a serial number that was entered or imported on the PO to count exactly that unit. A serial always counts 1, and a serial already received on this shipment shows Serial already received.
A scan doesn't recognize a serial that isn't on the PO. Count the item through Enter Quantity instead and type the serial in Serial #. Items that require a serial can't be counted without one.
Put Received Items Into Bins
Counted items wait in the Scan bin to allocate list. Scan a bin, or click Select Bin, to put everything in the list into that bin. This is when the units become received, on-hand stock.
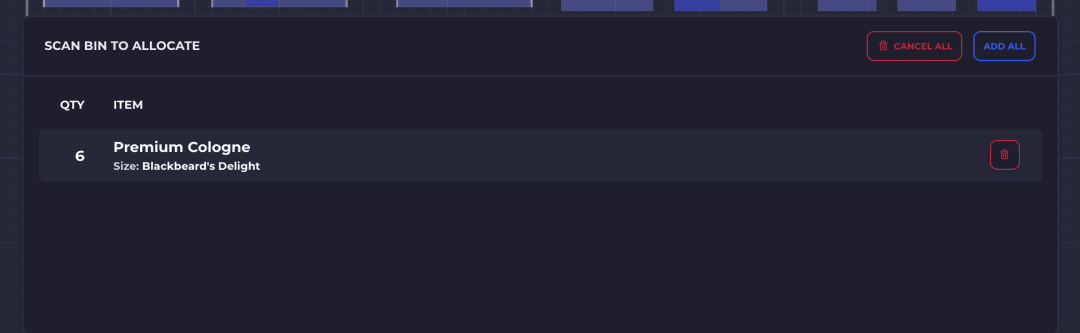
Items waiting for a bin. Each count is added here for you, and Add All adds any counted items that aren't.
Remove one item with its trash button, or click Cancel All. The count stays, and Allocate on the item's row adds it back.
Then scan a bin, or click Select Bin when Scan bin to allocate is off. Everything in the list goes into that one bin.
To put items in different bins, keep only one bin's items in the list and allocate them. Then add the next items with Allocate on their rows, or Add All.
Bin Suggestions
Select Bin suggests putaway bins first when staged putaway is on, then bins that already hold the item, then bins that match your check-in criteria. Full bins are left out, and you can't select a bin the units would overfill.
Allocate Right After Each Scan
Turn on Allocate immediately after item scan to scan an item and then a bin, with no taps in between. The units go straight into the bin as received stock, without a count step.
Remove an Overcounted Quantity
Click the number in an item's Count column to open Remove Counted. Enter how many to remove and click Remove. This works only on units that aren't in a bin yet.
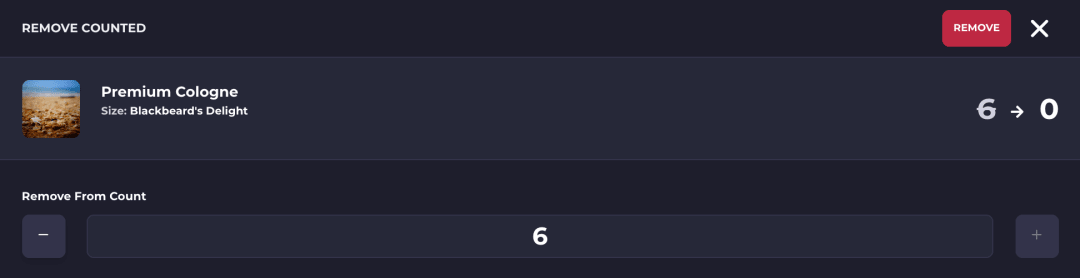
Enter how many units to remove.
Click Remove.
To reverse units already put in a bin, open the item's inventory log and click Undo on the check-in, with a note. Undo fails if any of those units were moved, picked or split off since, so undo before they leave the bin.
Print Labels at Check-In
Print labels at check-in so every unit is identified before it goes on a shelf. Click the printer icon in the table header to print for every item, or the icon on a row for one item. Check-in settings have no print options, because you choose everything in the print window.

| Type | What it prints | Template |
|---|---|---|
item | Each item's product barcode, the same label you print anywhere else in SKUSavvy. | An Item template, or Default Format for a plain barcode with the product name. |
qty | A label for the units on this PO, which can show the lot, serial number, vendor and PO cost. | An Inbound Qty template. There is no default one, so create it first. |
Print One Label per Unit
Check Print each and pick which quantity sets the number of labels: received, counted, ordered or expected on this shipment. Leave it unchecked to print one label per item. On a long list, choose All Pages or Current Page.
Print Before the Stock Is Received
Item labels print at any time. To label a PO's items before you count them, choose type item and Print each with the ordered quantity.
A qty label needs the item counted or received on this shipment first, and until then its printer icon shows You must check in the quantity to print a label. Printing qty labels from the table header includes only received items.
Label Serial Numbers and Lots
Each serial number has its own row, so qty labels printed with Print each unchecked give one label per serial. Add the Serial Number block to the template to print it, or set the Item Barcode block to prefer the serial to encode it in the barcode. Lot rows work the same way with the Lot block.
On a qty label, the Item Cost block shows the PO line's unit price, not the landed cost.
Check-In Settings
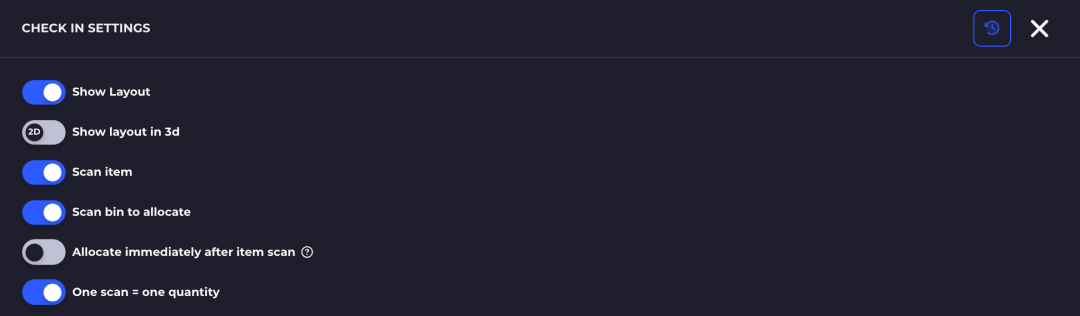
Open the settings with the 3-dot button on the check-in screen. They're saved in this browser for your user, separately for POs and transfers, so set them up on each receiving device.
| Setting | Default | What it does |
|---|---|---|
Show Layout | On | Shows the warehouse map beside the item list. |
Show layout in 3d | Off | Draws the map in 3D on this device. |
Scan item | On | Counts items by scan. Turned off, each row gets a Receive button and One scan = one quantity turns off. |
Scan bin to allocate | On | Turned off, a Select Bin button lets you pick the bin from a list. |
Allocate immediately after item scan | Off | Receives each scanned item into the next bin you scan, without a count step. |
One scan = one quantity | On | Counts each scan at once. Turned off, each scan opens Enter Quantity. |
Company Settings That Change Check-In
| Setting | What it does |
|---|---|
Enable one-step receiving (Receive All) | Adds Count All to the check-in screen. |
Limit one lot per item per bin | Refuses a second lot of the same item in a bin. On by default. |
Enable Check In Criteria | Suggests bins that match your check-in criteria. |
Enable staged putaway | Suggests putaway bins first. |
Edit closed POs | Keeps checked-in POs editable. |
Complete the Shipment and Add Shipment Costs
Click Complete when everything in the delivery is in bins. It stays disabled while counted units wait for a bin, with You need to allocate what you've counted before completing, and while nothing is received.
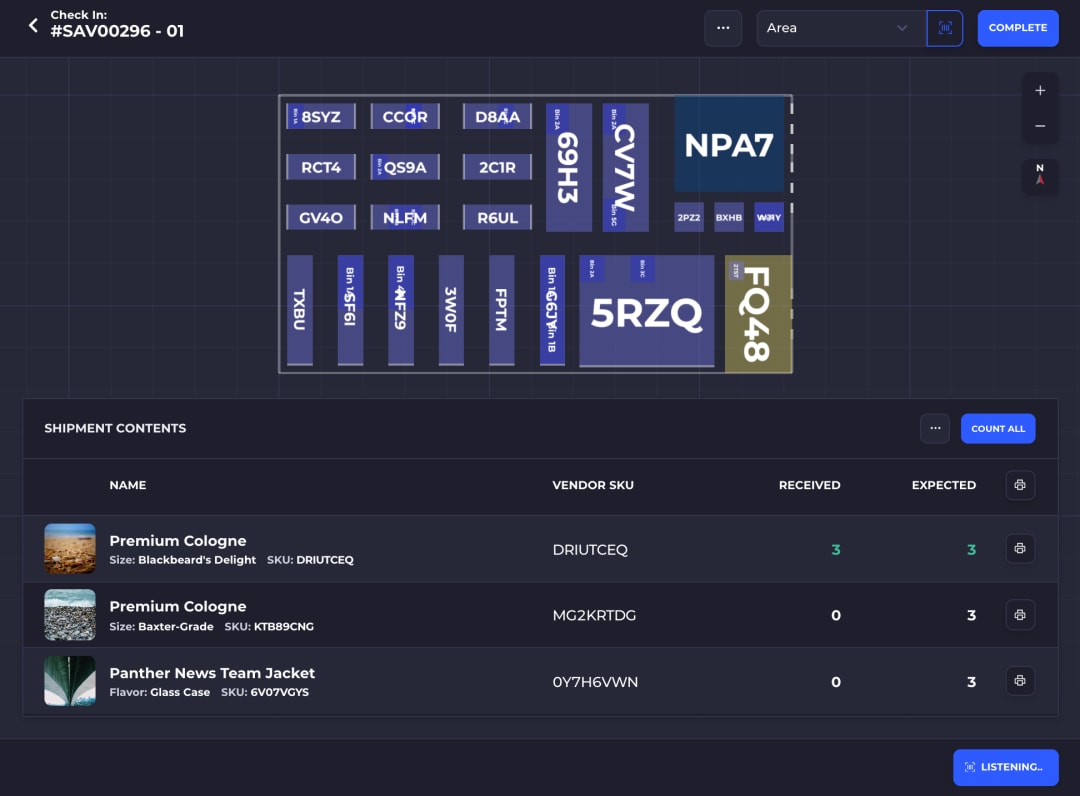
Click Complete.
The received quantities for this shipment.
Completing checks in the shipment and updates the PO's status. If units are still due, SKUSavvy opens a new shipment for them, so the next delivery has its own check-in.
Additional Costs for Shipment then opens. Enter the freight, duties or fees from this delivery's invoice and click Continue to Order. They divide over the units received on this shipment and update those units' cost.
Receive One PO in Several Shipments
Vendors often ship a PO in parts. Each delivery is its own shipment on the PO, numbered 01, 02 and so on, with its own counts, costs and check-in date.
A new shipment opens when you complete one with units still due. You can also add one ahead of time by choosing New shipment when you add a cost to the PO, and a tracking number from the vendor fills or creates one.
On the check-in screen, switch shipments with the number next to the PO number. The Expected column shows only what's still due after the other shipments.
Reopen a Shipment
Click Reopen on a checked-in shipment to count more into it, for example a carton found after you completed it. Reopen shows while the PO is Partially Checked In. The shipment's costs go back to pending until you complete it again.

Click Reopen to return to that shipment's check-in.
PO Receiving FAQ
Answers to common questions about checking in purchase orders.
When does received stock show up in Shopify?
When the units go into a bin. SKUSavvy then raises on-hand stock at the Shopify location linked to the warehouse. Counted units waiting for a bin don't sync.
Why is Complete disabled?
Some counted units aren't in a bin yet, or nothing has been received on the shipment. Allocate the counted units to a bin, then click Complete.
Why can't I print a qty label for an item?
A qty label needs the item counted or received on this shipment, and an Inbound Qty template. Count the item, choose a template in the print window, and print again.
Why does a scan show Barcode not recognized?
The barcode isn't on any item, bin or PO serial in your account. Add the barcode to the item, or count it with Enter Quantity and type a serial that isn't on the PO.
Does a case barcode count every unit in the case?
Yes. A barcode with a quantity, such as 24, counts 24 units each time you scan it.
How do I fix a quantity I counted by mistake?
Click the number in the Count column and remove the extra units. Units already in a bin are reversed with Undo on the check-in in the item's inventory log.
Who can check in a purchase order?
Users with the Update Inbound Order right can check in POs, and receiving a transfer needs the Update Transfers right instead. Creating a new lot at check-in needs the Update Inventory right, and anyone signed in can assign a delivery to an area.